HP Xw460c Processor Option Installation Instructions for HP ProLiant BL460c Se - Page 2
Important
 |
View all HP Xw460c manuals
Add to My Manuals
Save this manual to your list of manuals |
Page 2 highlights
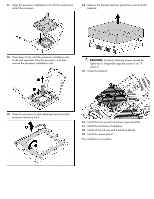
IMPORTANT: Depending on the BBWC solution, the hard drive backplane has either four or five thumbscrews. For specific steps, see the server blade user guide on the HP website (http://www.hp.com/go/bladesystem/documentation) . 5. Remove the hard drive backplane. 8. Open the processor retaining latch and the processor socket retaining bracket. 9. Remove the processor socket protective cover. 6. Remove the front panel/hard drive cage assembly. 7. Remove the heatsink blank. Retain the heatsink blank for future use. IMPORTANT: Be sure the processor remains inside the processor installation tool. 10. If the processor has separated from the installation tool, carefully re-insert the processor in the tool.
-
 1
1 -
 2
2 -
 3
3
 |
 |

IMPORTANT:
Depending on the BBWC solution,
the hard drive backplane has either four or five
thumbscrews. For specific steps, see the server blade
user guide on the HP website
)
.
5.
Remove the hard drive backplane.
6.
Remove the front panel/hard drive cage assembly.
7.
Remove the heatsink blank. Retain the heatsink blank
for future use.
8.
Open the processor retaining latch and the processor
socket retaining bracket.
9.
Remove the processor socket protective cover.
IMPORTANT:
Be sure the processor remains inside
the processor installation tool.
10.
If the processor has separated from the installation
tool, carefully re-insert the processor in the tool.