HP Xw8200 Fixed Rack Kit Installation - Page 4
Remove Top Panel and Foot from Chassis, If necessary
 |
UPC - 882780210455
View all HP Xw8200 manuals
Add to My Manuals
Save this manual to your list of manuals |
Page 4 highlights
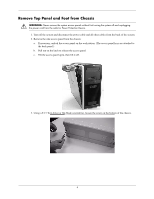
Remove Top Panel and Foot from Chassis Å WARNING: Never remove the system access panels without first turning the system off and unplugging the power cord from the outlet or Power Protection Device. 1. Turn off the system and disconnect the power cable and all other cables from the back of the system. 2. Remove the side access panel from the chassis: a. If necessary, unlock the access panel on the workstation. (The access panel keys are attached to the back panel.) b. Pull out on the latch to release the access panel. c. Tilt the access panel open, then lift it off. 3. Using a T-15 Torx driver or flat-blade screwdriver, loosen the screw on the bottom of the chassis. 4
-
 1
1 -
 2
2 -
 3
3 -
 4
4 -
 5
5 -
 6
6 -
 7
7 -
 8
8 -
 9
9 -
 10
10 -
11
-
12
-
13
-
14
-
15
-
16
 |
 |

4
Remove Top Panel and Foot from Chassis
Å
WARNING:
Never remove the system access panels without first turning the system off and unplugging
the power cord from the outlet or Power Protection Device.
1.
Turn off the system and disconnect the power cable and all other cables from the back of the system.
2.
Remove the side access panel from the chassis:
a.
If necessary, unlock the access panel on the workstation. (The access panel keys are attached to
the back panel.)
b.
Pull out on the latch to release the access panel.
c.
Tilt the access panel open, then lift it off.
3.
Using a T-15 Torx driver or flat-blade screwdriver, loosen the screw on the bottom of the chassis.