HP Xw8400 SAS Rear panel cable installation - Page 5
Optional SAS mounting bracket installation - pci slots
 |
UPC - 883585271085
View all HP Xw8400 manuals
Add to My Manuals
Save this manual to your list of manuals |
Page 5 highlights
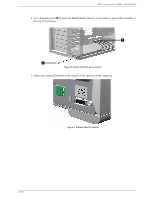
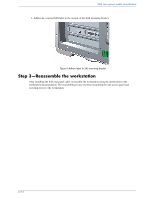
SAS rear panel cable installation Optional SAS mounting bracket installation 1. Identify an unused PCI slot. Depress the PCI retention clamp clips and lift the retention clamp 1. Remove the PCI slot cover from the PCI slot 2. Figure 4 Remove PCI slot cover 2. Attach the MiniSAS 4X connector of the SAS rear panel cable assembly to the SAS mounting bracket 1. Install the SAS mounting bracket in the workstation in place of the PCI slot cover 2. Connect the SAS cables to the SAS connectors on the system board 3, or to an approved, compatible plug in card. (Refer to Before you begin in this document for information on approved, compatible cards.) Figure 5 Attach SAS rear panel cable assembly to workstation 5/12
-
 1
1 -
 2
2 -
 3
3 -
 4
4 -
 5
5 -
 6
6 -
 7
7 -
 8
8 -
 9
9 -
 10
10 -
 11
11 -
12
 |
 |

SAS rear panel cable installation
5/
12
Optional SAS mounting bracket installation
1.
Identify an unused PCI slot. Depress the PCI retention clamp clips and lift the retention clamp
1
.
Remove the PCI slot cover from the PCI slot
2
.
Figure 4 Remove PCI slot cover
2.
Attach the MiniSAS 4X connector of the SAS rear panel cable assembly to the SAS mounting bracket
1
. Install the SAS mounting bracket in the workstation in place of the PCI slot cover
2
. Connect the
SAS cables to the SAS connectors on the system board
3
, or to an approved, compatible plug in card.
(Refer to
Before you begin
in this document for information on approved, compatible cards.)
Figure 5 Attach SAS rear panel cable assembly to workstation