HP Xw8400 Internal USB Cable - Page 2
Step 2-Install the Internal USB Cable, Step 3-Reassemble the Workstation
 |
UPC - 883585271085
View all HP Xw8400 manuals
Add to My Manuals
Save this manual to your list of manuals |
Page 2 highlights
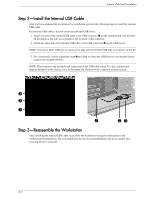
Internal USB Cable Installation Step 2-Install the Internal USB Cable After you have prepared the workstation for installation, perform the following steps to install the internal USB cable. The internal USB cable is used to connect an internal USB device. 1. Attach one end of the internal USB cable to the USB connector 1 on the system board. See the label on the inside of the side access panel for the location of this connector. 2. Attach the other end of the internal USB cable to the USB connector 2 on the USB device. NOTE: You need a Male USB type A connector to plug into the Female USB type A receptacle in this kit. 3. For convenience, use the adjustable strap 3 provided to fasten the USB device to an internal chassis surface (see examples below). NOTE: The location of the system board connector for the USB cable varies. Use the system board diagram included on the chassis cover to determine the location of the connector on your system. 3 2 1 1 23 Step 3-Reassemble the Workstation After installing the internal USB cable, reassemble the workstation using the instructions in the workstation documentation. The reassembly process involves reinstalling the side access panel, and restoring power to your unit. 2/4
-
 1
1 -
 2
2 -
 3
3 -
 4
4
 |
 |
