HP Xw8400 SAS Rear Panel Cable - Page 2
Step 2-Install the SAS Rear Panel Cable, Step 3-Reassemble the Workstation - review
 |
UPC - 883585271085
View all HP Xw8400 manuals
Add to My Manuals
Save this manual to your list of manuals |
Page 2 highlights
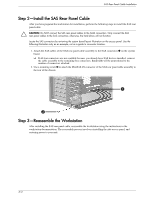
SAS Rear Panel Cable Installation Step 2-Install the SAS Rear Panel Cable After you have prepared the workstation for installation, perform the following steps to install the SAS rear panel cable. Ä CAUTION: Do NOT connect the SAS rear panel cables to the SATA connectors. Only connect the SAS rear panel cables to the SAS connectors; otherwise, the hard drives will not function. Locate the SAS connectors by reviewing the system board layout illustration on the access panel. Use the following illustration only as an example, not as a guide to connector location. 1. Attach the SAS cables of the SAS rear panel cable assembly to the SAS connectors 1 on the system board. ❏ If all four connectors are not available because you already have SAS devices installed, connect the cable assembly to the remaining free connectors. Bandwidth will be proportional to the number of connectors attached. 2. Use a mounting screw 2 to attach the MiniSAS 4X connector of the SAS rear panel cable assembly to the rear of the chassis. 1 2 Step 3-Reassemble the Workstation After installing the SAS rear panel cable, reassemble the workstation using the instructions in the workstation documentation. The reassembly process involves reinstalling the side access panel, and restoring power to your unit. 2/4
-
 1
1 -
 2
2 -
 3
3 -
 4
4
 |
 |
