HP Xw8400 SATA/SAS Hard Drive Installation - Page 1
HP Xw8400 - Workstation - 4 GB RAM Manual
 |
UPC - 883585271085
View all HP Xw8400 manuals
Add to My Manuals
Save this manual to your list of manuals |
Page 1 highlights
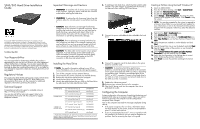
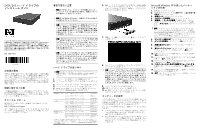
SATA/SAS Hard Drive Installation Guide © Copyright 2006 Hewlett-Packard Development Company, L.P. The information contained herein is subject to change without notice.The only warranties for HP products and services are set forth in the express warranty statements accompanying such products and services. Nothing herein should be construed as constituting an additional warranty. HP shall not be liable for technical or editorial errors or omissions contained herein. First Edition: May 2006 Your Responsibilities You are responsible for determining whether the product is appropriate for your use and will function with other equipment without malfunction or damage. You are also responsible for backing up data before installing any product and for regularly backing up data after installing the product. HP is not liable for any damage to equipment or data loss resulting from the use of any product. Regulatory Notices This product has been tested and found to comply with the limits for a Class B digital device of the FCC Rules. Refer to the documentation that came with the computer for additional regulatory information governing this product. Technical Support Comprehensive technical support is available online at http://www.hp.com/support. You can also call HP for technical support. Refer to the documentation that came with the computer for support telephone numbers. Important Warnings and Cautions WARNING! To avoid the risk of serious injury or damage to the computer, unplug the power cord from the electrical outlet before installing the hard drive. WARNING! To reduce the risk of personal injury from hot surfaces, allow the internal system to cool before touching it. CAUTION: Static electricity can damage the electronic components of the computer or optional equipment. Before installing the hard drive, ensure that you are static-free by briefly touching a grounded metal object. Refer to the documentation that came with the computer for more information on preventing electrostatic damage. CAUTION: Prior to replacing an existing hard drive, be sure to back up your data. If the computer supports only one hard drive, you must use a second system with thirdparty software to copy the data to the new hard drive. CAUTION: The data cable end is keyed to ensure proper alignment. To avoid damage to the cable header pins, check the header/connector alignment and push gently when connecting the data cable header to the SATA connector on the drive and system board. Installing the Hard Drive NOTE: For specific information relating to your HP xw Series Workstation, refer to www.hp.com/go/bizsupport. 1. Turn off the computer and any external devices. 2. Disconnect the AC power cord and any external devices. 3. Remove the side access panel from the computer. 4. Install the hard drive into the drive bay. 5. Identify the cable that best fits your SATA or SAS hard drive by referring to the Cable Identification Table. xw4000 series 3.5" internal drive bays (2) 381868-006 3.5" external drive bay (1) 5.25" external drive bays (3)1 not allowed 381868-002 xw6000 series 3.5" internal drive bays (2) 381868-006 3.5" external drive bay (1) not allowed 5.25 external "upper" bay (1) 5.25" external "lower" bay (1)1 not allowed 381868-002 xw8000 and xw9000 series 3.5" internal drive bays (4) 381868-006 3.5" internal chassis mount bay (1) 381868-002 5.25" external bays (3) not allowed 1. Hard drives installed in 5.25" external bays require a hard drive conversion bracket, which is available by finding your workstation at www.hp.com and selecting Options and Accessories. 6. If installing a SAS hard drive, attach the SAS-to-SATA cable adapter. The cable adapter is provided with the kit and is not required when installing SATA hard drives. 7. Connect the power cable 1 and data cable 2 to the hard drive. 8. Connect the opposite end of the data cable to the system board or controller card. CAUTION: To avoid any hard drive performance problems, connect the primary hard drive to the connector on the system board labeled SATA 0 or SAS 0, depending on hard drive type. Connect a second hard drive to the SATA 1 or SAS 1 connector. Connect a third hard drive to the SATA 2 or SAS 2 connector and a fourth hard drive to the SATA 3 or SAS 4 connector. 9. Replace the side access panel. 10. Reconnect any external devices to the computer. 11. Plug the AC power cord into the computer, then into a grounded AC outlet. Configuring the Computer System configuration is the process of specifying the devices and programs that make up a computer system. When you add or remove accessories, the computer must be configured to recognize these changes. Turn on the computer and read the messages displayed during startup. • If the system recognizes the new drive, information about the drive displays on the screen, and you are prompted to press F1 to save and continue. • If you are not prompted to press F1, there is a problem with the installation of the drive, and you need to diagnose the problem. Start by reviewing the steps in this guide. Creating a Partition Using Microsoft Windows XP 1. Log in as Administrator. 2. From the Windows desktop, click Start > Control Panel. 3. Double-click Administrative Tools. 4. Double-click Computer Management. 5. Select Storage > Disk Management. This starts the Write Signature and Upgrade Disk Wizard. Click Cancel to stop the wizard. NOTE: You may be prompted by the system to upgrade to a Dynamic drive. Refer to www.microsoft.com/support for more information or refer to the Microsoft OS Manual that shipped with the computer. Otherwise, select the default to continue. 6. Right-click the Disk 1 Unallocated area. 7. Click Initialize Disk and click OK. 8. Right-click the black bar above the Unallocated Disk area. 9. Click New Partition to run the New Partition Wizard. Click Next. 10. Select the partition needed or use the defaults and click Next. 11. Specify the partition size or use the defaults and click Next. 12. Specify the drive letter of the partition or use the default and click Next. 13. Select Choose Partition File System and other Partition Parameters or use the defaults and click Next. 14. Verify that the information in the Settings box is correct before finalizing the partition information. 15. Click Finish to create the partition and begin the format process.
-
 1
1 -
 2
2
 |
 |
