HP Xw9400 Setting up SATA RAID on the HP xw9400 Workstation - Page 1
HP Xw9400 - Workstation - 16 GB RAM Manual
 |
View all HP Xw9400 manuals
Add to My Manuals
Save this manual to your list of manuals |
Page 1 highlights
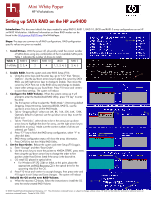
Mini White Paper HP Workstations Setting up SATA RAID on the HP xw9400 Introduction: This document details the steps needed to setup RAID 0, RAID 1, RAID 10, JBOD and RAID 5 array configurations on an HP xw9400 Workstation. Additional information on these RAID modes can be found in the Workstation RAID Primer MiniWhitePaper. Steps: The steps are common to all RAID configurations. RAID-configurationspecific values are given as needed. 1. Install Drives. With the power off, physically install the correct number of SATA drives using any combination of the 6 available SATA ports. Table 1 indicates the number of drives to install. Table 1 RAID 0 RAID 1 RAID 10 JBOD RAID 5 # of Disks 2, 3, 4 2 4 1, 2, 3, 4, 5 3, 4, 5 2a. . . . 2. Enable RAID. Boot the system and enter BIOS Setup (F10). a. Using the arrow keys and the enter key, go to "I/O" then "Device Options". Use the up/down arrow keys to place the cursor by SATA RAID, use left/right arrow keys to change to Enable. Then move the cursor by SATA Ports not in the RAID array and change to disable. b. Leave other settings as you found them. Press F10 twice and to save these settings. The system will reboot. 3. Configure the RAID Volume. When the system comes up it will prompt to enter the MediaShield RAID Utility, press "F6 key" to enter the utility a. The first section will be to select the "RAID Mode ": [Mirroring default Stripping, Stripe Mirroring, Spanning (JBOD), RAID 5], use the up/down arrow keys to set the RAID Mode. b. Tab to "Stripping Block" select size (4K, 8K, 16K, 32K, 64K, 128K, Optimal), default is Optimal, use the up/down arrow keys to set the block size. c. Tab to "Free Disks", select drives to be in the array (use up down arrow keys to highlight the drive for array, use the right arrow key to add drives to array). Make sure the correct number of drives are selected, per Table 1. d. Press "F7" key to finish the RAID array configuration, select "Y" to clear disk data. e. RAID Array configuration status will show the array information. f. Press CNTL-X to exit the nVidia RAID Utility. 4. Set the Boot Order. Reboot the system and enter Setup (F10) again. a. Enter "Storage" and then "Boot Order". b. Use the arrow keys to move the pointer to NVIDIA STRIPE, press enter, then using the up/down arrow key to change the order to first position under Hard Drives listed if the array is the boot drive. c. OS install CD placed in optical drive: • For Windows XP SP2 32bit or 64bit, at this point, place the appropriate xw9400 Recovery CD in the optical drive for the upcoming rebuild of the OS. d. Press F10 twice and to accept changes, then press enter and F10 again to exit Setup and Save changes. The system will reboot. 5. Rebuild the OS on the new RAID Volume. a. When the recovery CD boots, follow the instructions to install the OS 4b. onto the newly-created RAID Volume. 3a. 3c. 3c. 3d. 3. 3b. 4c. © 2005 Hewlett-Packard Development Company, L.P. The information contained herein is subject to change without notice. HP shall not be liable for technical or editorial errors or omissions contained herein. Printed in USA, 2005
-
 1
1
 |
 |