HP Z800 PCI Express Sound Blaster X-Fi Titanium audio card installation - Page 4
Step 2—Installing the Sound Blaster audio card,
 |
UPC - 884962082454
View all HP Z800 manuals
Add to My Manuals
Save this manual to your list of manuals |
Page 4 highlights
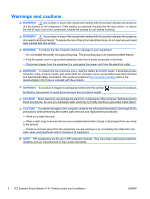
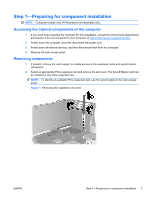
Step 2-Installing the Sound Blaster audio card 1. Install the Sound Blaster audio card (1) in the selected PCIe expansion slot, and then secure the expansion slot retention clamp (2). Figure 2 Installing the audio card 2. Disconnect the front audio cable from the front audio header on the system board. NOTE: To locate system board components, see the service label on the side access panel. 3. Connect the front audio cable from the system board to the front audio connector (1) on the Sound Blaster audio card. NOTE: The existing internal front audio cable in certain workstations may be incompatible with the add-in audio card. In this case, use the audio connections on the card. The HP Z Workstation series is fully compatible. Figure 3 PCIe Sound Blaster X-Fi Titanium audio card 4 PCI Express Sound Blaster X-Fi Titanium audio card installation ENWW
-
 1
1 -
 2
2 -
 3
3 -
 4
4 -
 5
5 -
 6
6
 |
 |
