HP Z820 LSI SAS RAID Host Bus Adapter installation - Page 3
Step 1-Preparing for component installation, Step 2-Installing the RAID controller card - manual
 |
View all HP Z820 manuals
Add to My Manuals
Save this manual to your list of manuals |
Page 3 highlights
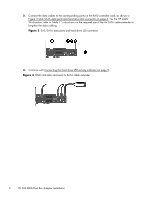
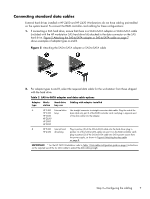
Step 1-Preparing for component installation NOTE: Computer models vary. All illustrations are examples only. Download and install updates 1. Check for available system BIOS updates specified for your HP computer model and operating system at http://www.hp.com/support. 2. Install the system BIOS updates, if available. Accessing the internal components of the computer 1. If you need help preparing the computer for this installation, refer to the ● Removal and replacement procedures in the Maintenance and Service Guide for your computer at http://www.hp.com/support/computer manuals, or ● Removal and Replacement videos for your computer at http://www.hp.com/go/sml. 2. Power down the computer, and then disconnect the power cord. 3. Power down all external devices, and then disconnect them from the computer. 4. Remove the side access panel. Step 2-Installing the RAID controller card 1. If present, remove the card support to enable access to the expansion slots and system board connectors. 2. Select an unused PCI Express (PCIe) x4, x8, or x16 expansion slot on the system board. The 9212-4i RAID controller card must be installed in a higher performance slot. NOTE: To identify an available PCIe expansion slot, see the service label on the side access panel. 3. Install the RAID controller card into the selected slot on the system board. Verify that the keyed components of the card align with the slot. Figure 1 Placing the RAID controller card in the expansion slot Step 1-Preparing for component installation 3
-
 1
1 -
 2
2 -
 3
3 -
 4
4 -
 5
5 -
 6
6 -
 7
7 -
 8
8 -
 9
9 -
10
 |
 |