HP b2600 hp workstation b2600 - desktop to rack mount installation guide - Page 6
Converting Your Rack-Mount System to a Desktop System - for sale
 |
View all HP b2600 manuals
Add to My Manuals
Save this manual to your list of manuals |
Page 6 highlights
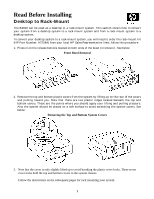
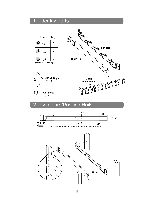
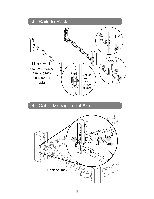
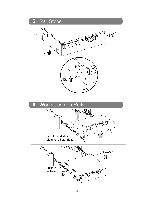
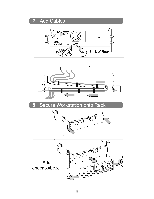
4. Plug-in the workstation that you just rack mounted and set the fan speed. To set the fan speed, use the Boot Console Handler (bch) and follow this procedure. A. Turn on the system and press the Tab key until the select display message appears. You should select the display frequency and resolution that are best for you. B. Stop the boot process by pressing any key before the ten-second limit. This gets you to the bch Main Menu. You will only need to do this if you have autoboot turned on; otherwise, the system stops at the bch Main Menu. When the Main Menu prompt appears, type: Main Menu: Enter command > configuration C. Enter the following command at the Configuration Menu prompt: Configuration Menu: Enter command > FanChoice RackMount D. Return to the Main Menu and enter this command at the prompt to continue booting: Configuration Menu: Enter command > boot Converting Your Rack-Mount System to a Desktop System To convert your rack-mount system to a desktop system, you will need to order the desktop kit (HP Part Number (A7227A) from you local HP Sales Representative. Next, follow this procedure: Unplug the workstation and reverse the procedure in the section "Converting Your Desktop System to a Rack-Mount System" in this chapter. You will need to complete steps 4 through 1 (respectively). Complete step 4 stated above,, but at the Configuration Menu prompt in step C, type: Configuration Menu: Enter command > FanChoice DeskSide © Copyright 200f1 Hewlett-Packard Company. Printed in U.S.A 6
-
 1
1 -
 2
2 -
 3
3 -
 4
4 -
 5
5 -
 6
6
 |
 |
