HP d3500 HP d3500 Digital Camera - Getting Started Guide - Page 1

HP d3500 Manual

Page 1 highlights

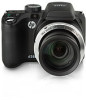
d3500 Dgital Camera Quick Start Guide For the full version of the d3500 product user manual go to: www.hp.com/support d3500 www.hp.com/support d3500 www.hp.com/support d3500 www.hp.com/support d3500 www.hp.com/support 1 1 2 3 4 17 18 19 27 26 25 24 23 22 2 OPEN 1 OPEN 5 3 6 7 8 9 5 10 11 16 12 15 13 14 20 21 28 29 3 2 4 4 5 6 7 CR2 0 0 0 8 0 4 9 9 - 0 Quick Start Guide English 1 Camera Views 1 AF Assist Beam/Timer Indicator 16 SET Button 2 Flash Lamp 17 Strap Buckle 3 Microphone 18 USB Port 4 Lens 19 HDMI Port 5 LCD Screen 20 Flash Button 6 Exposure Compensation Button 21 Speaker 7 Status Indicator 22 Zoom Toggle 8 i Button 23 Shutter Button 9 Menu Button 24 Continuous Capture Button 10 Display Button 25 Fast Video Recording Button 11 Playback Button 26 Power Switch 12 AF Button/Arrow Button (Up) 27 Mode Dial 13 Flash Button/Arrow Button (Right) 28 Battery Cover 14 Delete Button/Self-Timer Button/Arrow Button (Down) 29 Tripod Receptacle 15 Marco Button/Arrow Button (Left) 2 Inserting the Battery 1. Open the battery cover. 2. Insert the battery into the battery slot in the correct position as shown in the following diagram: 3. Close the battery cover. 3 Setting the Date/Time/Language 1. Slide the ON/OFF to the right to power the camera on and the language menu will appear. Use the Up/Down/Left/Right button to select a language, then press to confirm the language. 2. Use the Up/Down/Left/Right Button again to set the date and time, and press to confirm. 4 Using the Zoom Function 1. Hold the camera securely. 2. Use the zoom toggle to select Tele or Wide positions to zoom in or out on your subject. 3. Press the Shutter Button halfway to focus on the subject then press the Shutter Button completely down to take a picture. 5 Using the mode dial This HP camera provides a convenient mode dial that allows you to manually switch between different camera settings with ease. Available modes are listed below: Auto Mode Panorama Mode Manual Mode Aperture priority Shutter Priority Scene Mode Program AE Movie Mode Face Beautifier Custom Settings 6 Additional Features 1. Face Beautifier : In Portrait Mode, the camera is set to automatically adjust camera exposure for realistic portrayal of skin tones. 2. Panorama Mode : Panorama Mode allows you to create a panoramic picture. The camera will automatically compose a panoramic picture using the individual shots that you take. 3. Using Quick Recording : In shooting mode, press the Recording short cut button to begin recording video. 7 Using the menu button To access the Menu, press the Func/Menu button. Scroll down to the Menu icon and press SET to enter. Press Up/Down and Left/Right to navigate through each sections. Press to confirm selection. Photo Setup Transmission General Setup File/Software 1 1 AF 2 3 マイク 4 レンズ 5 6 7 8 i ボタン 9 func/menu ボタン 10 disp ボタン 11 12 AF 13 14 15 16 SET ボタン 17 18 USB 端子 19 HDMI 端子 20 21 22 23 24 25 26 27 28 29 2 1 2 3 3 1 2 4 1 2 3 5 HP AE 美肌 6 1 2 3 7 転送

  • 1
  • 2

1.
カメラの電源をオンにします。言語メニューが表示されます。 機能ボタン上/
下、左/右を押して、言語を選択し、
ボタンを押して設定 を確定します。
2.
機能ボタン上/下、左/右を押して、日時を設定し、
ボタンを押して設定
を確定します。
1
カメラの外観
2
電池の挿入
1.
バッテリーカバーを開けます。
2.
電池のプラスとマイナスを確認しながら、電池を挿入します。
3.
バッテリーカバーを閉めます。
3
日時/言語の設定
4
ズーム機能を使用する
1.
カメラを構えます。液晶モニターで被写体の構図を決めます。
2.
ズームレバーを操作して、被写体を拡大するときはT側に回します。広い範
囲を撮影するときはW側に回します。
3.
シャッターボタンを半押し(軽く押す)して、被写体にピントを合わせま
す。シャッターボタンを静かに全押しして画像を撮影します。
5
モードダイヤルの使用
HPカメラでは撮影シーンに応じて簡単に切り換えることができるモードダイヤル
が付いています。
使用可能なモードについて、下記の一覧で説明します。
自動モード
パノラマモード
手動モード
絞り優先
シャッター優先
シーンモード
プログラム AE
動画モード
美肌
カスタム設定
7
メニューボタンを使います
クイックスタートガイド
日本語
6
優れた機能
1.
美肌 : このモードは、人物の撮影にもっとも適しています。人物の肌色、やわ
らかさを自然に表現できます。
2.
パノラマモード : パノラマモードでは、パノラマ写真を作成します。カメラは
撮影した個々の画像で、パノラマ写真を自動的に構成します。
3.
動画撮影ショートカット : 動画ボタン
を押すと、素早く動画モードに切り
替わって録画を開始します。
このカメラは便利なメニューボタンで撮影メニューやカメラセッティングメニュ
ーを素早く設定することができます。機能ボタン左/右を押してメニュータイプ
を選び、下ボタンを押してこのメニューを開きます。
を押して決定します。
撮影セットアップ
一般的なセットアップ
転送
ファイル・ソフトウェア
1
AFアシストビーム/
タイマーインジケーター
16
SET ボタン
2
フラッシュ
17
ストラップ取り付け部
3
マイク
18
USB 端子
4
レンズ
19
HDMI 端子
5
液晶モニター
20
フラッシュポップアップボタン
6
露出補正ボタン
21
スピーカー
7
電源ランプ
22
ズームレバー
8
i ボタン
23
シャッターボタン
9
func/menu ボタン
24
連写ボタン
10
disp ボタン
25
動画ボタン
11
再生ボタン
26
電源スイッチ
12
AF ボタン/機能ボタン (上)
27
モードダイヤル
13
フラッシュモード/
機能ボタン (右)
28
バッテリーカバー
14
削除/セルフタイマ/
機能ボタン (下)
29
三脚ねじ穴
15
マクロモード/機能ボタン(左)
1
Camera Views
2
Inserting the Battery
1. Open the battery cover.
2.
Insert the battery into the battery slot in the correct position as shown in the
following diagram:
3. Close the battery cover.
1.
Slide the ON/OFF to the right to power the camera on and the language menu
will appear. Use the Up/Down/Left/Right button to select a language, then
press
to confirm the language.
2.
Use the Up/Down/Left/Right Button again to set the date and time, and press
to confirm.
3
Setting the Date/Time/Language
4
Using the Zoom Function
1. Hold the camera securely.
2.
Use the zoom toggle to select Tele or Wide positions to zoom in or out on your
subject.
3.
Press the Shutter Button halfway to focus on the subject then press the
Shutter Button completely down to take a picture.
5
Using the mode dial
This HP camera provides a convenient mode dial that allows you to manually
switch between different camera settings with ease. Available modes are listed
below:
Auto Mode
Panorama Mode
Manual Mode
Aperture priority
Shutter Priority
Scene Mode
Program AE
Movie Mode
Face Beautifier
Custom Settings
Quick Start Guide
English
7
Using the menu button
6
Additional Features
1.
Face Beautifier : In Portrait Mode, the camera is set to automatically adjust
camera exposure for realistic portrayal of skin tones.
2.
Panorama Mode : Panorama Mode allows you to create a panoramic picture.
The camera will automatically compose a panoramic picture using the
individual shots that you take.
3.
Using Quick Recording : In shooting mode, press the Recording short cut
button
to begin recording video.
To access the Menu, press the Func/Menu button. Scroll down to the Menu icon
and press SET to enter. Press Up/Down and Left/Right to navigate through each
sections. Press
to confirm selection.
Photo Setup
General Setup
Transmission
File/Software
1
AF Assist Beam/Timer Indicator
16
SET Button
2
Flash Lamp
17
Strap Buckle
3
Microphone
18
USB Port
4
Lens
19
HDMI Port
5
LCD Screen
20
Flash Button
6
Exposure Compensation Button
21
Speaker
7
Status Indicator
22
Zoom Toggle
8
i Button
23
Shutter Button
9
Menu Button
24
Continuous Capture Button
10
Display Button
25
Fast Video Recording Button
11
Playback Button
26
Power Switch
12
AF Button/Arrow Button (Up)
27
Mode Dial
13
Flash Button/Arrow Button
(Right)
28
Battery Cover
14
Delete Button/Self-Timer But-
ton/Arrow Button (Down)
29
Tripod Receptacle
15
Marco Button/Arrow Button (Left)
3
4
6
5
7
1
5
6
7
8
9
10
11
12
13
14
15
16
17
18
19
27
26
25
24
23
22
20
21
1
2
3
4
28
29
2
1
2
3
4
5
CR200080499-0
d3500
Dgital Camera
數位相機
数码相机
デジタルカメラ
디지털 카메라
Quick Start Guide
快速啟動指南
快速启动指南
クイックスタートガイド
빠른시작가이드
For the full version of the d3500 product user manual go to: www.hp.com/support
d3500
完整版產品使用者手冊請至
: www.hp.com/support
d3500
完整版产品用户手册请至
: www.hp.com/support
d3500
ユーザー向け取扱説明書のフルバージョンは以下のサイトでご覧頂けます:
www.hp.com/support
d3500 제품에관련된상세설명서는다음사이트에서확인해주십시오: www.hp.com/support