HP dc73 Illustrated Parts & Service Map - HP Compaq dc7800 Small Form Fact - Page 4
Failsafe Boot Block ROM, Password Security, Security Features, Diagnostic Functions, Error
 |
View all HP dc73 manuals
Add to My Manuals
Save this manual to your list of manuals |
Page 4 highlights
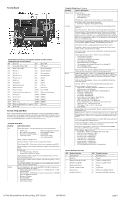
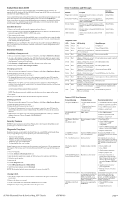
Failsafe Boot Block ROM The computer comes with a reprogrammable flash system ROM (read only memory). To upgrade the ROM, download the latest ROM BIOS image from the HP Web site (www.hp.com) and follow the online GUI/instructions. Your system ROM includes a Failsafe Boot Block that is protected during the flash process and allows the computer to be restarted in the unlikely event of an unsuccessful ROM flash. If the system detects an invalid system ROM during the boot sequence, the Failsafe Boot Block attempts to locate a valid BIOS image on removable media. To recover from the Boot Block recovery mode complete the following steps: Boot Block Recovery 1. Remove any bootable media from the computer and turn off power. 2. Insert a flash drive or CD containing the ROM BIOS in the root directory. The media must be formatted using the FAT12, FAT16, or FAT32 file system. 3. Turn on power to the system. 4. The system will automatically flash the ROM. After a successful flash, the system will either automatically restart or prompt the user to unplug the unit, wait 5 seconds, reattach the power cord, and then press the power button. NOTE: BitLocker prevents Windows Vista from booting when a CD containing the BIOS image file is in an optical drive. If BitLocker is enabled, remove this CD before attempting to boot to Windows Vista. Password Security Establishing a Setup password: 1. Turn on or restart the computer. If you are in Windows, click Start > Shut Down > Restart. 2. As soon as the computer is turned on, press F10 when the monitor light turns green to enter Computer Setup. Press Enter to bypass the title screen, if necessary. If you do not press F10 when prompted, a restart will be necessary. 3. Select Security > Setup Password and follow the instructions on the screen. 4. Before exiting, click File > Save Changes and Exit. Changing a password: 1. Turn on or restart the computer. If you are in Windows, click Start > Shut Down > Restart. To change the Setup password, go to step 2. To change the Power-on password, go to step 3. 2. To change the Setup password, as soon as the computer is turned on, press F10 when the monitor light turns green to enter Computer Setup. Press Enter to bypass the title screen, if necessary. 3. When the key icon appears, type your current password, a slash (/) or alternate delimiter character, your new password, another slash (/) or alternate delimiter character, and your new password again as shown: current password/new password/new password. NOTE: Type the new password carefully since the characters do not appear on the screen. 4. Press Enter. The new password will take effect the next time the computer is restarted. Deleting a password 1. Turn on or restart the computer. If you are in Windows, click Start > Shut Down > Restart. To delete the Setup password, go to step 2. To delete the Power-On password, go to step 3. 2. To change the Setup password, as soon as the computer is turned on, press F10 when the monitor light turns green to enter Computer Setup. Press Enter to bypass the title screen, if necessary. 3. When the key icon appears, type your current password followed by a slash (/) or alternate delimiter character as shown. Example: currentpassword/ 4. Press Enter. Security Features NOTE: For more information about Setup Utilities refer to the Computer Setup Menu on the previous page or in the Service Reference Guide. Diagnostic Functions Diagnostic functions are provided by the Setup Utility (in system ROM) and by Insight Diagnostics. Insight Diagnostics provides detailed system information including: • Processor type and speed • Memory amount, mapping, and integrity • Hardware peripheral availability/settings • Hard drive type, space used/available • System identification, asset tracking Insight Diagnostics may be found on the Documentation and Diagnostics CD that shipped with the computer. The tool may also be downloaded from the hp Web site using the following procedure: 1. Go to www.hp.com 2. Click the Software & Download driver link. 3. Enter the product number (for example, dc7800) in the text box and press the Enter key. 4. Select the specific product. 5. Select the OS. 6. Click the Diagnostics link. 7. Select HP Insight Diagnostics Offline Edition. 8. Select the proper language and click Download. NOTE: The download includes instructions on how to create a bootable CD. Clearing CMOS 1. Turn off the computer and any external devices, and disconnect the power cord from the power outlet. 2. Remove the chassis access panel. 3. On the system board, press and hold the CMOS button for 5 seconds. 4. Replace the chassis access panel and reconnect the power cord. Error Conditions and Messages Feature Purpose How It Is Established Floppy drive controller Prevents the transfer of data to or from the Setup Utilities floppy drive. Device Boot Disabling Prevents booting from and or all of these devices: Internal or external USB, Internal ODD, or Internal FDD Setup Utilities Security Option Prevents use of computer until password is Setup Utilities entered. Can apply to both initial startup and restart. BIOS Write Protect Restricts ability to change ROM BIOS with- Setup Utilities. out approval. USB Controller Allows you to disable or enable all USB devices. Setup Utilities Diagnostic LEDs LED Color LED Activity State/Message Power Power Power Power Power Power Power Power Power Power Power Power none Green Green Red Red Red Red Red Red Red Red Red Red none On Computer on 1 blink every 2 seconds Normal Suspend Mode 1 blink every second followed CPU thermal shutdown by a 2 second pause 3 blinks, 1 blink every second Processor not installed followed by a 2 second pause 4 blinks, 1 blink every second Power failure (power supply overload) followed by a 2 second pause 5 blinks, 1 blink every second Pre-video memory error followed by a 2 second pause 6 blinks, 1 blink every second Pre-video graphics error followed by a 2 second pause 7 blinks, 1 blink every second System board failure (ROM followed by a 2 second pause 8 blinks, 1 blink every second Invalid ROM based on Checksum followed by a 2 second pause 9 blinks, 1 blink every second System powers on but is unable to boot followed by a 2 second pause 10 blinks, 1 blink every second Bad option card followed by a 2 second pause 11 blinks, 1 blink every second The current processor does not support followed by a 2 second pause a feature previously enabled on this system. System does not power on and System unable to power on LEDs are not flashing Common POST Error Messages Screen Message Probable Cause Recommended Action 101-Option ROM Error 1. System ROM checksum error. 2. Expansion board option ROM checksum 3. System board 1. Verify ROM, reflash if required 2. Remove suspected card, reboot 3. Clear CMOS memory, reboot 4. Replace system board 103-System Board Failure DMA, timers 1. Clear CMOS memory. 2. Remove expansion boards. 3. Replace system board. 164-Memory Size Error and 201-Memory Error Incorrect memory configuration 1. Run Setup (F10). 2. Check DIMMs for proper seating, type, and HP compatibility. 3. Remove DIMMs singularly and reboot to isolate faulty DIMM. 4. Replace system board. 214-DIMM Configuration Warning Populated DIMM configura- Rearrange the DIMMs so that tion is not optimized each channel has the same amount of memory. 301-, 304-Keyboard error Keyboard failure. Check keyboard connection or keys. Check connector for bent of missing pins. Replace keyboard. If 304, possible system board problem. 501-Display Adapter Failure Graphics display controller. 1. Reseat graphics card. 2. Clear CMOS. 3. Check monitor connection. 4. Replace graphics card. 1720-SMART Hard Drive Hard drive is about to fail. Detects Imminent Failure 1. Determine if hard drive is giving correct error message. Enter Computer Setup and run the Drive Protection System test under Storage > DPS Selftest. 2. Apply hard drive firmware patch if applicable. 3. Back up contents and replace hard drive. 1796-SATA Cabling Error One or more SATA devices are improperly attached. For optimal performance, the SATA 0 and SATA 1 connectors must be used before SATA 2 and SATA 3. Ensure SATA connectors are used in ascending order. For one device, use SATA 0. For two devices, use SATA 0 and SATA 1. For three devices, use SATA 0, SATA1, and SATA 2. 1801-Microcode Patch Error Processor not supported by 1. Upgrade BIOS to proper ROM BIOS. version. 2. Change the processor. dc7800 Illustrated Parts & Service Map, SFF Chassis 459786-001 page 4
-
 1
1 -
 2
2 -
 3
3 -
 4
4
 |
 |
