HP dx7510 Illustrated Parts & Service Map: HP Compaq dx7510/dx7518 Busines - Page 4
Password Security, HP Insight Diagnostics, Clearing CMOS, Recovering the Configuration Settings - driver
 |
View all HP dx7510 manuals
Add to My Manuals
Save this manual to your list of manuals |
Page 4 highlights
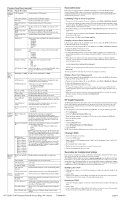
Computer Setup Menu (continued) Heading Option / Description Integrated USB Controller Peripherals Disables/enables USB controller. USB Legacy Support Disables/enables USB legacy support. HD Audio Disables/enables HD audio controller. Onboard LAN Con- Disables/enables onboard LAN controller. troller Onboard LAN Boot Disables/enables the boot ROM of the onboard LAN ROM chip. HP Network Clone ROM Disables/enables HP Network Clone ROM. This option is available for Network Clone users only. Onboard FDC Con- Disables/enables onboard FDC controller. troller Serial Port 1 Allows you to select a setting for the onboard serial port: • Disabled • 3F8/IRQ4 • 2F8/IRQ3 • 3E8/IRQ4 • 2E8/IRQ3 • Auto Parallel Port Allows you to select a setting for the onboard parallel port: • Disabled • 378/IRQ7 • 278/IRQ5 • 3BC/IRQ7 Parallel Port Mode Allows you to select parallel port mode: • SPP • EPP • ECP • ECP+EPP ECP Mode Use DMA If Parallel Port Mode is set to ECP or ECP+EPP, allows you to set the DMA channel for ECP Mode to 1 or 3. Power Management Setup PCI-E Wake on PME Disables/enables PCI-E Wake on PME. ACPI Function Disables/enables ACPI functions. Changing this item can make the existing OS unusable. ACPI Suspend Type Allows you to set type of ACPI sleep mode: • S1 (Power On Suspend) • S3 (Suspend To RAM) • S1 & S3 Resume on PME Disables/enables Resume by PME. Wake on Ring Disables/enables Resume by Ring. Resume by Alarm Disables/enables RTC (real-time clock) alarm. Date (of Month) Alarm If RTC Alarm Resume is enabled, allows you to select the day of the month for resumption of RTC alarm. (Set to 0 for every day.) Time (hh:mm:ss) Alarm If Resume on Alarm is enabled, allows you to select what time the RTC alarm will resume. Restore on AC/Power Loss Allows you to select system power loss behavior: • Power On • Power Off • Last State PnP/PCI Configurations Reset Configuration Data Disables/enables automatic reconfiguration. The default is Disabled. Select Enabled to reset Extended System Configuration Data (ESCD) when you exit Setup, if you have installed a new add-on and the system reconfiguration has caused such a serious conflict that the OS cannot boot. Resources Controlled By Allows you to select whether resources are controlled automatically or manually: • Auto (ESCD¨CExtended Storage Configuration Data) • Manual BIOS can automatically configure all the bootable and Plug-and-Play-compatible devices. If you choose Auto, you cannot select IRQ, DMA and memory base address fields since BIOS automatically assigns them. IRQ Resources • IRQ-3 assigned to • IRQ-4 assigned to • IRQ-5 assigned to • IRQ-7 assigned to • IRQ-9 assigned to • IRQ-10 assigned to • IRQ-11 assigned to • IRQ-12 assigned to • IRQ-14 assigned to • IRQ-15 assigned to When resources are controlled manually, allows you to assign each system interrupt a type, depending on the type of device using the interrupt. Legacy ISA for devices compliant with the original PC AT bus specification, PCI/ISA PnP for devices compliant with the Plug-and-Play standard whether designed for PCI or ISA bus architecture. Hardware Reset Case Open Sta- Disables/enables resetting of the case open status. Monitor tus Setup Fan Controller Disables/enables auto fan control mode. CPU Fan Speed (view only) System Fan Speed (view only) CPU Fan Fault Detected Disables/enables detection of CPU failure during POST. SYS Fan Fault Detect Disables/enables detection of fan failure during POST. (Action Load Optimized Choices) Defaults Allows you to reset Computer Setup to factory defaults. Set Supervisor Password Allows you to establish a password to control access to Computer Setup. Set User Password Allows you to establish a password to control access to the computer. (Supervisor password must be set before you can set a User password.) Save & Exit Setup Allows you to save current settings and exit Computer Setup. Exit Without Saving Allows you to exit Computer Setup without saving changes. Password Security If the system is equipped with an embedded security device, refer to the HP ProtectTools Security Manager Guide at http://www.hp.com. Establishing a setup password through Computer Setup prevents reconfiguration of the computer (use of the Computer Setup (F10) utility) until the password is entered. Establishing a Setup or Power-On password 1. Turn on or restart the computer. If you are in Windows, click Start > Shut Down >Restart. 2. As soon as the computer is turned on, press F10 when the monitor light turns green to enter Computer Setup. Press Enter to bypass the title screen, if necessary. If you do not press F10 when prompted, a restart will be necessary. 3. To establish a Setup password, select Security > Setup Password and follow the instructions on the screen. - or To establish a Power-On password, select Security > Power-On Password and follow the instructions on the screen 4. Before exiting, click File > Save Changes and Exit. Changing a Setup or Power-On password If the system is equipped with an embedded security device, refer to the HP ProtectTools Security Manager Guide at http://www.hp.com. 1. Turn on or restart the computer. If you are in Windows, click Start > Shut Down > Restart. To change the Setup password, go to step 2. To change the Power-on password, go to step 3. 2. To change the Setup password, as soon as the computer is turned on, press F10 when the monitor light turns green to enter Computer Setup. Press Enter to bypass the title screen, if necessary. 3. When the key icon appears, type your current password, a slash (/) or alternate delimiter character, your new password, another slash (/) or alternate delimiter character, and your new password again as shown: current password/new password/new password. NOTE: Type the new password carefully since the characters do not appear on the screen. 4. Press Enter. The new password will take effect the next time the computer is restarted. Deleting a Power-On or Setup password If the system is equipped with an embedded security device, refer to the HP ProtectTools Security Manager Guide at http://www.hp.com. 1. Turn on or restart the computer. If you are in Windows, click Start > Shut Down > Restart. To delete the Setup password, go to step 2. To delete the Power-On password, go to step 3. 2. To change the Setup password, as soon as the computer is turned on, press F10 when the monitor light turns green to enter Computer Setup. Press Enter to bypass the title screen, if necessary. 3. When the key icon appears, type your current password followed by a slash (/) or alternate delimiter character as shown. Example: currentpassword/ 4. Press Enter. HP Insight Diagnostics The HP Insight Diagnostics utility allows you to view information about the hardware configuration of the computer and perform hardware diagnostic tests on the subsystems of the computer. The utility simplifies the process of effectively identifying, diagnosing, and isolating hardware issues. Insight Diagnostics may be downloaded from the HP Web site using the following procedure: 1. Go to www.hp.com 2. Click the Software & Download driver link. 3. Enter the product number (for example, dc7510) in the text box and press the Enter key. 4. Select the specific product. 5. Select the OS. 6. Click the Diagnostics link. 7. Select HP Insight Diagnostics Offline Edition. 8. Click Download. NOTE: The download includes instructions on how to create a bootable CD. Clearing CMOS 1. Remove the chassis access panel. 2. Locate the CMOS jumper. 3. Remove the blue CMOS jumper from pins 4 and 6 and put the jumper on pins 2 and 4. This clears CMOS. 4. Put the jumper back on pins 4 and 6. 5. Replace the chassis access panel and reconnect the power cord. 6. Turn on the computer and allow it to start. Recovering the Configuration Settings Recovering the configuration settings established in the Computer Setup (F10) Utility requires that you first back up the settings before a recovery is needed. The CMOS Save/Load utility can be found at http://www.hp.com under the Software & Driver Downloads for your specific model. Download the firmware files into a folder on a removable storage device. It is recommended that you save any modified computer configuration settings to a diskette, a USB flash media device, or a diskette-like device (a storage device set to emulate a diskette drive) and save the diskette or device for possible future use. Backing Up the CMOS 1. Make sure the computer to be backed up is turned on. Connect the removable storage to thecomputer. 2. Boot to DOS. 3. Type N:\folder\BIOS.exe SAVE:ABC001.DAT (where N is the drive letter of the removable storage) to save the CMOS setting to the removable storage device. Restoring the CMOS 1. Make sure the target computer is turned on. Connect the removable storage to the target computer. 2. Boot to DOS. 3. Type N:\folder\BIOS.exe LOAD:ABC001.DAT (where N is the drive letter of the removable storage) to load the custom CMOS setting onto the target system. dx7510/dx7518 Illustrated Parts & Service Map, MT chassis 516948-001 page 4
-
 1
1 -
 2
2 -
 3
3 -
 4
4
 |
 |