HP e9180f Upgrade and Service - Page 10
Removing and Replacing an Optical Disc Drive, Before You Begin, Removing an Optical Disc Drive
 |
UPC - 884962007037
View all HP e9180f manuals
Add to My Manuals
Save this manual to your list of manuals |
Page 10 highlights
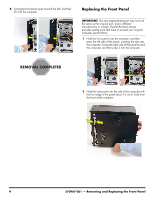
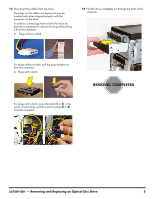
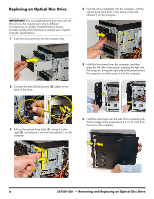
Removing and Replacing an Optical Disc Drive 15-25 minutes Before You Begin Observe the following requirements before removing and replacing the optical disc drive. Tools Needed Flathead screwdriver You can use a flathead screwdriver with the following screw (Torque screw). Removing an Optical Disc Drive 1 Before you begin servicing the computer, press the Eject button, and remove any CD or DVD from the optical disc drive tray. 2 Remove the Pocket Media Drive, if it is present. Remove the Personal Media Drive, if it is present. 3 Turn off the computer. 4 Disconnect all peripherals and cables from the front and the back of the computer. Disconnect the power cord last. CAUTION: Static electricity can damage the electronic components inside the computer. Discharge static electricity by touching the metal cage of the computer before touching any internal parts or electronic components. WARNING: Never open the cover with the power cord attached or power applied. You may damage your computer or be injured from the spinning fan blades. Avoid touching sharp edges inside the computer. NOTE: Computer features may vary by model. 2 537501-001 - Removing and Replacing an Optical Disc Drive
-
 1
1 -
2
-
3
-
4
-
 5
5 -
 6
6 -
 7
7 -
 8
8 -
 9
9 -
 10
10 -
 11
11 -
 12
12 -
 13
13 -
 14
14 -
 15
15 -
16
-
17
-
18
-
19
-
20
-
21
-
22
-
23
-
24
-
25
-
26
-
27
-
28
-
29
-
30
-
31
-
32
-
33
-
34
-
35
-
36
-
37
-
38
-
39
-
40
-
41
-
42
-
43
-
44
-
45
-
46
 |
 |
