HP nc4200 HP Compaq nc4200 Notebook PC - Maintenance and Service Guide - Page 121
Display Assembly, Display Assembly Spare Part Number Information
 |
View all HP nc4200 manuals
Add to My Manuals
Save this manual to your list of manuals |
Page 121 highlights
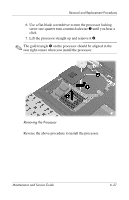
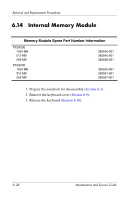
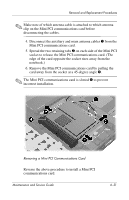
Removal and Replacement Procedures 6.16 Display Assembly Display Assembly Spare Part Number Information 12.1-inch, XGA, TFT display assembly (includes wireless antenna boards and cables) Display Hinge Kit LCD rubber pad kit, with screws 383548-001 383530-001 383546-001 1. Prepare the notebook for disassembly (Section 6.3). 2. Remove the keyboard cover (Section 6.9). 3. Remove the keyboard (Section 6.10). 4. Close the notebook. 5. Turn the notebook upside down with the rear panel toward you. 6-32 Maintenance and Service Guide
-
 1
1 -
2
-
3
-
4
-
5
-
6
-
7
-
8
-
9
-
10
-
11
-
12
-
13
-
14
-
15
-
16
-
17
-
18
-
19
-
20
-
21
-
22
-
23
-
24
-
25
-
26
-
27
-
28
-
29
-
30
-
31
-
32
-
33
-
34
-
35
-
36
-
37
-
38
-
39
-
40
-
41
-
42
-
43
-
44
-
45
-
46
-
47
-
48
-
49
-
50
-
51
-
52
-
53
-
54
-
55
-
56
-
57
-
58
-
59
-
60
-
61
-
62
-
63
-
64
-
65
-
66
-
67
-
68
-
69
-
70
-
71
-
72
-
73
-
74
-
75
-
76
-
77
-
78
-
79
-
80
-
81
-
82
-
83
-
84
-
85
-
86
-
87
-
88
-
89
-
90
-
91
-
92
-
93
-
94
-
95
-
96
-
97
-
98
-
99
-
100
-
101
-
102
-
103
-
104
-
105
-
106
-
107
-
108
-
109
-
110
-
111
-
112
-
113
-
114
-
115
-
 116
116 -
 117
117 -
 118
118 -
 119
119 -
 120
120 -
 121
121 -
 122
122 -
 123
123 -
 124
124 -
 125
125 -
 126
126 -
127
-
128
-
129
-
130
-
131
-
132
-
133
-
134
-
135
-
136
-
137
-
138
-
139
-
140
-
141
-
142
-
143
-
144
-
145
-
146
-
147
-
148
-
149
-
150
-
151
-
152
-
153
-
154
-
155
-
156
-
157
-
158
-
159
-
160
-
161
-
162
-
163
-
164
-
165
-
166
-
167
-
168
-
169
-
170
-
171
-
172
-
173
-
174
-
175
-
176
-
177
-
178
-
179
-
180
-
181
-
182
-
183
-
184
-
185
-
186
-
187
-
188
-
189
-
190
-
191
-
192
-
193
-
194
-
195
-
196
-
197
 |
 |

6–32
Maintenance and Service Guide
Removal and Replacement Procedures
6.16
Display Assembly
1. Prepare the notebook for disassembly (
Section 6.3
).
2. Remove the keyboard cover (
Section 6.9
).
3. Remove the keyboard (
Section 6.10
).
4. Close the notebook.
5. Turn the notebook upside down with the rear panel
toward you.
Display Assembly Spare Part Number Information
12.1-inch, XGA, TFT display assembly (includes wireless
antenna boards and cables)
383548-001
Display Hinge Kit
383530-001
LCD rubber pad kit, with screws
383546-001