HP p650 HP p650 Digital Camera - Getting Started Guide - Page 8
Using On-screen Menus
 |
View all HP p650 manuals
Add to My Manuals
Save this manual to your list of manuals |
Page 8 highlights
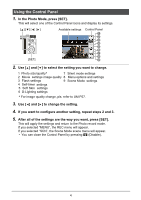
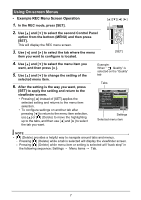
Using On-screen Menus • Example REC Menu Screen Operation 1. In the REC mode, press [SET]. [ ][ ][ ][ ] 2. Use [ ] and [ ] to select the second Control Panel option from the bottom (MENU) and then press [SET]. This will display the REC menu screen. 3. Use [ ] and [ ] to select the tab where the menu item you want to configure is located. [SET] 4. Use [ ] and [ ] to select the menu item you want, and then press [ ]. 5. Use [ ] and [ ] to change the setting of the selected menu item. 6. After the setting is the way you want, press [SET] to apply the setting and return to the viewfinder screen. • Pressing [ ] instead of [SET] applies the selected setting and returns to the menu item selection. • To configure settings on another tab after pressing [ ] to return to the menu item selection, use [ ] or [ ] (Delete) to move the highlighting up to the tabs, and then use [ ] and [ ] to select the tab you want. Example: When " Quality" is selected on the "Quality" tab Tabs REC Quality Setup Quality EV Compensation White Balance ISO Color Mode Fine Normal Settings Selected menu item NOTE • [ ] (Delete) provides a helpful way to navigate around tabs and menus. - Pressing [ ] (Delete) while a tab is selected will display the viewfinder screen. - Pressing [ ] (Delete) while menu item or setting is selected will "back step" in the following sequence: Settings Menu items Tab. 7
-
 1
1 -
2
-
 3
3 -
 4
4 -
 5
5 -
 6
6 -
 7
7 -
 8
8 -
 9
9
 |
 |
