HP s5160f Getting Started - Page 66
Cleaning the computer and monitor, Cleaning the keyboard and mouse
 |
UPC - 884420975267
View all HP s5160f manuals
Add to My Manuals
Save this manual to your list of manuals |
Page 66 highlights
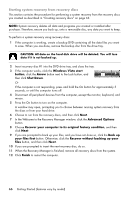
Cleaning the computer and monitor 1 Unplug the computer from its power source. 2 Unplug the monitor from its power source. 3 Use a clean, dry cloth to dust the computer case and the monitor. 4 Use a clean cloth dampened with warm water to wipe the computer case and the monitor case clean. Do not use water on the monitor screen. NOTE: If there is sticker residue or a spill on the computer or monitor case, use isopropyl or rubbing alcohol and a lint-free cloth to remove it. 5 Use a clean cloth to dry the computer and monitor case. 6 Use a clean, dry cloth to clean the monitor screen, or, for more thorough cleaning use an antistatic screen cleaner and a clean cloth. Cleaning the computer vents Air vents keep the computer and monitor cool. To maintain efficient air flow, keep these vents clean by using a small battery-powered vacuum cleaner. (A battery-powered vacuum cleaner eliminates the risk of electric shock.) 1 Run the vacuum over the vents in the computer case and the monitor case. 2 Remove any debris that has accumulated in and around the computer connectors (for example, the Ethernet and USB connectors). Cleaning the keyboard and mouse When cleaning the keyboard keys, use a low setting on the battery-powered vacuum cleaner, to avoid removing key caps and springs. 1 Vacuum between the keys of the keyboard and along the grooves. 2 Use a clean, dry cloth and isopropyl alcohol to clean buildup on the keyboard keys and along its edges. 3 Wipe the body of the mouse and the mouse cord with cleaning wipes or a cloth and cleanser. If you have a roller ball mouse, clean the ball and rollers inside: 1 Turn the mouse upside down. 2 Rotate the ball-cover ring counterclockwise to remove the ring and release the roller ball. 3 Rinse the roller ball with soap and warm water. 4 Clean the rollers inside the mouse with a cotton swab dampened with isopropyl alcohol. 5 After the roller ball and rollers are completely dry, replace the ball and ball-cover ring. 62 Getting Started (features vary by model)
-
 1
1 -
2
-
3
-
4
-
5
-
6
-
7
-
8
-
9
-
10
-
11
-
12
-
13
-
14
-
15
-
16
-
17
-
18
-
19
-
20
-
21
-
22
-
23
-
24
-
25
-
26
-
27
-
28
-
29
-
30
-
31
-
32
-
33
-
34
-
35
-
36
-
37
-
38
-
39
-
40
-
41
-
42
-
43
-
44
-
45
-
46
-
47
-
48
-
49
-
50
-
51
-
52
-
53
-
54
-
55
-
56
-
57
-
58
-
59
-
60
-
 61
61 -
 62
62 -
 63
63 -
 64
64 -
 65
65 -
 66
66 -
 67
67 -
 68
68 -
 69
69 -
 70
70 -
 71
71 -
72
-
73
-
74
-
75
-
76
 |
 |