HP st5742 Troubleshooting Guide: HP t5740/t5745 Thin Clients and HP st5742/st5 - Page 38
Beep Codes, POST Error Messages
 |
View all HP st5742 manuals
Add to My Manuals
Save this manual to your list of manuals |
Page 38 highlights
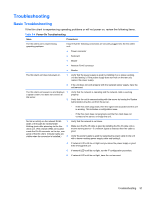
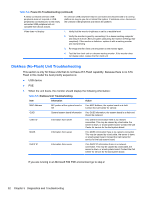
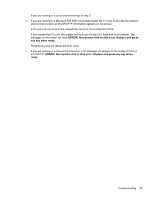
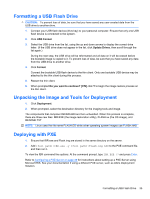
Beep Codes If there are no video errors, the system goes directly to POST messages. Beep Code 1 long, 2 short 1 long, 3 short Description A video error has occurred and the BIOS cannot initialize the video screen to display any additional information. System running in boot block recovery mode. POST Error Messages Table 5-3 POST Error Messages POST Error Message Description BIOS ROM checksum error - System halted The checksum of the BIOS code in the BIOS chip is incorrect, indicating the BIOS code may have become corrupt. To restore a corrupt BIOS, refer to Appendix D, "System BIOS" or call your local HP Call Center for a diagnosis. For phone numbers of an HP Call Center near you, visit the following Web site: http://www.hp.com/cgi-bin/hpsupport/index.pl CMOS battery failed The CMOS battery is no longer functional. For information on replacing the battery, refer to Appendix E, "Replacing the CMOS Battery." CMOS checksum error - Defaults loaded Checksum of CMOS is incorrect, so the system loads the default equipment configuration. A checksum error may indicate that CMOS has become corrupt. A weak battery may have caused this error. Replace the battery if necessary. For more information, refer to Appendix E, "Replacing the CMOS Battery." CPU at nnnn Displays the running speed of the CPU. Press ESC to skip memory test The user may press Esc to skip the full memory test. Hard Disk Install Failure Cannot find or initialize the hard drive controller or the drive. Make sure the controller is installed correctly. If no hard drives are installed, be sure the Hard Drive selection in Setup is set to NONE. Keyboard error or no keyboard present Cannot initialize the keyboard. Make sure the keyboard is attached correctly and no keys are pressed during POST. To purposely configure the system without a keyboard, set the error halt condition in Setup to HALT ON ALL, BUT KEYBOARD. The BIOS then ignores the missing keyboard during POST Memory Test This message displays during a full memory test, counting down the memory areas being tested. Memory Test Fail If POST detects an error during memory testing, additional information appears giving specifics about the type and location of the memory error Override enabled - Defaults loaded If the system cannot boot using the current CMOS configuration, the BIOS can override the current configuration with a set of BIOS defaults designed for the most stable, minimal-performance system operations. Press TAB to show POST screen Press the TAB key during POST to display messages hidden by the HP logo. Error: Non-System disk or disk error The BIOS was unable to find a suitable boot device. For the t5000 Series, this may mean an uninitialized or corrupt ATA Flash. Reflash the unit and press any key when ready. For more information, refer to Chapter 5, "Restoring the Flash Image." 30 Chapter 5 Diagnostics and Troubleshooting
-
 1
1 -
2
-
3
-
4
-
5
-
6
-
7
-
8
-
9
-
10
-
11
-
12
-
13
-
14
-
15
-
16
-
17
-
18
-
19
-
20
-
21
-
22
-
23
-
24
-
25
-
26
-
27
-
28
-
29
-
30
-
31
-
32
-
 33
33 -
 34
34 -
 35
35 -
 36
36 -
 37
37 -
 38
38 -
 39
39 -
 40
40 -
 41
41 -
 42
42 -
 43
43 -
44
-
45
-
46
-
47
-
48
-
49
-
50
-
51
-
52
-
53
 |
 |