HP xp8000 HP xp8000 series digital projector - (English) Ceiling Mount Install - Page 2
Setup > Projector Position
 |
View all HP xp8000 manuals
Add to My Manuals
Save this manual to your list of manuals |
Page 2 highlights
w Attach the ceiling bracket to the ceiling rod with the round thumbscrew. Height adjustments can be made by using different holes on the ceiling rod and ceiling bracket. v The total adjustment range is15.75 to 25.6 inches (40~65cm). Adjusments can be made in one inch (2.5cm) increments. Round Thumbscrew Ceiling Bracket x Make necessary roll and yaw adjustments to the projector. (YAW ADJUSTMENT) (ROLL ADJUSTMENT) 180° ±60° ±20° v Open the on-screen menu and select Setup > Projector Position. Select the appropriate ceiling option. C Copyright Hewlett-Packard Company 2003 First Edition (August 2003) Printed in Taiwan P/N 36.87108.001-A
-
 1
1 -
 2
2
 |
 |

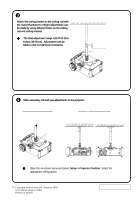
Make necessary roll and yaw adjustments to the projector.
180°
(
Y
A
W
ADJUSTMENT)
v
v
v
v
v
Open the on-screen menu and select
Setup > Projector Position
. Select the
appropriate ceiling option.
x
(
ROLL
ADJUSTMENT)
±60°
±20°
P/N 36.87108.001-A
w
Attach the ceiling bracket to the ceiling rod with
the round thumbscrew. Height adjustments can
be made by using different holes on the ceiling
rod and ceiling bracket.
v
v
v
v
v
The total adjustment range is15.75 to 25.6
inches (40~65cm).
Adjusments can be
made in one inch (2.5cm) increments.
Ceiling Bracket
Round Thumbscrew
Copyright Hewlett-Packard Company 2003
First Edition (August 2003)
Printed in Taiwan
C