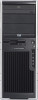
HP xw4000 HP Z200, Z400 and xw4000 Workstations - Rack Mount Tray Installation
HP xw4000 Manual
 |
View all HP xw4000 manuals
Add to My Manuals
Save this manual to your list of manuals |
HP xw4000 manual content summary:
- HP xw4000 | HP Z200, Z400 and xw4000 Workstations - Rack Mount Tray Installation - Page 1
how to install the HP Z200 and Z210, Z400, and xw4000 series Workstations into a rack mount tray. It also describes how to mount the workstation-tray assembly into a rack. Kit contents ● Rack mount tray ● Adapter brackets ● Rails and mounting hardware (installation instructions in Appendix A of this - HP xw4000 | HP Z200, Z400 and xw4000 Workstations - Rack Mount Tray Installation - Page 2
risk of serious injury, read the Safety and Comfort Guide. It describes proper workstation setup, posture, health, and work habits for computer users, and provides important electrical and mechanical safety information. This guide is located at http://www.hp.com/ergo and on the documentation CD (if - HP xw4000 | HP Z200, Z400 and xw4000 Workstations - Rack Mount Tray Installation - Page 3
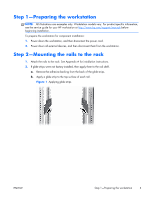
. For product-specific information, see the service guide for your HP workstation at http://www.hp.com/support/manuals before beginning installation. To prepare the workstation for component installation: 1. Power down the workstation, and then disconnect the power cord. 2. Power down all external - HP xw4000 | HP Z200, Z400 and xw4000 Workstations - Rack Mount Tray Installation - Page 4
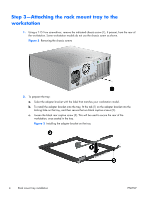
the chassis screw as shown. Figure 2 Removing the chassis screws 2. To prepare the tray: a. Select the adapter bracket with the label that matches your workstation model. b. To install the adapter bracket onto the tray, fit the tab (1) on the adapter bracket into the locking hole on the tray, and - HP xw4000 | HP Z200, Z400 and xw4000 Workstations - Rack Mount Tray Installation - Page 5
3. To install the workstation on the tray: a. Guide the front bezel of the workstation under the lip of the adapter bracket (1). b. Rotate the back of the workstation down onto the tray (2). c. Tighten the single, black rear captive screw (3), to secure the rear of the workstation into the tray. - HP xw4000 | HP Z200, Z400 and xw4000 Workstations - Rack Mount Tray Installation - Page 6
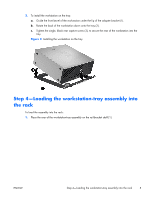
out of the rack until the latches in the tray (2) engage the stop feature. Reach under the assembly and release the latches (2) to disengage the tray from the rails. CAUTION: For removal, the workstation must be supported once the latches are disengaged. 6 Rack mount tray installation ENWW - HP xw4000 | HP Z200, Z400 and xw4000 Workstations - Rack Mount Tray Installation - Page 7
Step 5-Completing installation 1. Reconnect power to the workstation. 2. Restore power to the workstation. ENWW Step 5-Completing installation 7 - HP xw4000 | HP Z200, Z400 and xw4000 Workstations - Rack Mount Tray Installation - Page 8
be used to support a variety of rack-mountable devices. This option occupies 2U of HP rack space and can be used with all HP Series racks. instructions (this document) This kit may contain extra pieces of hardware for your convenience. Required tools ● Medium cross-tip screwdriver 8 Appendix A HP - HP xw4000 | HP Z200, Z400 and xw4000 Workstations - Rack Mount Tray Installation - Page 9
be sure that: ● The leveling jacks are extended to the floor. ● The full weight of the rack rests on the leveling jacks. ● The stabilizing feet are attached slightly to stabilize the brackets during installation. 3. Beginning at the front of the rack, use the top screw holes for initial placement - HP xw4000 | HP Z200, Z400 and xw4000 Workstations - Rack Mount Tray Installation - Page 10
Refer to the documentation included with the component for complete installation instructions. NOTE: After installing the component, insert additional screws into the front depth-adjustable fixed rails for component support. 10 Appendix A HP Depth-Adjustable Fixed Rails Rack Option Kit installation
-
 1
1 -
 2
2 -
 3
3 -
 4
4 -
 5
5 -
 6
6 -
 7
7 -
8
-
9
-
10
 |
 |

Rack mount tray installation
Introduction
This document describes how to install the HP Z200 and Z210, Z400, and xw4000 series
Workstations into a rack mount tray. It also describes how to mount the workstation-tray assembly into
a rack.
Kit contents
●
Rack mount tray
●
Adapter brackets
●
Rails and mounting hardware (installation instructions in Appendix A of this document)
●
Installation instructions
●
Warranty information
Required tools
●
T-15 Torx screwdriver
●
T-20 Torx screwdriver
●
Cross-tip screwdriver
© 2011 Hewlett-Packard Development Company, L.P. Printed in the U.S.
ENWW
Introduction
1