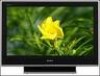
Hitachi 42HDX60 Owners Guide
Hitachi 42HDX60 Manual
 |
View all Hitachi 42HDX60 manuals
Add to My Manuals
Save this manual to your list of manuals |
Hitachi 42HDX60 manual content summary:
- Hitachi 42HDX60 | Owners Guide - Page 1
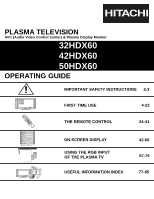
PLASMA TELEVISION AVC (Audio Video Control Center) & Plasma Display Monitor 32HDX60 42HDX60 50HDX60 OPERATING GUIDE Video Audio Ch. Manager Locks Setup Move SEL Sel STB POWER TV CBL VCR SOURCE WIZARDTAPE CD 2 AMP 3 6 DVD 1 5 9 INFO 4 8 MODE 7 0 ASPECT A/V NET SLEEP EXIT CH SELECT - Hitachi 42HDX60 | Owners Guide - Page 2
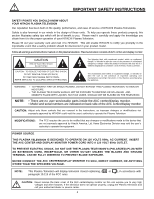
card and mail it to HITACHI. This will enable HITACHI to notify you promptly in the improbable event that a safety problem should be discovered in your product model. Follow all warnings and instructions marked on this plasma television. Plasma television consists of AVC center and display monitor - Hitachi 42HDX60 | Owners Guide - Page 3
nonmoving) patterns can cause permanent damage to television receivers. Such "SCREEN BURNS" constitute misuse and are NOT COVERED by your HITACHI Factory Warranty. PUBLIC VIEWING OF COPYRIGHTED MATERIAL Public viewing of programs broadcast by TV stations and cable companies, as well as programs from - Hitachi 42HDX60 | Owners Guide - Page 4
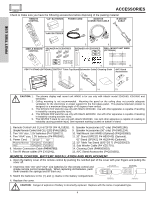
POWER 2. 8. 9. 10. PDP TV STAND (OPTIONAL) 50STD3 T Table Top Stand Subwoofer Cable Cleaning Cloth C B A C« B« A« C B A C« B« A« AVC Stand Accessories 11. 12. 13. 14. 15. CAUTION: 1. 2. 3. 4. 5. The plasma display wall mount unit WM50 is for use only with Hitachi model 32HDX60, 42HDX60 - Hitachi 42HDX60 | Owners Guide - Page 5
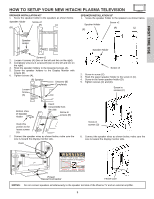
FIRST TIME USE HOW TO SETUP YOUR NEW HITACHI PLASMA TELEVISION SPEAKER INSTALLATION 42" 1. Screw the speaker holder to the speakers as shown below. Speaker Holder Screw x2 (R) (L) : Do not connect speakers simultaneously to the speaker terminal of the Plasma TV and an external amplifier. 5 - Hitachi 42HDX60 | Owners Guide - Page 6
STANDBY (RED) ON (GREEN) VOL- POWER NOTES: String or Wire 50" 42" 1. Do not block the ventilation holes of the Plasma Display monitor or the AVC center. Blocking the ventilation holes might cause fire or defect. 2. The plasma television has two AC cords, one on the AVC center and the other on - Hitachi 42HDX60 | Owners Guide - Page 7
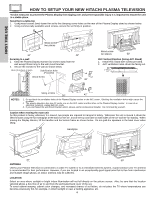
. Moreover, since there is also high power consumption value, a specified television (temperature) temperature environment is required. 14 Caution on prolonged storage Storing the plasma television for a period of more than 2 to 3 months without use might cause an unstable picture when the - Hitachi 42HDX60 | Owners Guide - Page 8
AVC Center. The resolution should be set correctly to display the signal on the Plasma Television. Subwoofer Cable (Provided) This cable is used to an optional antenna cable mixer to the TV antenna terminal, and connect the cables to the antenna mixer. Consult your dealer or service store for the - Hitachi 42HDX60 | Owners Guide - Page 9
) MAIN POWER ቨቦ ቧ STANDBY (RED) ON (GREEN) ቦ ቧ AUDIO VIDEO CONTROL CENTER PULL PHONES S-VIDEO INPUT 5 VIDEO L/(MONO) R AUDIO MENU/SELECT ቪ ቩ ቢ ቨ ቢ MENU/SELECT button This button allows you to enter the MENU, making it possible to set TV features to your preference without using the - Hitachi 42HDX60 | Owners Guide - Page 10
recommended to leave the "MAIN POWER" to ON condition (lights red) for stand-by mode. STANDBY (RED) ON (GREEN) MAIN POWER or MAIN POWER FIRST TIME USE 32"/42" 50" AVC POWER button The AVC power can be turned ON/OFF manually or by remote control. Turning on the AVC Power will only turn on the - Hitachi 42HDX60 | Owners Guide - Page 11
USE REAR PANEL JACKS 32"/42" Monitor Bottom View REAR PANEL OF THE AVC AUDIO Please use HITACHI specified cable. TO cable box, only when ANT B is displayed as a main picture. ባ Audio/Video Inputs 1, 2, 3 and 4 The VID1~VID4 buttons will select each video source each time they are pressed. Use - Hitachi 42HDX60 | Owners Guide - Page 12
) ቯ To AVC Connect the Monitor Connection cable from the AVC center's "TO MONITOR" to these connectors ("FROM AVC"). ተ SUB-POWER button This power is for serviceman usage. ቱ To Power Swivel base (32" and 42" Only) Connects the plasma monitor to the power swivel base using a connection cable. NOTES - Hitachi 42HDX60 | Owners Guide - Page 13
are trademarks of SRS Labs, Inc. To AC outlet Please use HITACHI specified cable. TO MONITOR Back of AVC Center AC IN TruBass SRS and symbol are trademarks of SRS Labs, Inc. To AC outlet The Display Monitor and the AVC Center have their own AC Power. Both AC cords must be completely plugged in to - Hitachi 42HDX60 | Owners Guide - Page 14
use to connect the VCR, camcorder, laserdisc player, DVD player, or HDTV Set Top Box to your Plasma TV is dependent on the model and features of each component. Check the owner's manual button to return to the previous channel. Rear Panel of AVC ) AUDIO Please use HITACHI specified cable. TO MONITOR - Hitachi 42HDX60 | Owners Guide - Page 15
AVC Center below. 2. Connect the cable from the AUDIO OUT R of the VCR or the laserdisc player to the INPUT (AUDIO/R) jack. 3. Connect the cable button to return to the previous channel. Rear Panel of AVC MONO) AUDIO Please use HITACHI specified cable. TO MONITOR INPUT VCR can be used for VCR #1 - Hitachi 42HDX60 | Owners Guide - Page 16
guide for more information on line input-output connections. CONNECTING A COMPONENT SOURCE WITH DVI-HDTV CAPABILITY TO INPUT 1 1. Connect the DVI connection cable button to return to the previous channel. Rear Panel of AVC HDTV L/(MONO) AUDIO Please use HITACHI specified cable. TO MONITOR INPUT 1 - Hitachi 42HDX60 | Owners Guide - Page 17
four seconds. 7. Press the ANT button to return to the previous channel. OUTPUT Player PR/CR PB/CB Y L R Rear Panel of AVC Center ANT B TO CONVERTER ANT A S-VIDEO S-VIDEO VIDEO L AUDIO DVI-HDTV L/(MONO) AUDIO Please use HITACHI specified cable. TO MONITOR INPUT 1 R R AUDIO - Hitachi 42HDX60 | Owners Guide - Page 18
Plasma TV to an external audio amplifier, connect the system as shown below. The "AUDIO OUT" from the AVC center is a fixed output. The Volume of the amplifier is controlled by the amplifier, not by the Plasma Television -HDTV L/(MONO) AUDIO Please use HITACHI specified cable. TO MONITOR INPUT 1 - Hitachi 42HDX60 | Owners Guide - Page 19
connector to control your equipment using your Hitachi Plasma TV Remote Control. You can use your Hitachi remote control to control the Audio/Video equipment command without the equipment's remote control. The Plasma Television AVC Center has 2 IR BLASTER jacks. Each IR Mouse cable can connect up to - Hitachi 42HDX60 | Owners Guide - Page 20
uninstall) Input 1 Using TV Transmission Test BACK POWER OK PLAY EXIT Move Set Input SEL Select THUMB STICK (x2) CH UP HITACHI AV NET SET UP Using TV Not Setup Not Setup Not Setup Not Setup Not Setup Not Setup EXIT SEL Select 6. To uninstall or change device (equipment), press INFO button - Hitachi 42HDX60 | Owners Guide - Page 21
remote control) FIRST TIME USE VCR BRAND CODE Admiral 0047 Harley Davidson 0000 Harman/Kardon 0038, 0081 Harwood 0072 Hitachi 0000, 0041, 0042 Hughes Network Systems 0042 JVC 0067, 0503 Yamaha 0490, 0545, 0539 Zenith 0591, 0503 CABLE BRAND CODE ABC 0003, 0008, 0014, 0017 Americast - Hitachi 42HDX60 | Owners Guide - Page 22
12 11 AUDIO OUT Rear Panel of Display Monitor (PROVIDED) INPUT OUTPUT Cable TV Box ANT B TO CONVERTER ANT A S-VIDEO S-VIDEO VIDEO L VIDEO -HDTV L/(MONO) AUDIO INPUT 1 R R AUDIO OUT RGB Please use HITACHI specified cable. TO MONITOR AC IN TruBass SRS and symbol are trademarks of SRS - Hitachi 42HDX60 | Owners Guide - Page 23
AVC Center. • Refer to the operating guide of your other electronic equipment for additional information on connecting your hook-up cables. • A single VCR can be used connect the components B-Y output to the TV's PB input and the components R-Y output to the TV's PR input. • Your component outputs - Hitachi 42HDX60 | Owners Guide - Page 24
Plasma TV, point the remote control at the remote sensor of the AVC box/Display Monitor and press the TV button. The TV button will blink, indicating that the remote will now control your television receiver, use this button to program your satellite receiver (see page 37 for instructions on how - Hitachi 42HDX60 | Owners Guide - Page 25
GUIDE/TV VID 4 SCHD VID 5 SWAP PIP ACCESS FREEZE REC VIDEO CLU-5723TSI THE REMOTE CONTROL ᕃ POWER button Press this button to turn the Plasma TV on or off when the remote is in TV mode (see page 24 for instructions on how to set the remote control to TV mode). ባ TV button When the TV button - Hitachi 42HDX60 | Owners Guide - Page 26
enter the remaining two numbers using the number buttons. Channel selection may also be performed by pressing CH up (̆) or down (̄). NOTE: The Plasma TV may not receive some channels if you are not in the correct ANTENNA/CABLE mode (see page 50). ቪ SLEEP button Press this button to display the sleep - Hitachi 42HDX60 | Owners Guide - Page 27
THUMB STICK Cable Box POWER CH ̄ Set Top Box 1 2 Custom 4 5 7 8 Move LAST CH 0 INFO Device Setting CH ̆ 3 6 9 MENU INFO GUIDE THUMB STICK Cable Box Set Top Box Custom SETUP Move INFO Device Setting THUMB STICK HITACHI AV NET WIZARD (Learning) Use this wizard to manually learn - Hitachi 42HDX60 | Owners Guide - Page 28
your equipment to the soft keys of your AV NET. If all remote button transfers are successful, the user can now control their equipment by using the Plasma TV remote control. HITACHI AV NET WIZARD (Learning) Use this wizard to manually learn or modify your AV NET soft keys. Highlight CUSTOM, and - Hitachi 42HDX60 | Owners Guide - Page 29
+ SVCS VID 2 VID 1 HOW TO USE THE REMOTE TO CONTROL YOUR PLASMA TV VOL TV POWER SLEEP ANT TV/RGB MENU DVD 1 VCR CDSOURCE WIZARDCBL TAPE STB 4 2 AMP 7 5 3 8 6 0 9 A/V NET ASPECT INFO SELECT CH PIP PIP MODE LAST CH PIP VID 3 CH GUIDE/TV VID 4 SWAPPIP ACCESS FREEZE VIDEO - Hitachi 42HDX60 | Owners Guide - Page 30
GUIDE/TV SCHD VID 4 VID 5 POWER STB CBL VCRSOURCE WIZARTDAPE AMP 3 TV CD DVD 1 2 5 6 9 4 7 8 INFO MODE 0 ASPECT A/V NET SLEEP TV/ ACCESS VIDEO SWAP PIP MODE REC CLU-5723TSI HOW TO USE THE REMOTE TO CONTROL YOUR PLASMA TV (4) RGB (Analog Input) ASPECT DISPLAY MODE. RGB ( - Hitachi 42HDX60 | Owners Guide - Page 31
1 HOW TO USE THE REMOTE TO CONTROL YOUR PLASMA TV ቶ LAST CHANNEL (LAST CH) button Use this button to select between the last two channels viewed (good for watching two sporting events, etc.). 3:32 PM Ant A 10 Stereo R LAST CH 3:32 PM Ant A 39 Stereo R VOL TV POWER SLEEP ANT TV/RGB MENU DVD - Hitachi 42HDX60 | Owners Guide - Page 32
GUIDE/TV SCHD VID 4 VID 5 POWER STB CBL VCRSOURCE WIZARTDAPE TV CD AMP 3 DVD 1 2 5 6 9 4 7 SLEEP 8 0 A/V NET TV HITACHI Plasma TV incorporates Dual Tuner technology designed for improved viewing enjoyment. This Dual Tuner Please use HITACHI specified cable. TO button Press the PIP button - Hitachi 42HDX60 | Owners Guide - Page 33
TV POWER SLEEP ANT TV/RGB MENU DVD 1 VCR CDSOURCE WIZARDCBL TAPE STB 4 2 AMP 7 5 3 8 6 0 9 A/V NET ASPECT INFO SELECT CH PIP PIP MODE LAST CH PIP VID 3 CH GUIDE/TV and DVI-HDTV). PIP MODE ባ SWAP button (with PIP ON) Press this button to toggle between the Main and Sub - Hitachi 42HDX60 | Owners Guide - Page 34
CH GUIDE/TV SCHD VID 4 VID 5 POWER STB CBL VCRSOURCE WIZARTDAPE AMP 3 TV CD DVD 1 2 5 6 9 4 7 8 INFO MODE 0 ASPECT A/V NET SLEEP TV/RGB the picture to motion, press the FREEZE button again. To change FREEZE modes, use the PIP MODE button to cycle through the four modes. SPLIT - Hitachi 42HDX60 | Owners Guide - Page 35
INFO ANT TV/RGB A/V NET ASPECT VIDEO ቤ MENU EXIT ቤ VOL SELECT CH ባ MUTE LAST CH VID 1 VID 2 PIP VID 3 SURF VID 5 VID 4 FREEZE PIP MODE PIP ACCESS SWAP DAY/NIGHT ቤ ቤ ባ REC MY VCR CODE IS: NOTE: Refer to instruction manual of the VCR for operation of the buttons exclusively for - Hitachi 42HDX60 | Owners Guide - Page 36
to CABLE mode. ባ PRECODED CABLE BOX buttons These buttons transmit the chosen precoded cable codes. ቤ EXCLUSIVE TV buttons These buttons are for operating the TV. REC MY CABLE BOX CODE IS: NOTE: Refer to instruction manual of the Cable Box for operation of the buttons exclusively for the Cable Box - Hitachi 42HDX60 | Owners Guide - Page 37
VID 2 VID 1 USING THE REMOTE TO CONTROL SET-TOP-BOX/SATELLITE RECEIVER FUNCTIONS VOL TV POWER SLEEP ANT TV/RGB MENU DVD 1 VCR CDSOURCE WIZARDCBL TAPE STB 4 2 AMP 7 5 3 8 6 0 9 A/V NET ASPECT INFO SELECT CH PIP PIP MODE LAST CH PIP VID 3 CH GUIDE/TV VID 4 SWAPPIP ACCESS - Hitachi 42HDX60 | Owners Guide - Page 38
precoded DVD codes. ቤ EXCLUSIVE TV Buttons These buttons are for operating the TV. ቤ VOL SELECT CH MUTE LAST CH VID 1 VID 2 PIP VID 3 SURF VID 5 VID 4 FREEZE PIP MODE PIP ACCESS SWAP DAY/NIGHT ቤ ቤ ባ REC MY DVD PLAYER CODE IS: NOTE: Refer to instruction manual of the DVD player for - Hitachi 42HDX60 | Owners Guide - Page 39
to Audio mode. ባ PRECODED AUDIO Buttons These buttons transmit the chosen precoded Audio component codes. ቤ PRECODED PVR Buttons These buttons transmit the chosen precoded PVR codes. ብ EXCLUSIVE TV Buttons These buttons are for operating the Plasma TV. ባ POWER ቤ ብ TV DVD VCR CBL SOURCE WIZARD - Hitachi 42HDX60 | Owners Guide - Page 40
Simple Remote Control has the basic features that are most often used. CH + ባ ቦ ቪ VOL - SELECT MUTE CH - MENU EXIT ቢ POWER A/V NET VOL + FAV CH ANT ቫ ቤ ብ ቧ ቨ ቩ (Patent Pending) ᕃ POWER button Press Power button to turn the Plasma TV ON or OFF. ባ CH+ (̆), CH- (̄) Press the CH+ (̆) up or CH - Hitachi 42HDX60 | Owners Guide - Page 41
TV POWER SLEEP ANT TV/RGB MENU DVD 1 VCR CDSOURCE WIZARDCBL TAPE STB 4 2 AMP 7 5 3 8 6 0 9 A/V NET ASPECT INFO SELECT CH PIP PIP MODE LAST CH PIP VID 3 CH GUIDE/TV Cable Star 32 Century 11 Citizen 11 Colour Voice 30, 42 10 Fisher 08, 11 Hitachi 12 JVC 13 Kenwood 14 - Hitachi 42HDX60 | Owners Guide - Page 42
MENU on the remote control to display the different features on your HITACHI Plasma TV. 2. Use the THUMB STICK to navigate to a different menu item. A/V Net Power Swivel Move SEL Sel This part of the screen shows which Remote Control buttons to use. STANDBY (RED) ON (GREEN) MAIN POWER 32"/42" - Hitachi 42HDX60 | Owners Guide - Page 43
using the Lock feature. Label Video Inputs , VCR, DVD, etc. Set tint and color coordinates for DTV programs. Set the gray side bars on/off when watching 4:3 signals in standard mode. Turn TV on and off once, daily, or weekly. Feature to display dialogue/text. Controls the motorized stand for 32"/42 - Hitachi 42HDX60 | Owners Guide - Page 44
, only the selected mode will reset to initial conditions. Picture Mode Use this function to choose from automatic picture settings to optimize your TV's performance. Video Audio Aspect Chan. Manager Locks MENU Setup Power Swivel Move SEL Sel THUMB STICK SELECT Video Picture Mode Contrast - Hitachi 42HDX60 | Owners Guide - Page 45
Manager Locks MENU Setup Power Swivel Move SEL Sel THUMB STICK SELECT Video Picture Mode Contrast Brightness Color Tint Sharpness Color Temperature Black Enhancement Contrast Mode Reset Video Settings Move SEL Select ANT A/B Day 100% 50% 50% Night 50% High High Dynamic Use the THUMB STICK - Hitachi 42HDX60 | Owners Guide - Page 46
SEL Select ANT A/B Off Low Off THUMB STICK Video Color Management Set User Colors Magenta 50% Red 50% Yellow 50% Green 50% Cyan 50% Blue 50% Reset Move SEL Select Use THUMBSTICK to highlight function. Press down to select the User Colors setting. When the function has a "ͱ" in - Hitachi 42HDX60 | Owners Guide - Page 47
noise in the picture without degrading picture quality. Set NOISE REDUCTION to OFF if the TV experiences picture blocking. Auto your Hitachi Plasma Television will activate the circuitry for this special feature to improve video performance when watching film based sources. NOTE: When using - Hitachi 42HDX60 | Owners Guide - Page 48
Plasma TV internal speakers. TruBass is an audio enhancement technology from SRS Labs that provides deep, rich bass on any speaker system without Audio Source Multi-Channel Television Sound will allow you to select STEREO (a stereo broadcast), MONO (monaural sound) used when receiving a weak - Hitachi 42HDX60 | Owners Guide - Page 49
ASPECT Aspect Mode Use this function to select the Picture Format Aspect Ratio. Auto /ZOOM2 or 16:9 ZOOM. Vertical position can be changed with these modes. For example, it will be useful for centering the picture area at both the top and bottom of the picture with 480i/480P signal. Adjustable - Hitachi 42HDX60 | Owners Guide - Page 50
Select ANTENNA if you are using an indoor or outdoor antenna. Select Cable if you have cable TV. Chan. Manager Ant. A Ant. B Move SEL Select THUMB STICK SELECT THUMB STICK Chan. Manager Ant. A Channel Source Antenna Cable(1) Auto Channel Scan Channel List Cable(2) Start Move SEL Return - Hitachi 42HDX60 | Owners Guide - Page 51
This feature will automatically store active TV channels in Auto Channel Scan. This will allow you to skip unused channels when using CHANNEL UP (̆) or DOWN (̄). Chan. Manager Ant. A Channel Source Antenna Cable(1) Auto Channel Scan Channel List Cable(2) Start Move SEL Select Chan. Manager - Hitachi 42HDX60 | Owners Guide - Page 52
CH ID Lock Press THUMB STICK ̆ or ̄ to review more channels. Press EXIT to quit the menu. Scan Use this feature after Auto Channel Scan is completed to add (On) or skip (Off) additional channels to the remote control channel ̆ or ̄ buttons. Chan. Manager Ant. A Ch# 2 3 4 5 6 7 8 9 Scan Off - Hitachi 42HDX60 | Owners Guide - Page 53
This section contains advanced features which will make TV viewing easier and more enjoyable. Use this feature to give up to 20 0-9, _, -) SEL Return NOTES: 1. If ANT A and ANT B are in the same ANTENNA/CABLE mode, the CHANNEL ID for both antenna inputs will be the same. 2. CHANNEL ID will not be - Hitachi 42HDX60 | Owners Guide - Page 54
turned on, all buttons on the Front Panel will be deactivated, except the Power button. When TV TIME LOCK is TV RATINGS is selected, various types of television programming based on a parental guide ratings will be blocked. Picture-in-Picture will also be blocked automatically (see page 56). Use - Hitachi 42HDX60 | Owners Guide - Page 55
: 1. A movie rating is dependent upon the movie that is viewed. If the movie does not carry a rating, the TV will not block it. 2. Blocking "NOT RATED (NR)" programs may block emergency programming, sports, news, public service announcements, religious programs and weather. ON-SCREEN DISPLAY 55 - Hitachi 42HDX60 | Owners Guide - Page 56
S V FV Use THUMB STICK ̆ or ̄ to highlight the category that you want to block. Press select to block the TV RATINGS that you have selected. Press EXIT to quit the menu or select TV RATINGS to return to the previous menu. TV Parental Guide Ratings Chart N/A TV-Y TV-Y7 TV-G TV-PG TV-14 TV-MA FV - Hitachi 42HDX60 | Owners Guide - Page 57
Ratings (Eng) to block various types of movies and television programs used in (Eng) Canada that you feel may be inappropriate due to its content. MENU THUMB STICK Locks Change Access Code Engage Lock TV Time Lock Movie Ratings TV Ratings Canadian Ratings (Eng) Canadian Ratings (Frn) Move SEL - Hitachi 42HDX60 | Owners Guide - Page 58
13 ans+: 16 ans+: 18 ans+: Move SEL Return Use THUMB STICK ̆ or ̄ to highlight the category that you want to block. Press SELECT to set the CANADIAN RATINGS (FRN) that you have selected. Once rating is selected, for example 8 ans+, all movies and television programs rated 8 ans+ and higher (13 ans - Hitachi 42HDX60 | Owners Guide - Page 59
SETUP Setup Select SETUP when setting up your TV for the first time. Use the THUMB STICK ̆ or ̄ on the remote to highlight the function desired. MENU THUMB STICK Video Audio Aspect Chan. Manager Locks Setup Power Swivel Move SEL Sel THUMB STICK SELECT Setup Menu Preference Screen Saver Set - Hitachi 42HDX60 | Owners Guide - Page 60
fixed (non-moving) patterns can cause permanent damage to Plasma Television. Use the SCREEN SAVER feature to hide screen burn. MENU THUMB is not used, permanent damage may occur. Press the EXIT button to return to normal viewing. Screen Saver Picture's Movement ON-SCREEN DISPLAY Image Power (50 - Hitachi 42HDX60 | Owners Guide - Page 61
time must be set before you can Set Event Timer or TV Time Out. Setup Menu Preference Screen Saver Set The Clock Tue --:-- PM Move SEL Return THUMB STICK Setup Set The Clock Time : Tue --:-- PM Move SEL Return Use THUMB STICK ̆ or ̄ to set the time, and day of the week. Press THUMB STICK ̇ or - Hitachi 42HDX60 | Owners Guide - Page 62
original factory preset condition. NOTE: The video input name will be displayed only when video input is displayed as main picture. Video Power Save Use this feature to reduce power consumption for video input when there is no video input signal. In RGB mode, this feature will always be on. Setup - Hitachi 42HDX60 | Owners Guide - Page 63
side bars on/off when watching 4:3 signals in Standard mode. When the Plasma Television is powered OFF, BLACK SIDE PANEL feature will be set to OFF automatically when the TV is powered ON. BLACK SIDE PANEL feature needs to be set every time the TV is turned ON. The top/bottom gray bar will appear in - Hitachi 42HDX60 | Owners Guide - Page 64
the Plasma TV on and off, one time only, every day, or once a week. If the clock is not set, you can not use this TV. Use number buttons to set the channel the TV will tune to when it automatically turns on. Use THUMB STICK ̆ or ̄ to select mode Once (TV will turn on/off one time only), Daily (TV - Hitachi 42HDX60 | Owners Guide - Page 65
television program or home video which are displayed on the Plasma Television screen. Your local TV program guide used for a second language (may vary by region). 3 is sometimes used for a third language (may vary by region). 4 is sometimes used for a fourth language (may vary by region). Use - Hitachi 42HDX60 | Owners Guide - Page 66
stand for the 32" and 42" models. It allows the customer to turn the plasma display left or right using the remote control. Video Audio Aspect Chan. Manager Locks Setup Power Swivel Move SEL Sel THUMB STICK SELECT Power Swivel Move SEL Return Use THUMB STICK ̈ to rotate the TV to the right. Use - Hitachi 42HDX60 | Owners Guide - Page 67
R AUDIO INPUT 1 ANALOG INPUT L AUDIO DVI-HDTV L/(MONO) AUDIO Please use HITACHI specified cable. TO MONITOR INPUT 1 R R AUDIO OUT RGB AC IN TruBass SRS and symbol are trademarks of SRS Labs, Inc. This Plasma Television can automatically detect and display the signal format below. 1. RGB - Hitachi 42HDX60 | Owners Guide - Page 68
USING 's setting, second setting and so on. 3. Operation in RGB mode in relation to TV functions are shown below. No. Item 1 Event Timer 2 Video Control 3 AV Net Front Panel Lock 11 Auto Link 12 Menu Background Operation Only power on is available. Contrast and brightness work separately, however, - Hitachi 42HDX60 | Owners Guide - Page 69
displayed correctly. Use AUTO ADJUST to automatically adjust the horizontal position, vertical position, clock, and phase. We recommend you use a signal, supported by this product. If the setting is wrong, the Display Monitor will display: NO SYNC. SIGNAL INVALID SCAN FREQ. Without sync POWER - Hitachi 42HDX60 | Owners Guide - Page 70
EXIT on the remote control to quickly exit from a menu. TV/RGB MENU EXIT SELECT Video Aspect Setup Power Swivel Move SEL Sel This part of the screen shows which Remote Control buttons to use. STANDBY (RED) ON (GREEN) MAIN POWER 32"/42" Only Video Aspect Setup Move SEL Sel This part of the - Hitachi 42HDX60 | Owners Guide - Page 71
USING THE RGB INPUT RGB ON SCREEN DISPLAY Video Aspect Setup Power Swivel Contrast Brightness Color Temperature Enhancer Reset Change the contrast between black when watching Aspect in Real and Normal signals in standard mode. Power Swivel Controls the motorized stand for 32"/42" models. 71 - Hitachi 42HDX60 | Owners Guide - Page 72
RGB mode. 100% 50% High Off Reset Use THUMB STICK ̇ or ̈ to adjust contrast. Press MENU button to return to RGB MODE MENU and EXIT to quit. NOTES: 1. Contrast can be set up to 110% if THUMBSTICK ̈ is pressed and held for more than 3 seconds. 2. See TV - Hitachi 42HDX60 | Owners Guide - Page 73
detail. Video Contrast Brightness Color Temperature Enhancer Reset Move SEL Select 100% 50% High Off Reset Use THUMB STICK ̆, ̄ to set ENHANCER Off, Low, Medium or High. Press SELECT button to ACCEPT and EXIT to quit. RESET Set CONTRAST, BRIGHTNESS, COLOR TEMPERATURE, and ENHANCER to factory - Hitachi 42HDX60 | Owners Guide - Page 74
. • Allow the Plasma TV to warm up for 20 minutes before performing AUTO ADJUST. • Select a bright image for display while AUTO ADJUST takes place. • If AUTO ADJUST terminates unsuccessfully, try AUTO ADJUST again. If AUTO ADJUST fails several times in succession, try using manual - Hitachi 42HDX60 | Owners Guide - Page 75
Position Horizontal Clock Clock Phase Reset Input Level Black Side Panel Move SEL Select Adjust 0 0 0 0 Reset 0.7V Off Use THUMB STICK ̇, ̈ to adjust the horizontal clock. Press the MENU button to return to previous menu. Press EXIT to quit. NOTE: Due to varying signal content, you may see - Hitachi 42HDX60 | Owners Guide - Page 76
the plasma phosphor from burning when watching Aspect in Real and Normal signal, turn off the BLACK SIDE PANEL. It is recommended to watch 4:3 signal with gray side bar. POWER SWIVEL Controls the motorized stand for 32"/42" displays. Use THUMB STICK ̈ to rotate the TV to the right. Use THUMB - Hitachi 42HDX60 | Owners Guide - Page 77
soft cloth. A mild soap may be used if the screen is extremely dirty. Place your Plasma Television away from extreme heat, humidity, and extremely dusty places. Remove the plug (AVC Center/Display Monitor) from the wall outlet if your Plasma Television will not be used for a long period of time, for - Hitachi 42HDX60 | Owners Guide - Page 78
away from the monitor. - Use a coaxial cable for antenna. You can check if this monitor influences Radio receivers by turning off all other equipment other than the monitor. If you find a problem receiving Radio when using the monitor, check the instructions mentioned above. • Adjust the horizontal - Hitachi 42HDX60 | Owners Guide - Page 79
USEFUL INFO SYMPTOMS No Picture, no sound Sound OK, picture poor © Picture OK, sound poor © Picture blurred © Lines or streaks in picture Poor reception on some channels Picture rolls vertically Power Swivel not working No color © Poor color © © ©©© © © ©©© © © ©©© © © ©©© © © - Hitachi 42HDX60 | Owners Guide - Page 80
Plasma Television complies the plug & play. When a Plug and Play PC is powered on, it sends a command to the Monitor requesting identification. Cable Compatible Television Apparatus- Tèlèvision câblocompatible, Canada. Notes on Closed Caption: This Plasma Television receiver will display television - Hitachi 42HDX60 | Owners Guide - Page 81
not installed and used in accordance with the instructions, may cause harmful interference to radio communications. However, there is no guarantee that interference will not occur in a particular installation. If this equipment does cause harmful interference to radio or television reception, which - Hitachi 42HDX60 | Owners Guide - Page 82
x 0.81(vert.) mm • Pixel Pitch(42HDX60) .....0.90(horiz.) x 0.51(vert.) mm • Pixel Pitch(32HDX60) .....0.84(horiz.) x 0.39(vert.) mm • FCC class B for Consumer Use • Power Requirements 108-132V, 60Hz DIMENSIONS Monitor without stand and speakers (42" and 50") 32" 42" 50" • Width 38 7/16" 40 - Hitachi 42HDX60 | Owners Guide - Page 83
USEFUL INFORMATION USEFUL INFO To locate an authorized HITACHI service facility in the continental U.S.A. and Canada, DIAL TOLL FREE 7 days a week, 24 hours a day (1-800-448-2244) Hitachi America, LTD. Home Electronics Division Hitachi has made every effort to assure you hours of trouble free - Hitachi 42HDX60 | Owners Guide - Page 84
EST 9:00am - 7:00pm Saturday EST 9:00am - 5:00pm Look for your French Manual on the outside of the box. If the manual is missing, call 1-800-HITACHI (1-800-448-2244) for a copy. Pour de plus amples renseignements sur le service durant la période couverte par la garantie, sur le fonctionnement ou - Hitachi 42HDX60 | Owners Guide - Page 85
TV Ratings (Canadian - English 57 TV Ratings (Canadian - French 58 TV Time Out 64 M Matrix Surround 48 Menu Preference Language 59 Background 60 Monitor Out 11 N Noise Cancel 48 C P USEFUL 74 Vertical 74 Power Swivel 66, 76 Stand 4 Surf Button 31 T Time 61 Tint 45 Treble - Hitachi 42HDX60 | Owners Guide - Page 86
NOTES 86 - Hitachi 42HDX60 | Owners Guide - Page 87
NOTES 87 - Hitachi 42HDX60 | Owners Guide - Page 88
QR57972
-
 1
1 -
 2
2 -
 3
3 -
 4
4 -
 5
5 -
 6
6 -
 7
7 -
8
-
9
-
10
-
11
-
12
-
13
-
14
-
15
-
16
-
17
-
18
-
19
-
20
-
21
-
22
-
23
-
24
-
25
-
26
-
27
-
28
-
29
-
30
-
31
-
32
-
33
-
34
-
35
-
36
-
37
-
38
-
39
-
40
-
41
-
42
-
43
-
44
-
45
-
46
-
47
-
48
-
49
-
50
-
51
-
52
-
53
-
54
-
55
-
56
-
57
-
58
-
59
-
60
-
61
-
62
-
63
-
64
-
65
-
66
-
67
-
68
-
69
-
70
-
71
-
72
-
73
-
74
-
75
-
76
-
77
-
78
-
79
-
80
-
81
-
82
-
83
-
84
-
85
-
86
-
87
-
88
 |
 |

PLASMA TELEVISION
AVC (Audio Video Control Center) & Plasma Display Monitor
32HDX60
42HDX60
50HDX60
OPERATING GUIDE
IMPORTANT SAFETY INSTRUCTIONS
2-3
FIRST TIME USE
4-23
THE REMOTE CONTROL
ON-SCREEN DISPLAY
USEFUL INFORMATION INDEX
77-85
Setup
Locks
Ch. Manager
Audio
Video
Move
SEL
Sel
42-66
24-41
Locks
Chan. Manager
Aspect
Audio
Video
Move
SEL
Sel
Setup
USING THE RGB INPUT
OF THE PLASMA TV
67-76