Hitachi 50VS69A User Manual - Page 8
Front Panel Controls - remote
 |
View all Hitachi 50VS69A manuals
Add to My Manuals
Save this manual to your list of manuals |
Page 8 highlights
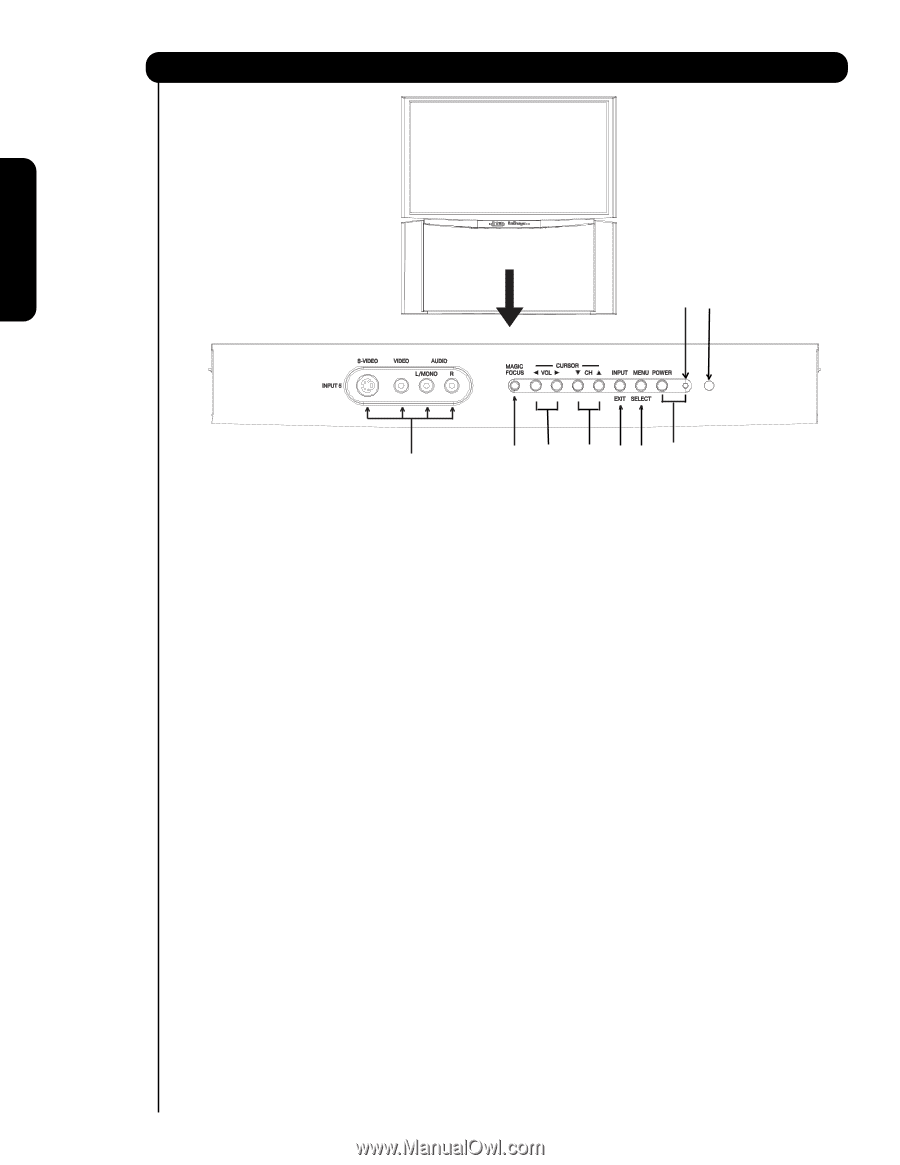
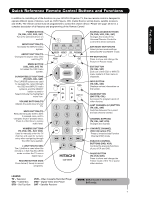
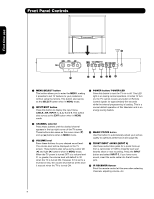
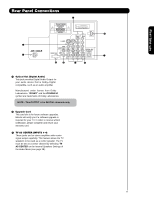
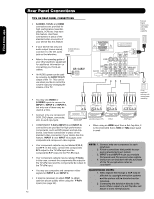
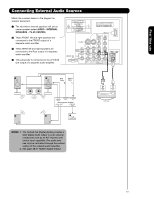
Front Panel Controls First time use POWER LED º ¶ ³ MENU/SELECT button This button allows you to enter the MENU, making it possible to set TV features to your preference without using the remote. This button also serves as the SELECT button when in MENU mode. · INPUT/EXIT button Press this button to display the input menu, CABLE, AIR, INPUT: 1, 2, 3, 4 and 5. This button also serves as the EXIT button when in MENU mode. ´ POWER button/ POWER LED Press this button to turn the TV on or off. This LED light is on during normal operation. At initial TV turn on, the TV cannot receive any button or Remote Control signals for approximately five seconds while the internal programming is loading. This is a normal default operation of this television and is an energy saving feature. » CHANNEL selector Press these buttons until the desired channel appears in the top right corner of the TV screen. These buttons also serve as the cursor down (̄) and up (̆) buttons when in MENU mode. ¿ VOLUME level Press these buttons for your desired sound level. The volume level will be displayed on the TV screen. These buttons also serve as the cursor left (̇) and right (̈) buttons when in MENU mode. When the TV power is turned OFF at a volume level 31 or greater, the volume level will default to 30 when the TV is turned ON. However, if it is set to a level 30 or less, the volume level will be at the level it was set when the TV is turned ON. ² MAGIC FOCUS button Use this button to automatically adjust your picture quality to optimum performance (see page 53). ¶ FRONT INPUT JACKS (INPUT 5) Use these audio/video jacks for a quick hook-up from a camcorder or VCR to instantly view your favorite show or new recording. Press the INPUT button and select INPUT 5. If you have mono sound, insert the audio cable into the left audio jack. º IR RECEIVER Sensor Point the remote control at this area when selecting channels, adjusting volume, etc. 8
-
 1
1 -
2
-
 3
3 -
 4
4 -
 5
5 -
 6
6 -
 7
7 -
 8
8 -
 9
9 -
 10
10 -
 11
11 -
 12
12 -
 13
13 -
14
-
15
-
16
-
17
-
18
-
19
-
20
-
21
-
22
-
23
-
24
-
25
-
26
-
27
-
28
-
29
-
30
-
31
-
32
-
33
-
34
-
35
-
36
-
37
-
38
-
39
-
40
-
41
-
42
-
43
-
44
-
45
-
46
-
47
-
48
-
49
-
50
-
51
-
52
-
53
-
54
-
55
-
56
-
57
-
58
-
59
-
60
-
61
-
62
-
63
-
64
-
65
-
66
-
67
-
68
-
69
-
70
-
71
-
72
-
73
-
74
-
75
 |
 |