Hitachi C18DLP4 Instruction Manual - Page 16
Replacing Light Bulb
 |
UPC - 717709011823
View all Hitachi C18DLP4 manuals
Add to My Manuals
Save this manual to your list of manuals |
Page 16 highlights
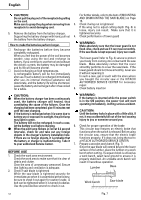
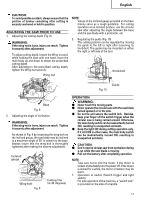
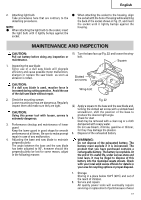
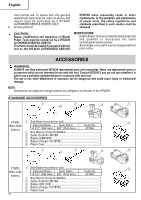
English Left-hand bolt Washer (A1) Ring Spindle Light cover Convex Washer (B2) Concave Saw blade Fig. 18 NOTE: ⅷ Thoroughly remove any sawdust which has accumulated on the spindle, bolt and washers. ⅷ To assure proper rotation direction of the saw blade, the arrow direction on the saw blade must coincide with the arrow direction on the saw cover. ⅷ Using the fingers, tighten the left-hand bolt retaining the saw blade as much as possible. Then depress the lock lever, lock the spindle, and thoroughly tighten the left-hand bolt. Housing Concave Fig. 19 (2) Push the back of the socket, and remove the socket and the light bulb together from the housing (Fig. 20). Back of the socket CAUTION: After mounting the saw blade, reconfirm that the lock lever is firmly secured in the prescribed position. REPLACING LIGHT BULB WARNING: ⅷ Make absolutely sure that the battery is removed from the main body before replacing the light bulb. ⅷ Immediately after the light is turned OFF, the bulb retains high temperature. Make sure to cool down the light bulb thoroughly before replacing it so as to prevent burns. Housing Fig. 20 (3) Remove the light bulb from the socket (Fig. 21). CAUTION: When replacing the light bulb, check the shape of base as well as the rating (12 V, 5 W), and then carry out perfect mounting. Otherwise, the light bulb can come off and/or cause overheat. 1. Detaching light bulb (1) Remove the convex part of the light cover from the concave part of the housing, and then pull out the light cover in the arrow-marked direction as shown in Fig. 19. 16 Light bulb Socket Housing Fig. 21
-
 1
1 -
2
-
3
-
4
-
5
-
6
-
7
-
8
-
9
-
10
-
 11
11 -
 12
12 -
 13
13 -
 14
14 -
 15
15 -
 16
16 -
 17
17 -
 18
18 -
 19
19 -
 20
20 -
 21
21 -
22
-
23
-
24
-
25
-
26
-
27
-
28
-
29
-
30
-
31
-
32
-
33
-
34
-
35
-
36
-
37
-
38
-
39
-
40
-
41
-
42
-
43
-
44
-
45
-
46
-
47
-
48
-
49
-
50
-
51
-
52
-
53
-
54
-
55
-
56
-
57
-
58
-
59
-
60
 |
 |
