Hitachi CPX960 User Guide - Page 8
Checking the package Contents, Names and functions of each part - reset lamp
 |
View all Hitachi CPX960 manuals
Add to My Manuals
Save this manual to your list of manuals |
Page 8 highlights
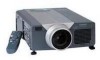
Checking the package Contents Make sure all of the following items are included in the package. If anything is missing, please contact your dealer. VIDEO RGB LASER STANDBY/ON POSITION RESET MENU FREEZE MAGNIFY VOLUME OFF Projector unit Remote control Remote control Batteries User's Guide (this document) CP-X958W CP-X960W CP-X958E CP-X960E ( ) Po1w10eVra-CUoSrd vid3e-oC/Aonubdduioctcoarble c 220-UK, Europe RGB cable ( 220-UK, Europe ) (15-15 pin M/M) Mac adapter with dip switch d Mouse cable × 3 Names and functions of each part Main unit ZOOM button Used to adjust the size of the image. (Refer to page 13.) MUTE button This button turns the sound on and off. Press once to turn the sound off; then press again to turn the sound back on. STANDBY / ON button Press this button to turn the power on and off. When turned off, the projector enters standby status. Refer to page 13 - 14 for details. ZOOM MUTE MENU FOCUS INPUT STANDBY/ON LAMP POWER TEMP RESET LAMP indicator Lights or flashes when the temperature inside the projector increases or the lamp does not light. Refer to page 33 for details. POWER indicator This indicator lights or blinks during standby and during operation. Refer to page 33 for details. Remote control I/R receiver Lens FOCUS button Used to adjust the focus of the image on the screen. (Refer to page 13.) INPUT button Press this button to switch the input. The input changes in the following sequence each time this button is pressed. RGB1 RGB2 VIDEO MENU button Displays the image menu. Refer to page 17 21 for details. RESET button Used to reset the initial settings. Refer to page 10.17.25.26 for details. TEMP indicator Blinks when the fan malfunctions. Refer to page 33 for details. Speaker Speaker Cooling fan (exhaust side) Lens cap Carring handle Cooling fan (intake side) • Use the remote control in front of the remote control photoreceptor at a distance of about 5 m or less and an angle of 30 degrees to the left or right of the center. 8
-
 1
1 -
2
-
 3
3 -
 4
4 -
 5
5 -
 6
6 -
 7
7 -
 8
8 -
 9
9 -
 10
10 -
 11
11 -
 12
12 -
 13
13 -
14
-
15
-
16
-
17
-
18
-
19
-
20
-
21
-
22
-
23
-
24
-
25
-
26
-
27
-
28
-
29
-
30
-
31
-
32
-
33
-
34
-
35
-
36
-
37
-
38
-
39
-
40
-
41
-
42
-
43
-
44
-
45
-
46
-
47
-
48
-
49
-
50
-
51
-
52
-
53
-
54
-
55
-
56
-
57
-
58
-
59
-
60
-
61
-
62
-
63
-
64
-
65
-
66
-
67
-
68
-
69
-
70
-
71
-
72
-
73
-
74
-
75
-
76
-
77
-
78
-
79
-
80
-
81
-
82
-
83
-
84
-
85
-
86
-
87
-
88
-
89
-
90
-
91
-
92
-
93
-
94
-
95
-
96
-
97
-
98
-
99
-
100
-
101
-
102
-
103
-
104
-
105
-
106
-
107
-
108
-
109
-
110
-
111
-
112
-
113
-
114
-
115
-
116
-
117
-
118
-
119
-
120
-
121
-
122
-
123
-
124
-
125
-
126
-
127
-
128
-
129
-
130
-
131
-
132
-
133
-
134
-
135
-
136
-
137
-
138
-
139
-
140
-
141
-
142
-
143
-
144
-
145
-
146
-
147
-
148
-
149
-
150
-
151
-
152
-
153
-
154
-
155
-
156
-
157
-
158
-
159
-
160
-
161
-
162
-
163
-
164
-
165
-
166
-
167
-
168
-
169
-
170
-
171
-
172
-
173
-
174
-
175
-
176
-
177
-
178
-
179
-
180
-
181
-
182
-
183
-
184
-
185
-
186
-
187
-
188
-
189
-
190
-
191
-
192
-
193
-
194
-
195
-
196
-
197
-
198
-
199
-
200
-
201
-
202
-
203
-
204
-
205
-
206
-
207
-
208
-
209
-
210
-
211
-
212
-
213
-
214
-
215
-
216
-
217
-
218
-
219
-
220
-
221
-
222
-
223
-
224
-
225
-
226
-
227
-
228
-
229
-
230
-
231
-
232
-
233
-
234
-
235
-
236
-
237
-
238
-
239
-
240
-
241
-
242
-
243
-
244
-
245
-
246
-
247
-
248
-
249
-
250
-
251
-
252
 |
 |
