Hitachi DZ GX5020A Owners Guide - Page 96
Changing Title Of Play List Title, Deleting Play List Delete
 |
UPC - 050585223875
View all Hitachi DZ GX5020A manuals
Add to My Manuals
Save this manual to your list of manuals |
Page 96 highlights
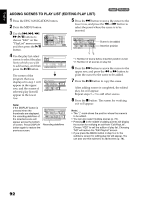
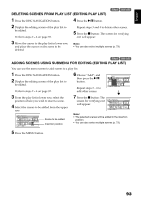
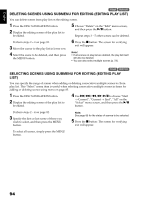
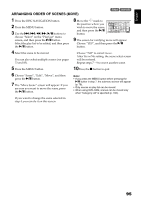
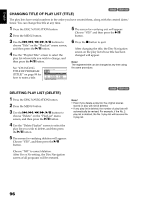
English CHANGING TITLE OF PLAY LIST (TITLE) 1< The play lists have serial numbers in the order you have created them, along with the created dates/ times: You can change this title at any time. 1 Press the DISC NAVIGATION button. 2 Press the MENU button. 5 The screen for verifying exit will appear: Choose "YES" and then press the A button. 3 Use the f/e/d/c/A buttons to choose "Title" on the "PlayList" menu screen, and then press the A button. 4 Use the "Playlist Title" screen to select the play list whose title you wish to change, and then press the A button. See "CHANGING TITLE OF PROGRAM (TITLE)" on page 88 for how to enter a title. PlayList Ti t le 01 1 / 10/2007 02 1 / 15/ 2007 03 2 / 10 / 2007 04 2 / 11/ 2007 ENTER RETURN 1 2 : 3 0PM 8 : 0 0 AM 9 : 3 0 AM 3 : 1 5PM 6 Press the C button to quit. After changing the title, the Disc Navigation screen on the play list whose title has been changed will appear. Note: The registered title can be changed at any time using the same procedure. DELETING PLAY LIST (DELETE) 1 Press the DISC NAVIGATION button. 2 Press the MENU button. 3 Use the f/e/d/c/A buttons to choose "Delete" on the "PlayList" menu screen, and then press the A button. 4 Use the "Delete Playlist" screen to select the play list you wish to delete, and then press the A button. 5 The screen for verifying deletion will appear: Choose "YES", and then press the A button. Choose "NO" to cancel deletion. After Yes or No setting, the Disc Navigation screen of all programs will be restored. 1< Note: • Even if you delete a play list, the original scenes stored on disc will not be deleted. • If any play list is deleted, the number of play lists will automatically be revised. For example, if the No. 2 play list is deleted, the No. 3 play list will become No. 2 play list. 96
-
 1
1 -
2
-
3
-
4
-
5
-
6
-
7
-
8
-
9
-
10
-
11
-
12
-
13
-
14
-
15
-
16
-
17
-
18
-
19
-
20
-
21
-
22
-
23
-
24
-
25
-
26
-
27
-
28
-
29
-
30
-
31
-
32
-
33
-
34
-
35
-
36
-
37
-
38
-
39
-
40
-
41
-
42
-
43
-
44
-
45
-
46
-
47
-
48
-
49
-
50
-
51
-
52
-
53
-
54
-
55
-
56
-
57
-
58
-
59
-
60
-
61
-
62
-
63
-
64
-
65
-
66
-
67
-
68
-
69
-
70
-
71
-
72
-
73
-
74
-
75
-
76
-
77
-
78
-
79
-
80
-
81
-
82
-
83
-
84
-
85
-
86
-
87
-
88
-
89
-
90
-
 91
91 -
 92
92 -
 93
93 -
 94
94 -
 95
95 -
 96
96 -
 97
97 -
 98
98 -
 99
99 -
 100
100 -
 101
101 -
102
-
103
-
104
-
105
-
106
-
107
-
108
-
109
-
110
-
111
-
112
-
113
-
114
-
115
-
116
-
117
-
118
-
119
-
120
-
121
-
122
-
123
-
124
-
125
-
126
-
127
-
128
-
129
-
130
-
131
-
132
-
133
-
134
-
135
-
136
-
137
-
138
-
139
-
140
-
141
-
142
-
143
-
144
-
145
-
146
-
147
-
148
-
149
-
150
-
151
-
152
-
153
-
154
-
155
-
156
-
157
-
158
 |
 |