Hitachi NR90AC3 Instruction Manual - Page 15
Warning, Adjusting The Nailing Depth
 |
UPC - 717709007888
View all Hitachi NR90AC3 manuals
Add to My Manuals
Save this manual to your list of manuals |
Page 15 highlights
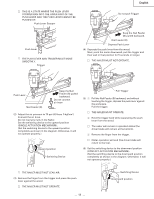
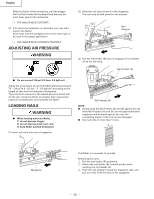
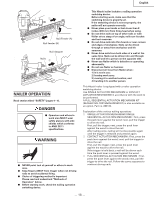
English 4 Move the Nailer along the workpiece with a bouncing motion. Each depression of the push lever will drive a nail. As soon as the desired number of nails have been driven, remove finger from the trigger. Switching Device 1 Downward position Previously pull the trigger 2 4 Push Lever WARNING ⅷ Keep your finger off the trigger except during fastening operation, because serious injury could result if the push lever accidentally contacts you or others in work area. ⅷ Keep hands and body away from the discharge area. This Hitachi nailer may bounce from the recoil of driving a fastener and unwanted subsequent fastener may be driven, possibly causing injury. ⅷ Some types of loaded nails can spark out of the muzzle during a nail driving operation. Exericise caution! THE FULL SEQUENTIAL ACTUATION MECHANISM (SEQUENTIAL TRIP MECHANISM) is for use where precision fastener placement is desired and must be operated in accordance with the following "Method of Operation". You must first depress the push lever (upward position) where you wnat to drive a nail and then pull the trigger. After the each nail is driven, completely release the trigger and lift the tool off the work surface. An FULL SEQUENTIAL ACTUATION MECHANISM (SEQUENTIAL TRIP MECHANISM) may reduce the possibility of bodily injury to you or others in the work area. This is because it is less likely to drive an unwanted nail if you keep the trigger pulled and accidentally bump the push lever against yourself or others. NOTE : ⅷ If all warnings and instructions are followed, safe operation is possible with all three systems : SINGLE ACTUATION MECHANISM, CONTACT ACTUATION MECHANISM and FULL SEQUENTIAL ACTUATION MECHANISM. ⅷ Always handle nails and package carefully. If nails are dropped, collating plastic may be broken. ⅷ After nailing : 1) disconnect air hose from the Nailer; 2) remove all nails from the Nailer; 3) supply 5 - 10 drops of Hitachi pneumatic tool lubricant into the air plug on the Nailer; and 4) open the petcock on the air compressor tank to drain any moisture. ADJUSTING THE NAILING DEPTH To assure that each nail penetrates to the same depth, be sure that : 1) the air pressure to the Nailer remains constant (requlator is installed and working properly), and 2) the Nailer is always held firmly against the workpiece. If nails are driven too deep or shallow into the workpiece, adjust the nailing in the following order. 1 DISCONNECT AIR HOSE FROM NAILER. Adjuster 15 Disconnect air hose 2 If nails are driven too deep, turn the adjuster to the shallow side. Adjustments are in half-turn increments. 2 Turn Adjuster Too Deep Flush If nails are driven too shallow, turn the adjuster to the deep side. 2 Turn Adjuster Too Shallow Flush - 15 -
-
 1
1 -
2
-
3
-
4
-
5
-
6
-
7
-
8
-
9
-
 10
10 -
 11
11 -
 12
12 -
 13
13 -
 14
14 -
 15
15 -
 16
16 -
 17
17 -
 18
18 -
 19
19 -
 20
20 -
21
-
22
-
23
-
24
-
25
-
26
-
27
-
28
-
29
-
30
-
31
-
32
-
33
-
34
-
35
-
36
-
37
-
38
-
39
-
40
-
41
-
42
-
43
-
44
-
45
-
46
-
47
-
48
-
49
-
50
-
51
-
52
-
53
-
54
-
55
-
56
 |
 |
