HoMedics AQ-DAN User Manual - Page 3
Maintenance, Troubleshooting
 |
View all HoMedics AQ-DAN manuals
Add to My Manuals
Save this manual to your list of manuals |
Page 3 highlights
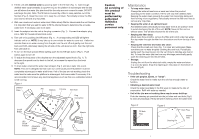
3. Fill the unit with distilled water by pouring water in the fill hole (Fig. 1). Add enough distilled water (approximately 2 cups/475 mL) so the platform is submerged and the jets are still above the water (the jets should be the only area not covered in water, DO NOT submerge the jets). Note: The fill hole is covered by a filter to keep particles out of the fountain (Fig. 2). Keep this cover on to keep the unit clean. Periodically remove the filter and rinse to remove any impurities. 4. Wait one minute and recheck water level. Water slowly fills the tubes inside the unit therfore it is important that you wait for water to fill the internal tubes to determine the accurate water level. If necessary, add more water. 5. Insert the adaptor into the unit at the plug connector (Fig. 1). Connect the adaptor plug into a 120V AC household electrical outlet. 6. Turn unit on by pushing On/Off button (Fig. 1). A corresponding red LED will light to indicate unit is on. NOTE: It may take up to one minute for water to come out. If after two minutes there is no water coming from the jets, turn the unit off and gently rock the unit back and forth, alternately raising the left side of the unit about an inch, then the right side. Turn unit back on. 7. To turn on the blue special effects lighting push the On/Off light button (Fig.1). Push button again to turn off. 8. To adjust the frequency of the droplets turn the adjustable speed knob (Fig. 1). To decrease the speed turn the knob to the left, to increase the speed turn the knob to the right. 9. To drain water unscrew the water drain stopper (Fig.1) and pour water into a sink. NOTE: This unit is designed so that it can run continuously and the platform must be completely submerged in water at all times. If all of the jets are not working check the water level to make sure the platform is submerged. Add more water if necessary. It is recommended not to leave any electrical appliance such as this one unattended while it is still running. Figure 1 Distilled Water Jets Platform Fill Hole Vent Hole Plug Connection On/Off Button LED On/Off Indicator Adjustable Speed Light Knob Button 4 Water Drain Adaptor Cleaning Pin Caution: All servicing of this product must be performed by authorized HoMedics service personnel only. Maintenance • To keep water clean: Change the water at least once a week and clean the product according to the water condition. Fill the unit only with distilled water. Keeping the water clean prevents the water from becoming sticky and from forming micro-organisms. Periodically remove the filter and rinse to remove any impurities. • Keeping the water at an optimum level: Add distilled water periodically to keep water level at an optimum level to avoid shortening the life of the unit. NOTE: Never let the unit run without water. This will also shorten the life of the unit. • Keeping the filter clean: About every three months, remove the filter and hold it under tap water. Run tap water throught the filter from the bottom and from the top of the filter. • Keeping the vent hole and water jets clean: Check that the small vent hole (Fig. 1) is clear and unblocked. Make sure there are no water droplets covering the vent hole. Periodically gently push the cleaning pin into the vent hole to dislodge any dust or dirt. To keep the water jets free from any blockage periodically gently push the cleaning pin into the jet holes. • Storage: Unplug the unit from the electrical outlet, empty the water and store in a cool, dry place. Snap the cleaning pin into place on the bottom of the unit (Fig.3). Troubleshooting • If the unit gurgles, spews, or "burps": Check the water level to make sure the unit has enough water to function. • Obtaining a desired water level: Check the water level daily in the first week to measure the rate of evaporation. Refill with water as needed. • If all of the jets are not working there may be some build-up: Push the cleaning pin provided into the jet holes and vent hole (Fig.1) to clear any blockage. If they still aren't working check the water level. Figure 2 Fill Hole Filter Figure 3 Drain Plug Cleaning Pin Bottom Side 5
-
 1
1 -
 2
2 -
 3
3
 |
 |