HoMedics DWS-400 User Manual - Page 3
Setting Alarm Time
 |
View all HoMedics DWS-400 manuals
Add to My Manuals
Save this manual to your list of manuals |
Page 3 highlights
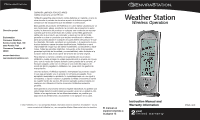
To select between mb/hPa and inHg, hold " P/A- " key for 3 seconds. To view air pressure for the past 12 hours, press the "HIST" button to scroll through the hourly readings. The respective values can only be available after the barometer has recorded the pressure data in the past 12 hours. Push any other button to cancel the "view history" selection. The spectrum bar chart indicates the pressure changes (range from -8 to +8 hPa mb) hourly over the past 12 hours. SETTING THE CLOCK & CALENDAR Hold "SET" button for 3 seconds to enter clock set. 1. Select 12 Hour or 24 Hour Setting - Using the " + , - " buttons located on the back of the home receiver. Press "SET" button to confirm your selection. 2. Select Fahrenheit/Centigrade - Use the " + , - " buttons located on the back of the home receiver to adjust setting. Press "SET" button to confirm your selection. 3. Select Year - Use the " + , - " buttons located on the back of the home receiver to adjust year setting. Press "SET" button to confirm your selection. 4. Select Month - Use the " + , - " buttons located on the back of the home receiver to adjust month setting. Press "SET" button to confirm your selection. 5. Select Day - Use the " + , - " buttons located on the back of the home receiver to adjust day setting. Press "SET" button to confirm your selection. 6. Select Language - Use the " + , - " buttons located on the back of the home receiver to adjust language setting. Press "SET" button to confirm your selection. LANGUAGE GE = German EN = English FR = French IT = Italian 7. Select Hour - Use the " + , - " buttons located on the back of the home receiver to adjust hour setting. Press "SET" button to confirm your selection. 4 8. Select Minute - Use the " + , - " buttons located on the back of the home receiver to adjust minute setting. Press "SET" button to confirm your selection. 9. Select World Time Offset - Use the " + , - " buttons located on the back of the home receiver to adjust "World Time Offset". Press "SET" button to confirm your selection. SETTING ALARM TIME This unit features two alarms (Alarm 1 and Alarm 2). To select one press the "CLEAR/AL" button to scroll through alarm settings, press "+, ". Your selection will be shown on the display. To enter alarm time: 1. Hold the "CLEAR/AL" button for 3 seconds. Press " + , - " to enter the desired Hr/ Min values and press "CLEAR/AL" to confirm setting. 2. To view alarm time - Press "CLEAR/AL" button. Alarm time will display for 5 seconds and then resume to normal clock thereafter. 3. The home receiver will provide either a daily alarm, which lasts for 1 minute or a snooze mode where the alarm will repeat every 10 minutes until manually cleared (see SNOOZE/LIGHT section below). 4. To turn alarm(s) off for extended periods, press "+, " to deselect both Alarm 1 and Alarm 2. SNOOZE/ LIGHT 1. Press the "SNOOZE/ LIGHT" button (Zz/ light icon button) for an extended backlight. 2. In snooze alarm mode, press this button to trigger a repetitive snooze alarm. 3. When normal alarm mode is selected, press any button on the back of the unit to turn off alarm for one day. MAX/ MIN MEMORY SETTINGS 1. Press "MAX/ MIN" button to view the maximum values (In/Outdoor Temp., Humidity, Pressure) for 5 seconds. Press again to view the minimum values. 2. To clear the memory record, press "CLEAR/AL" button while the respective values are displayed on screen. 5
-
 1
1 -
 2
2 -
 3
3 -
 4
4 -
 5
5 -
 6
6 -
 7
7 -
 8
8 -
 9
9 -
10
-
11
-
12
 |
 |