HoMedics SS-5050 Instruction Manual - Page 4
Setting, Clock, Display, Dimmer, Control, Using, Alarms
 |
View all HoMedics SS-5050 manuals
Add to My Manuals
Save this manual to your list of manuals |
Page 4 highlights
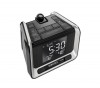
SETTING CLOCK TOME 1. Press and hold (3 seconds) the TIME SET button on back of unit, the hour will begin to flash. 2. Select the hour using the TUNER selector button (or the volume up/down button) to adjust the hour (when in 12 hour mode remember to set correct AM/PM, a "PM" icon will be displayed). 3. Press TIME SET button again to select the minute using the TUNER selector button (or the volume up/down button) to adjust. 4. Press TIME SET button again to select 12/24 hour display, use the TUNER selector button (or the volume up/down button) to select. 5. Press TIME SET button again, now time is set. DISPLAY DIMMER CONTROL Press the SNOOZE/DIM/SLEEP bar to adjust the backlight intensity of LCD. The power needs to be off to use the dimmer control. NOTE: • There are 4 DIM settings: HIGH, MEDIUM, LOW, and OFF. • The Sleep Solutions Projection Clock is equipped with enhanced DIM features when dimmer is in OFF setting: • LCD will illuminate to LOW setting when ALARM first sounds. • Once the clock time reache s 9:00 AM the LCD will illuminate to LOW setting. • To view the display simply hit any button (except power or SNOOZE) and LCD will illuminate to LOW setting for 10 seconds. • Hit SNOOZE/DIM/SLEEP and LCD will illuminate to HIGH setting for 10 seconds SETTING AND USING THE ALARMS SETTING ALARM 1 OR ALARM 2 1. Press and hold (3 seconds) the desired alarm button (ALARM 1 or ALARM 2) located on the top of the unit. 2. Use the TUNER selector button (or the volume up/down button) to adjust the hour, paying attention to the PM indicator (when in 12 hour mode). 3. Repeat steps 1 and 2 to adjust Minute, Source (Beep or Radio) and Maximum Volume of gradual wake (0-16). 4. Press the ALARM button a final time, the alarm is now set. NOTE: The Sleep Solutions Projection clock is equipped with gradual wake, which means that the alarm begins soft and slowly gets louder. This will ensure a non-jarring wake-up. USING THE ALARMS Once an alarm time has been set, press the desired ALARM button (ALARM 1 or ALARM 2) located on the top of the unit to activate the alarm, the ALARM time will display on the LCD. NOTE: If an alarm time is displayed on the LCD, ALARM is active and will sound at selected time. To deactivate press the desired alarm (ALARM 1 or ALARM 2) button. 4
-
 1
1 -
 2
2 -
 3
3 -
 4
4 -
 5
5 -
 6
6 -
 7
7 -
 8
8
 |
 |
