Holmes HCH6150 Product Manual - Page 2
Operating - Instructions, Cleaning And Maintenance, Caracteristicas Y Funcionamiento, Limpieza Y
 |
View all Holmes HCH6150 manuals
Add to My Manuals
Save this manual to your list of manuals |
Page 2 highlights
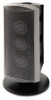
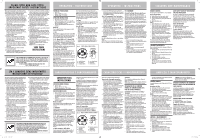
PLEASE READ AND SAVE THESE IMPORTANT SAFETY INSTRUCTIONS When using electrical appliances, basic safety precautions should always be followed to reduce the risk of fire, electric shock, and injury to persons, including the following: 1. Read all instructions before using this heater. 2. This heater is hot when in use. To avoid burns, do not let bare skin touch hot surfaces. If provided, use handles when moving this heater. Keep combustible materials, such as furniture, pillows, bedding, papers, clothes, and curtains at least 3 feet (0.9 m) from the front of the heater and keep them away from the sides and rear. 3. Extreme caution is necessary when any heater is used by or near children or invalids and whenever the heater is left operating and unattended. 4. Always unplug heater when not in use. 5. Do not operate any heater with a damaged cord or plug or after the heater malfunctions, has been dropped or damaged in any manner. Discard heater, or return to authorized service facility for examination and/or repair. 6. Do not use outdoors. 7. This heater is not intended for use in bathrooms, laundry areas and similar indoor locations. Never locate heater where it may fall into a bathtub or other water container. 8. Do not run cord under carpeting. Do not cover cord with throw rugs, runners, or similar coverings. Do not route cord under furniture or appliances. Arrange cord away from traffic area and where it will not be tripped over. 9. To disconnect heater, turn controls to off, then remove plug from outlet. 10. Do not insert or allow foreign objects to enter any ventilation or exhaust opening as this may cause an electric shock or fire, or damage the heater. 11. To prevent a possible fire, do not block air intakes or exhaust in any manner. Do not use on soft surfaces, like a bed, where openings may become blocked. 12. A heater has hot and arcing or sparking parts inside. Do not use it in areas where gasoline, paint, or flammable liquids are used or stored. 13. Use this heater only as described in this manual. Any other use not recommended by the manufacturer may cause fire, electric shock, or injury to persons. 14. Always plug heaters directly into a wall outlet/ receptacle. Never use with an extension cord or relocatable power tap (outlet/power strip). 15. When unplugging, be sure to pull by the plug and not the cord. 16. If the heater will not operate, see specific instructions on Auto Safety Shut-off. 17. DO NOT attempt to repair or adjust any electrical or mechanical functions on this unit. Doing so will void your warranty. The inside of the unit contains no user serviceable parts. All servicing should be performed by qualified personnel only. 18. Discontinue use if plug or outlet is hot. It is recommended that the outlet be replaced if plug or outlet is hot to touch. 19. The heater must not be located immediately below a socket-outlet. Do not use this heater in the immediate surroundings of a bath, a shower or a swimming pool. NOTE: This unit is for FLOOR USE ONLY. SAVE THESE INSTRUCTIONS THIS APPLIANCE HAS A POLARIZED PLUG (one blade is wider than the other). To reduce the risk of electric shock, this plug is intended to fit in a polarized outlet only one way. If the plug does not fit fully in the outlet, reverse the plug. If it still does not fit, contact a qualified electrician to install the proper outlet. DO NOT ATTEMPT TO MODIFY THIS PLUG OR DEFEAT THIS SAFETY FEATURE IN ANY WAY. OPERATING - INSTRUCTIONS TECHNICAL SPECIFICATIONS • Amps: 12.5 • Wattage: 1500W (+5% -10%) • Working voltage: 120V AC/60Hz OPERATING INSTRUCTIONS • Place heater on firm level surface. • Avoid overloading your circuit by not using other high wattage appliances in the same outlet. At 1500 Watts, this unit draws 12.5 Amps. • The power light will illuminate when the heater is turned on. Mode/On Press the Mode/On button in below sequence to select your precise comfort level: 1. OFF When the heater is plugged in, the heater is at OFF Mode without heat output. The room temperature will appear on the LCD Display. Power Light will not illuminate until you press Mode/On button to turn on the heater. 2. HI - Manual HIGH or LO - Manual LOW Press the Mode/On Button to set the heater at HI setting, the heater will run continuously at HIGH setting. Press the Down Button " - " to turn the heater to LOW setting. The heater will then run continuously at reduced wattage. NOTE: In Manual Mode, only the room temperature will be displayed (ranging from 30-99 °F). 3. Auto Mode - HIGH/LOW Press the Mode/On button again will set the heater to run at Auto Mode. Use Up and Down Buttons to set your desired temperature ranging from 55 °F to 85 °F. The LCD Display will show both the room temperature and the preset temperature. The heater will then increase heat blows until the room has reached your preset temperature. NOTE: Please make sure the set temperature is higher than the current room temperature. NOTE: It is normal for the heater to cycle On and Off as it maintain the preset temperature. To prevent the unit form cycling, you need to raise the thermostat setting. When the preset temperature is reached, the fan will run for 25 seconds without heat. This cool down process ensures an accurate and consistent temperature reading. NOTE: Digital thermostat has memory, it will remember the previous temperature setting after the unit has been turned off. However, if the unit is unplugged, the digital thermostat will be reset and will no longer remember the previous temperature setting. Set Timer The Digital Thermostat allows user to program the heater to turn ON at a preset time or turn OFF after a set amount of time: Auto Off Timer: 1. While your heater is in the ON mode, press the Timer Button and the numbers will start flashing on the right of the display. pressing the Up and Down Buttons to go from 0-24 to set the number of hours you want your heater to run before shutting off. 2. Two seconds after releasing the Timer Button, the LCD will return to the previous setting and a small clock will appear to indicate the timer is set. 3. If the Timer Button is pressed while the heater is running, the time remaining is shown and can be changed by pressing the Up and Down Buttons Figure 1 CONTROL PANEL & REMOTE CONTROL C A A D DB B C E F A. Mode/On Button B. Timer Button C. Oscillation Button D. Up & Down Buttons E. LCD Display F. Remote Sensor OPERATING - INSTRUCTIONS 4. You can turn off the timer by pressing the Timer Button back to zero, let the heater run to the end of the programmed period or by turning the heater OFF using the Mode/On Button. Auto On Programmable Timer Instructions: 1. When your heater is OFF, press the Timer Button and the numbers will start flashing on the right of the display. Press the Up and Down Buttons to go from 0-24 to set the number of hours that you want your heater to turn On. 2. At the specified time, the heater will turn on to an automatic setting of Auto High at 75 °F and will remain on for 2 hours. 3. When the heater turns On, the power light will appear and a small clock will appear on the display to signal the timer is activated. 4. You can turn off the timer by pressing the Timer Button back to zero, let the heater run to the end of the programmed period or by pressing the Mode/On Button before the timer runs out. Oscillation Press the Oscillation Button to activate or stop oscillation feature. NOTE: Please do not manually turn the heater on the base; it is designed to turn only by motorized oscillation. FCC STATEMENT Potential for Radio/Television interference This device complies with Part 15 of the FCC Rules. Operation is subject to the following two conditions: (1) This device may not cause harmful interference, and (2) this device must accept any interference received, including interference that may cause undesired operation. This product has been tested and found to comply with the limits for a Class B digital device, pursuant to part 15 of the FCC rules. These limits are designed to provide reasonable protection against harmful interference in a residential installation. The product generates, uses, and can radiate radio frequency energy and, if not installed and used in accordance with the instructions, may cause harmful interference to radio communications. However, there is no guarantee that the interference will not occur in a particular installation. If the product does cause harmful interference to radio or television reception, which can be determined by turning the product on or off, the user is encouraged to try to correct the interference by one or more of the following measures: • Reorient or relocate the receiving antenna. • Increase the separation between the product and the receiver. • Connect the product into an outlet on a circuit different from that to which the receiver is connected. • Consult the dealer or an experienced radio/TV technician for help. • Changes or modifications not expressly approved by the party responsible for compliance could void the user's authority to operate the equipment. CLEANING AND MAINTENANCE REMOTE CONTROL This unit requires two (2) AAA batteries, 1.5v (not included). Battery Replacement a) Remove battery cover from remote control. b) Remove batteries from the remote control. c) Insert two new batteries, pressing them firmly into their slot. d) Replace the battery cover. NOTES: • Replace all batteries of a set at the same time. • Being careful not to bend or damage the contact spring, clean the battery contacts and the devices' contacts prior to installing the batteries. • Remove the batteries from the equipment when it is not being used for an extended period of time. • Remove the used batteries promptly. • Do not mix old and new batteries. Do not mix alkaline, standard, (carbon-zinc), or rechargeable batteries. • Do not discard used batteries into household trash containers. Contact your local governments for disposal or recycling practices in your area. The remote control for this unit has the capability of operating all control panel functions. Please note this remote control will not work through walls. AUTO SAFETY SHUT-OFF WITH INSTANT TIP OVER PROTECTION This heater is equipped with a patented, technologicallyadvanced safety system that requires the user to reset the heater if there is a potential overheat situation. When a potential overheat temperature is reached, the system will automatically shut the heater off. It can only resume operation when the user resets the unit. For specific reset instructions please refer to the unit. RESET INSTRUCTIONS If your heater shuts down: 1) Unplug the unit and wait 30 minutes. 2) Plug in and operate normally. Tip Over Shut-Off: When the unit is accidentally knocked over, it will instantly shut off. The unit may also shut off if it is moved or bumped. To reset, simply place the heater in an upright position and it will operate normally. NOTE: If unit does not turn on when placed in the upright position, press the mode button once and heater will resume operation. CLEANING/MAINTENANCE Always unplug the heater before cleaning and allow the heater to cool down. 1. Clean the unit with a soft cloth moistened with a mild soap solution. 2. NEVER use abrasive or flammable solvents to clean the unit. 3. After cleaning, be sure to completely dry the unit with a cloth or towel. 4. Store heater in a cool, dry location. 5. It is recommended that you store the unit in its original carton. TIP: Over time, dust may accumulate on the front grills. This can be removed by wiping the unit with a damp cloth. LEA Y CONSERVE ESTAS IMPORTANTES INSTRUCCIONES DE SEGURIDAD Para reducir el riesgo de incendios, descargas eléctricas y lesiones personales al utilizar electrodomésticos, siga siempre las precauciones básicas de seguridad, incluyendo las que se mencionan a continuación: 1. Lea todas las instrucciones antes de usar este calefactor. 2. El calentador se calienta al usarlo. Para evitar quemaduras, NO toque las superficies calientes con la piel. Si existen, utilice las manijas para mover la unidad. Mantenga los materiales combustibles, como muebles, almohadones, sábanas, papeles, ropa y cortinas a por lo menos 3 pies (0,9m) de la parte delantera del calefactor y manténgalos alejados de los costados y de la parte de atrás. 3. Debe tener mucho cuidado cuando el calefactor es utilizado por, o cerca de niños o inválidos, y siempre que se deje el calefactor prendido y desatendido. 4. Siempre desenchufe el calefactor cuando no lo utilice. 5. NO utilice el calefactor si el cable o el enchufe están dañados o luego de una falla, se haya caído o haya sufrido cualquier tipo de daño. Deseche el calefactor o devuélvalo al centro de servicio autorizado para su revisión y/o reparación. 6. NO utilizar en el exterior. 7. Este calefactor no está diseñado para ser utilizado en baños, lavaderos y zonas similares de interiores. NUNCA coloque el calefactor donde pueda caerse dentro de una bañera u otro recipiente con agua. 8. No coloque el cable debajo de la alfombra. No cubra el cable con alfombras, tapetes o artículos similares. No pase el cable por debajo de muebles o electrodomésticos. Coloque el cable lejos del área de tráfico y donde no se tropiece con él. 9. Para desconectarlo, gire el control a la posición OFF, luego quite el enchufe del tomacorriente. 10. No inserte ni permita que objetos extraños penetren en la ventilación o salida de aire ya que esto puede causar un choque eléctrico o incendio, o dañar el calefactor. 11. Para evitar un posible incendio, no bloquee las entradas de aire o escape de ninguna manera. No lo use en superficies blandas, como una cama, donde las aberturas se pueden bloquear. 12. Un calefactor tiene partes calientes y que pueden producir chispas en su interior. NO lo utilice en áreas donde se utiliza o se guarda gasolina, pintura o líquidos inflamables. 13. Utilice este calefactor sólo como se describe en este manual. Cualquier otro uso no recomendado por el fabricante puede provocar incendios, descargas eléctricas o lesiones a personas. 14. Siempre conecte el calefactor directamente a un tomacorriente de pared. Nunca lo use con un cable de extensión o con un tomacorriente múltiple. 15. Al desenchufarlo, asegúrese de tirar del enchufe y no del cable. 16. Si el calefactor no funciona, vea las instrucciones específicas del apagado automático de seguridad. 17. NO intente reparar o ajustar ninguna función eléctrica o mecánica de esta unidad. El hacerlo invalidará la garantía. La unidad no contiene partes reparables por el usuario. Toda reparación debe ser realizada únicamente por personal calificado. 18. Deje de usarlo si el cable o el enchufe se calienta. Se recomienda que reemplace el tomacorriente si el enchufe o el tomacorriente se calienta. 19. El calefactor no se debe localizar inmediatamente debajo de un tomacorriente. No use este calefactor en áreas cercanas a un baño, una ducha o una piscina. NOTA: Esta unidad es para uso en el suelo solamente. ESTE PRODUCTO TIENE UN ENCHUFE POLARIZADO (una hoja es más ancha que la otra). A fin de disminuir el riesgo de descarga eléctrica, este enchufe está diseñado para insertarse en un tomacorriente polarizado en un solo sentido. Si el enchufe no entra completamente en el tomacorriente, inviértalo. Si aun así no entra, llame a un electricista calificado para instalar un tomacorriente apropiado. NO MODIFIQUE EL ENCHUFE NI ANULE ESTA FUNCION DE SEGURIDAD DE NINGUNA MANERA. CARACTERISTICAS Y FUNCIONAMIENTO CONSERVE ESTAS INSTRUCCIONES ESPECIFICACIONES TÉCNICAS • Amperios: 12,5 • Potencia: 1500 W (+5% -10%) • Voltaje de funcionamiento: 120V CA/60Hz INSTRUCCIONES DE USO • Coloque el calefactor en una superficie plana y firme. • Evite sobrecargar el circuito. Para ello, no utilice otros aparatos de mayor potencia en la misma toma de corriente. A 1500 vatios, esta unidad utiliza 12,5 amperios. • El indicador de alimentación se encenderá cuando el calefactor se encienda. Modo/encendido Para seleccionar el nivel de comodidad deseado, pulse el botón de modo/encendido siguiendo la siguiente secuencia: 1. APAGADO Cuando el calefactor está enchufado, se encuentra en modo APAGADO y no emite calor. La temperatura ambiente se mostrará en la pantalla LCD. El indicador de alimentación no se encenderá hasta que presione el botón de modo/encendido para encender el calefactor. 2. HI - ALTO manual o LO - BAJO manual Pulse el botón de modo/encendido para seleccionar la configuración HI; el calefactor funcionará continuamente en ALTO. Pulse el botón de Aumento y Disminución para configurar el calefactor en BAJO. El calefactor funcionará continuamente en un voltaje reducido. NOTA: En el modo Manual, sólo se mostrará la temperatura ambiente (entre los -1 y 37 °C [30 y 99 °F]). 3. Modo automático: ALTO/BAJO Si pulsa nuevamente el botón de modo/encendido, el calefactor funcionará en modo automático. Utilice los botones de Aumento y Disminución para establecer la temperatura deseada entre los 12 °C y 29 °C (55 °F y 85 °F). La pantalla LCD mostrará la temperatura ambiente y la temperatura preestablecida. El calefactor aumentará el calor hasta que la habitación alcance la temperatura preestablecida. NOTA: Asegúrese de que la temperatura establecida sea superior a la temperatura ambiente. NOTA: Es normal que el calefactor se encienda y se apague para mantener la temperatura preestablecida. Para evitar que la unidad se encienda y se apague periódicamente, debe subir el nivel del termostato. Cuando se alcance la temperatura establecida previamente, el ventilador funcionará durante 25 segundos sin emitir calor. Con este proceso de enfriamiento se garantiza una lectura precisa y constante de la temperatura. NOTA: El termostato digital tiene memoria: recordará el nivel de temperatura anterior después de que la unidad se haya apagado. Sin embargo, si la unidad se desenchufa, el termostato digital se restablecerá y ya no recordará el nivel de temperatura anterior. Ajuste del temporizador El termostato digital permite al usuario programar el calefactor para que se ENCIENDA a una hora previamente determinada o para que se APAGUE Figura 1 PANEL DE CONTROL Y MANDO A DISTANCIA C A A D DB B C E F A. Botón de modo/ encendido B. Botón del temporizador C. Botón de oscilación D. Botón de aumento y disminución E. Pantalla LCD F. Sensor remoto CARACTERISTICAS Y FUNCIONAMIENTO después de un período de tiempo determinado: Temporizador de apagado automático: 1. Mientras el calefactor está en modo ENCENDIDO, pulse el botón del temporizador y los números comenzarán a aparecer en la parte derecha de la pantalla. Pulse los botones de Aumento y Disminución para desplazarse de 0 a 24 y establecer la cantidad de horas que desea que el calefactor funcione antes de apagarse. 2. Dos segundos después de soltar el botón del temporizador, la pantalla LCD mostrará la configuración anterior y aparecerá un reloj pequeño para indicar que se configuró el temporizador. 3. Si se presiona el botón del temporizador mientras el calefactor está en funcionamiento, se muestra el tiempo restante y se lo puede cambiar al pulsar los botones de Aumento y Disminución 4. Para apagar el temporizador, puede pulsar el botón del temporizador y volverlo a cero, dejar que el calefactor finalice el período programado o apagar el calefactor con el botón de modo/encendido. Instrucciones para el encendido automático del temporizador programable: 1. Cuando el calefactor está APAGADO, pulse el botón del temporizador y los números comenzarán a aparecer en la parte derecha de la pantalla. Pulse los botones de Aumento y Disminución para desplazarse de 0 a 24 y establecer la cantidad de horas que desea que pasen para que el calefactor se encienda. 2. En el momento especificado, el calefactor se encenderá en modo Alto automático a 24 °C (75 °F) y permanecerá encendido durante 2 horas. 3. Cuando el calefactor se enciende, en la pantalla aparecerán el indicador de alimentación y un reloj pequeño para indicar que el temporizador está activado. 4. Para apagar el temporizador, puede pulsar el botón del temporizador y volverlo a cero, dejar que el calefactor finalice el período programado o pulsar el botón Modo/encendido antes de que termine el período programado. Oscilación Pulse el botón de oscilación para activar o detener la función de oscilación. NOTA: No gire manualmente el calefactor sobre la base, está diseñado para girar sólo con oscilación mecánica. DECLARACIÓN DE LA COMISIÓN FEDERAL DE COMUNICACIONES (FCC POR SUS SIGLAS EN INGLÉS) Posibilidad de interferencias con Radio/ Televisión Este equipo cumple con la Parte 15 de las Normas de la FCC. Su funcionamiento está sujeto a las siguientes dos condiciones: (1) Este equipo no puede causar interferencia perjudicial y (2) este equipo debe aceptar toda interferencia recibida, inclusive interferencia que pueda causar un funcionamiento no deseado. Este producto ha sido probado y se determinó que cumple con los límites para un dispositivo digital Clase B, según la parte 15 del reglamento de la FCC. Estos límites están diseñados para brindar protección razonable contra interferencias nocivas en una instalación residencial. El producto genera, usa y puede irradiar energía de radiofrecuencia, y si no se lo instala y se lo usa según las instrucciones, puede causar interferencias adversas en las comunicaciones radiales. Sin embargo, no hay garantía de que la interferencia no ocurra en una instalación en particular. Si el producto causa interferencias nocivas en la recepción de radio o televisión, lo cual se puede determinar apagando y encendiendo el producto, se recomienda al usuario que intente corregir la interferencia por medio de una de los siguientes métodos: • Reorientar o reubicar la antena receptora. • Aumentar la separación entre el producto y el receptor. • Conectar el producto a una salida en un circuito diferente de aquella a la cual está conectado el receptor. • Pedir ayuda al distribuidor o a un técnico de radio/ TV idóneo. • Todo cambio o modificación que no haya sido expresamente autorizado por la parte responsable LIMPIEZA Y MANTENIMIENTO de exigir el cumplimiento podría anular la autoridad del usuario para usar el equipo. CONTROL REMOTO Esta unidad funciona con dos (2) pilas AAA de 1.5 V (no incluidas). Reemplazo De Pilas a) Quite la tapa de las baterías del control remoto. b) Quite las baterías del control remoto. c) Inserte dos nuevas pilas y presiónelas firmemente hacia adentro de la cavidad. d) Vuelva a colocar la cubierta de las pilas. NOTAS: • Reemplace todas las pilas al mismo tiempo. • Con cuidado de no doblar ni dañar el resorte de contacto, limpie los contactos de la batería y los contactos de los dispositivos antes de instalar las baterías. • Quite las pilas del equipo cuando no lo vaya a usar por un período de tiempo prolongado. • Reemplace las pilas que estén agotadas. • No mezcle pilas nuevas y viejas. No mezcle pilas alcalinas, comunes (carbón-zinc) o recargables. • No deseche las pilas usadas en contenedores de basura de la casa. Comuníquese con el gobierno local para informarse sobre las prácticas de reciclaje o de desecho de su zona. El control remoto de esta unidad puede operar todas las funciones del panel de control. Tenga en cuenta que este control remoto no funciona a través de paredes. *CONSEJO: Con el transcurso del tiempo se acumulará polvo en las rejillas delanteras que puede eliminarse con un paño húmedo. APAGADO AUTOMATICO DE SEGURIDAD INCLUYE PROTECCIÓN INSTANTÁNEA EN CASO VUELCOS Esta estufa está equipada con un sistema de seguridad tecnológicamente avanzado y patentado que requiere que el usuario la reactive si se produce un recalentamiento. Si la unidad se recalienta, el sistema la apagará automáticamente y sólo podrá volver a funcionar si el usuario la reactiva manualmente. Para obtener instrucciones específicas de restablecimiento, remítase a la unidad. INSTRUCCIONES VOLVER A ENCENDER Si la unidad se apaga: 1) Desenchufe la unidad y espere 30 minutos. 2) Enchufela y vuélvala a operar normalmente. Apagado de inclinación: Cuando la unidad se cae accidentalmente, se apaga instantáneamente. También es posible que la unidad se apague si se mueve o se golpea. Para restablecer la unidad, simplemente coloque el calefactor en posición vertical y éste funcionará normalmente. NOTA: Si la unidad no se enciende al ubicarla en posición vertical, pulse el botón de Modo una sola vez y el calefactor volverá a funcionar. LIMPIEZA / MANTENIMIENTO Siempre desenchufe el calefactor y deje que se enfríe antes de limpiarlo. 1. Limpie la unidad con un paño suave, humedecido en una solución de jabón suave. 2. NUNCA utilice solventes abrasivos o inflamables para limpiar la unidad. 3. Luego de limpiarla, asegúrese de secar completamente la unidad con un trapo o toalla. 4. Guarde el calefactor en un lugar fresco y seco. 5. Se recomienda guardar la unidad en su embalaje original. HCH6150_11ESM1.indd 2 1/17/11 9:59 AM
-
 1
1 -
 2
2
 |
 |
