Homelite HGCA3000 User Manual - Page 18
Caution, Starting The Engine, Stopping The Engine, Understanding The Digital Display, Moving
 |
View all Homelite HGCA3000 manuals
Add to My Manuals
Save this manual to your list of manuals |
Page 18 highlights
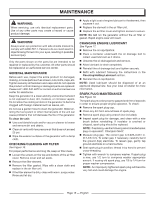
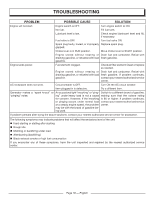
OPERATION CAUTION: On a level surface with the engine off, check the lubricant level before each use of the generator. STARTING THE ENGINE See Figures 12 - 14. NOTE: If location of generator is not level, the unit may not start or may shut down during operation. Unplug all loads from the generator. Turn the fuel valve to the ON position. Move the choke lever right to the START position. NOTE: If engine is warm or the temperature is above 50˚F, move the choke lever left to the RUN position. Put the engine switch in the ON ( I ) position. Pull the recoil starting grip until the engine runs (a maximum of 6 times). NOTE: Do not allow the grip to snap back after starting; return it gently to its original place. Allow the engine to run for 30 seconds, then move the choke lever left to the RUN position. STOPPING THE ENGINE See Figures 12 - 13. To stop the engine under normal operating conditions: Remove any load from the generator. Turn the fuel valve to the OFF position. Put the engine switch in the OFF ( O ) position. To stop the engine in an emergency situation: Put the engine switch in the OFF ( O ) position. UNDERSTANDING THE DIGITAL DISPLAY See Figure 15. The digital display shows AC voltage output, frequency, and the total number of hours used. To cycle through these displays, depress the select button. The indicators below the digital display will light in sequence to show which type of information is being displayed. Hour meter: The hour meter keeps track of how many hours the unit has been used. If an alarm condition exists, the button associated with the alarm will blink. AC voltage: The AC voltage indicator will blink when the output voltage exceeds the rated voltage more than 10%. The light will stop blinking when the voltage returns to within the 10% range. Frequency: The frequency indicator will blink when the rated frequency is more than 5%. Once the frequency has returned to within the 5% range, the indicator will stop blinking. Low engine lubricant: The low engine lubricant light will blink and the engine will automatically shut off whenever the lubricant level in the engine becomes low. The engine may not be restarted until sufficient engine oil as been added to the generator. NOTE: It is normal for the indicator lights to illuminate and/ or blink each time the engine is started. Once the engine warms up, the lights should default to the pattern above. MOVING THE GENERATOR Turn the engine switch OFF ( O ). Disconnect any equipment that is plugged into the generator. Turn the fuel valve to the OFF position. Allow 30 minutes of "cool down" time before storing the machine. For security, insert the pin to secure the handle before transporting. Tilt the machine away from you until it balances on the wheels, then roll the machine to the desired location. Page 14 - English
-
 1
1 -
2
-
3
-
4
-
5
-
6
-
7
-
8
-
9
-
10
-
11
-
12
-
 13
13 -
 14
14 -
 15
15 -
 16
16 -
 17
17 -
 18
18 -
 19
19 -
 20
20 -
 21
21 -
 22
22 -
 23
23 -
24
-
25
-
26
-
27
-
28
-
29
-
30
-
31
-
32
-
33
-
34
-
35
-
36
-
37
-
38
-
39
-
40
-
41
-
42
-
43
-
44
-
45
-
46
-
47
-
48
-
49
-
50
-
51
-
52
-
53
-
54
-
55
-
56
-
57
-
58
-
59
-
60
-
61
-
62
-
63
-
64
 |
 |
