Homelite UT43103 User Manual - Page 14
Operation
 |
View all Homelite UT43103 manuals
Add to My Manuals
Save this manual to your list of manuals |
Page 14 highlights
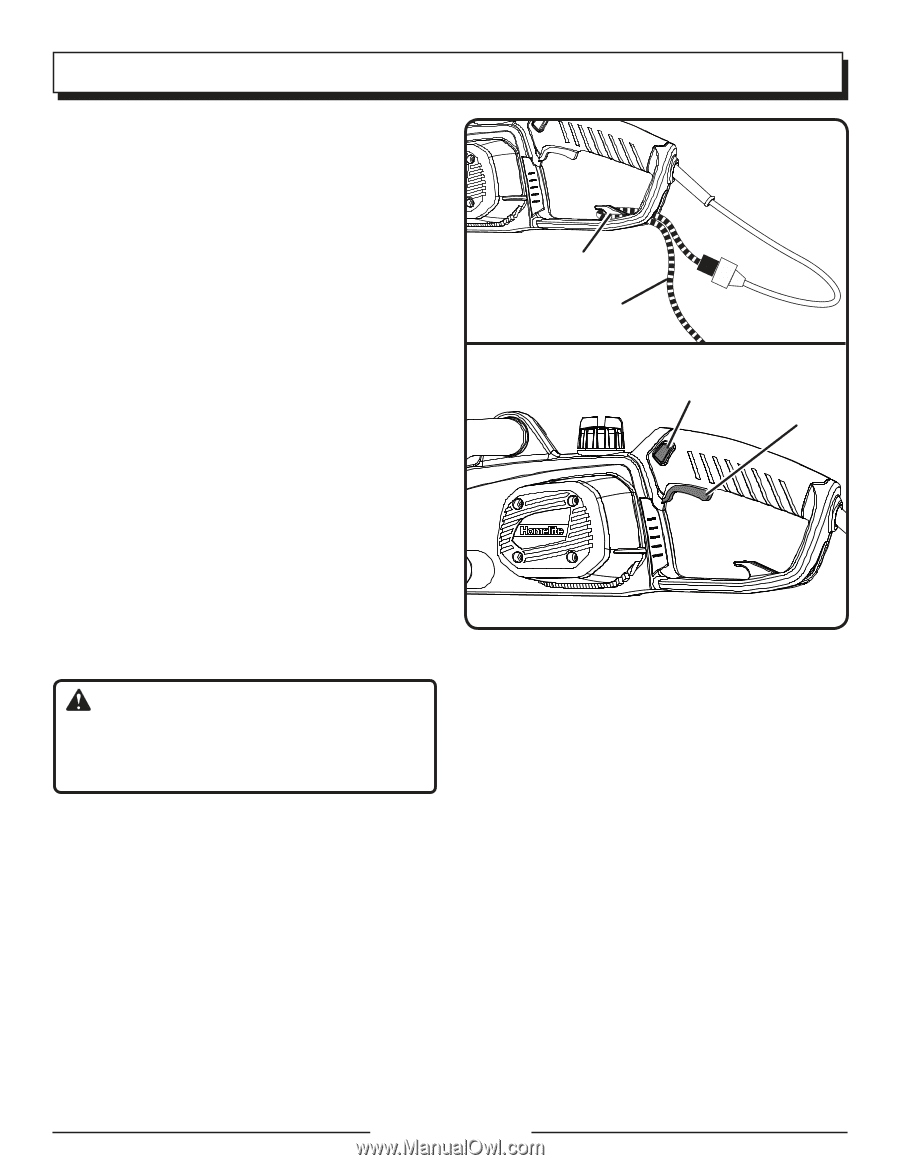
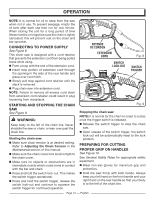
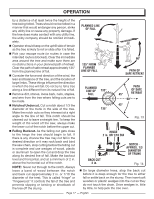
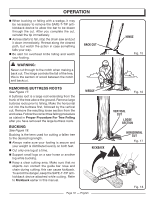
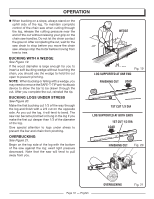
OPERATION NOTE: It is normal for oil to seep from the saw when not in use. To prevent seepage, empty the oil tank after each use then run for one minute. When storing the unit for a long period of time (three months or longer) be sure the chain is lightly lubricated; this will prevent rust on the chain and bar sprocket. CONNECTING TO POWER SUPPLY See Figure 8 This chain saw is designed with a cord retainer that prevents the extension cord from being pulled loose while using. n Form a loop with the end of the extension cord. n Insert loop portion of extension cord through the opening in the side of the rear handle and place over cord hitch. n Slowly pull loop against cord retainer until the slack is removed. n Plug chain saw into extension cord. NOTE: Failure to remove all excess cord slack from extension cord retainer could result in plug loosening from receptacle. STARTING AND STOPPING THE CHAIN SAW See Figure 9. WARNING: Keep body to the left of the chain line. Never straddle the saw or chain, or lean over past the chain line. Starting the chain saw: n Make sure chain tension is at desired setting. Refer to Adjusting the Chain Tension in the Maintenance section of this manual. n Make sure the chain cover lock knob is tight to the chain cover. n Make sure no objects or obstructions are in immediate vicinity which could come in contact with the bar and chain. n Press and hold the switch lock-out. This makes the switch trigger operational. n Press and hold the switch trigger, release the switch lock-out and continue to squeeze the switch trigger for continued operation. RETENUE DE CORDON EXTENSION CORD Fig. 8 SWITCH LOCK-OUT SWITCH TRIGGER Fig. 9 Stopping the chain saw: NOTE: It is normal for the chain to coast to a stop once the trigger switch is released. n Release the switch trigger to stop the chain saw. n Upon release of the switch trigger, the switch lock-out will be automatically reset to the lock position. PREPARING FOR CUTTING PROPER GRIP ON HANDLES See Figure 10. See General Safety Rules for appropriate safety equipment. n Wear non-slip gloves for maximum grip and protection. n Hold the saw firmly with both hands. Always keep your left hand on the front handle and your right hand on the rear handle so that your body is to the left of the chain line. Page 14 - English
-
 1
1 -
2
-
3
-
4
-
5
-
6
-
7
-
8
-
 9
9 -
 10
10 -
 11
11 -
 12
12 -
 13
13 -
 14
14 -
 15
15 -
 16
16 -
 17
17 -
 18
18 -
 19
19 -
20
-
21
-
22
-
23
-
24
-
25
-
26
-
27
-
28
-
29
-
30
-
31
-
32
-
33
-
34
-
35
-
36
-
37
-
38
-
39
-
40
-
41
-
42
-
43
-
44
-
45
-
46
-
47
-
48
-
49
-
50
-
51
-
52
-
53
-
54
-
55
-
56
-
57
-
58
-
59
-
60
-
61
-
62
-
63
-
64
-
65
-
66
-
67
-
68
-
69
-
70
-
71
-
72
-
73
-
74
-
75
-
76
-
77
-
78
-
79
-
80
-
81
-
82
-
83
-
84
-
85
-
86
-
87
-
88
-
89
-
90
-
91
-
92
 |
 |