Honeywell 18155 Owners Guide - Page 5
Removing/Changing the Filters - pre filter
 |
UPC - 073502505953
View all Honeywell 18155 manuals
Add to My Manuals
Save this manual to your list of manuals |
Page 5 highlights
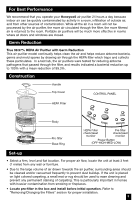
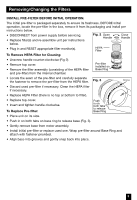
Removing/Changing the Filters INSTALL PRE-FILTER BEFORE INITIAL OPERATION. The initial pre-filter is packaged separately to ensure its freshness. BEFORE initial operation, locate the pre-filter in the box, remove it from its packaging and install per instructions below. • DISCONNECT from power supply before servicing. • Replace filter(s) and re-assemble unit per instructions Fig. 2 Open Handle Close Handle below. • Plug in and RESET appropriate filter monitor(s). HEPA Filter To Remove HEPA Filter for Cleaning: • Unscrew handle counter-clockwise (Fig 2). • Remove top cover. • Remove the filter assembly (consisting of the HEPA filter and pre-filter) from the internal chamber. HIGH HEPA FILTER MED POWER LOW PREFILTER Pre-filter installed on Base Ring • Locate the seam of the pre-filter and carefully separate the fastener to remove the pre-filter from the HEPA filter. Fig. 3 Groove • Discard used pre-filter if necessary. Clean the HEPA filter if necessary. • Replace HEPA Filter (there is no top or bottom to filter). • Replace top cover. • Insert and tighten handle clockwise. To Replace Pre-filter: Push in on both tabs to release Base Ring • Place unit on its side. • Push in on both tabs on base ring to release base (Fig. 3). • Gently remove base from motor assembly. • Install initial pre-filter or replace used one. Wrap pre-filter around Base Ring and attach with fastener provided. • Align base into grooves and gently snap back into place. 5
-
 1
1 -
 2
2 -
 3
3 -
 4
4 -
 5
5 -
 6
6 -
 7
7 -
 8
8
 |
 |
