Honeywell RPWL800A1002/W Owner's Manual - Page 2
Contents - w pages
 |
UPC - 085267334310
View all Honeywell RPWL800A1002/W manuals
Add to My Manuals
Save this manual to your list of manuals |
Page 2 highlights
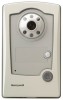
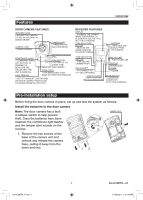
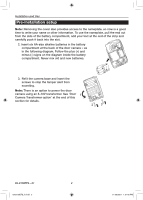
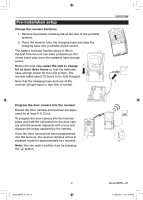
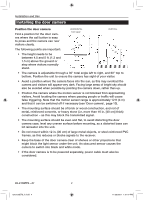
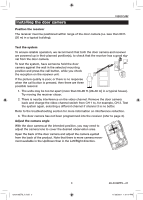
Contents Features 1 The VisioCam system ii Checking Pack Contents ii Setting up 2 Pre-installation Setup 2 Installing the Door Camera 4 Door Camera TransformerOption 7 Installing the receiver 8 Receiver Operation 8 Door Camera 10 Expanding Your System 11 Maintenance and Use 12 Care and Maintenance 12 Replacing the Receiver Batteries 12 Troubleshooting 13 Specifications 15 Declaration 16 Disposal and Recycling 16 Guarantee 16 Thank you for choosing this Honeywell product. Please carry out the following the instructions to ensure correct installation and use, and keep these notes in a safe place for future reference. Before you mount the door camera or receiver in a permanent place, make sure that you have tested the two units and that the system works in the location you have chosen! (See 'Setting up', beginning on the next page.) THE VISIOCAM SYSTEM Your Honeywell wireless video entry system uses radio signals to transmit a video picture of the caller from the door camera to the receiver. The system is expandable, so you can install additional surveillance cameras, or a second door camera if required. CHECKING PACK CONTENTS The following items are included in the pack: Chime Kit • Door camera transmitter unit • Receiver unit with LCD display • Receiver charging base • RCA connection lead • Six No. 8 screws for wall mounting • Six wall plugs You will need: • 6 x AA alkaline batteries for the door camera • A No. 2 Phillips screwdriver • A 1/4-in. (6 mm) dia. masonry drill • A large flat-bladed screwdriver Camera Only • Door camera transmitter unit • Four No. 8 screws and plugs for wall mounting 69-2108EFS-01 ii 69-2108EFS_A.indd 2 11/30/2007 1:51:44 PM
-
 1
1 -
 2
2 -
 3
3 -
 4
4 -
 5
5 -
 6
6 -
 7
7 -
 8
8 -
9
-
10
-
11
-
12
-
13
-
14
-
15
-
16
-
17
-
18
-
19
-
20
-
21
-
22
-
23
-
24
-
25
-
26
-
27
-
28
-
29
-
30
-
31
-
32
-
33
-
34
-
35
-
36
-
37
-
38
-
39
-
40
-
41
-
42
-
43
-
44
-
45
-
46
-
47
-
48
-
49
-
50
-
51
-
52
-
53
-
54
-
55
-
56
 |
 |