Honeywell RTH230B Owner's Manual - Page 3
Configuration Menu, Programming - thermostat manuals
 |
UPC - 085267263450
View all Honeywell RTH230B manuals
Add to My Manuals
Save this manual to your list of manuals |
Page 3 highlights
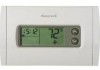
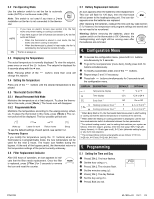
3.2 Fan Operating Mode Use the selector switch to set the fan to automatic mode (AUTO) or continuous mode (ON). Note: This switch is not used if you have a 2-wire installation as the fan is not connected to the thermostat. • If you have an electric furnace (see section 2.4), the fan works only when heating or cooling is activated. • If you have a gas or fuel oil furnace (see section 2.4), the fan AUTO works as follows: • When the thermostat is placed in cool mode, the fan works only when cooling is activated. • When the thermostat is placed in heat mode, the fan is controlled by the furnace fan control circuitry. ON The fan is always on. 3.3 Displaying the Temperature The actual temperature is normally displayed. To view the setpoint, press once on one of the buttons. The setpoint is displayed for 5 seconds along with the icon. Note: Pressing either of the change the setpoint. buttons more than once will 3.4 Setting the Temperature Press one of the played. buttons until the desired temperature is dis- 3.5 Thermostat Control Mode 3.5.1 Manual/Permanent Hold Mode Maintains the temperature at a fixed setpoint. To place the thermostat in this mode, press [ Mode ]. The house icon will disappear. 3.5.2 Programmable Mode Maintains the temperature according to the energy-saving schedule. To place the thermostat in this mode, press [ Mode ]. The current period will be displayed. The four possible periods are: Wake up Leave for work Return home Sleep To see the default settings of each period, see section 5.2. Temporary Bypass If you modify the temperature (using the buttons) when the thermostat is in programmable mode, the new temperature will be used for the next 2 hours. The house icon flashes during the bypass. At the end of the bypass period, the thermostat returns to the temperature settings of the period currently underway. 3.6 Filter Replacement Indicator After 500 hours of operation, an icon appears to indicate that the filter needs replacement. Once the filter is replaced, press [ Filter ] for 3 seconds to remove the icon and reset the counter. 3.7 Battery Replacement Indicator An icon appears when the batteries need replacement. This icon will flash for 120 days, then the thermostat will cut power to the heating/cooling unit. The icon disappears once the batteries are replaced. After replacing the batteries, readjust the time and day (see section 5.1). However, the temperature and program settings are saved and do not need to be re-entered. Warning: Before removing the batteries, place the system switch on the thermostat to Off. Otherwise, the heating/cooling unit might still be running even after the batteries are removed. 4. Configuration Menu To access the configuration menu, press both buttons simultaneously for 3 seconds. To go to the next parameter (menu item), briefly press both buttons simultaneously. To modify a parameter, press one of the buttons. Repeat steps 2 and 3 if necessary. Press both buttons simultaneously for 3 seconds to exit the configuration menu. DISPLAY DESCRIPTION DEFAULT OPTIONS Temperature display °F °C or °F Time display 12 h 12 h or 24 h Early Start 1 Off On or Off Heating cycles per hour 2 4 2, 3, 4, 5 or 6 3 Cooling cycles per hour 2 4 2, 3, 4, 5 or 6 4 1 When Early Start is On, the thermostat determines when to start heating or cooling so that the desired temperature is reached at the set time. 2 When either the heating or cooling parameter is displayed, use the system mode selector switch to alternate between the two parameters. 3 For optimal heating control, use the setting that matches your system as follows: 2=30 min (steam, gravity), 3=20 min (hot water, 90%+ high-efficiency furnace), 4=15 min (gas or oil), 5=12 min (alternate setting for gas or oil), 6=10 min (electric). 4 The corresponding cooling cycle lengths are as follows: 2=30 min, 3=20 min, 4=15 min, 5=12 min, 6=10 min 5. Programming 5.1 Setting the Time and Day Press [ Clk ]. The hour flashes. Set the hour using . Press [ Clk ]. The minutes flash. Set the minutes using . Press [ Clk ]. The day flashes. Set the day using . Press [ Exit ] to exit. RTH230B 69-1800-03 03-11 3/4
-
 1
1 -
 2
2 -
 3
3 -
 4
4
 |
 |
