Honeywell RTH7600D Owner's Manual - Page 24
About your new thermostat, Wiring-heat pump - installation guide
 |
View all Honeywell RTH7600D manuals
Add to My Manuals
Save this manual to your list of manuals |
Page 24 highlights
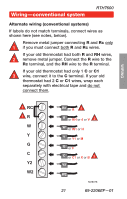
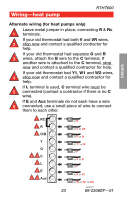
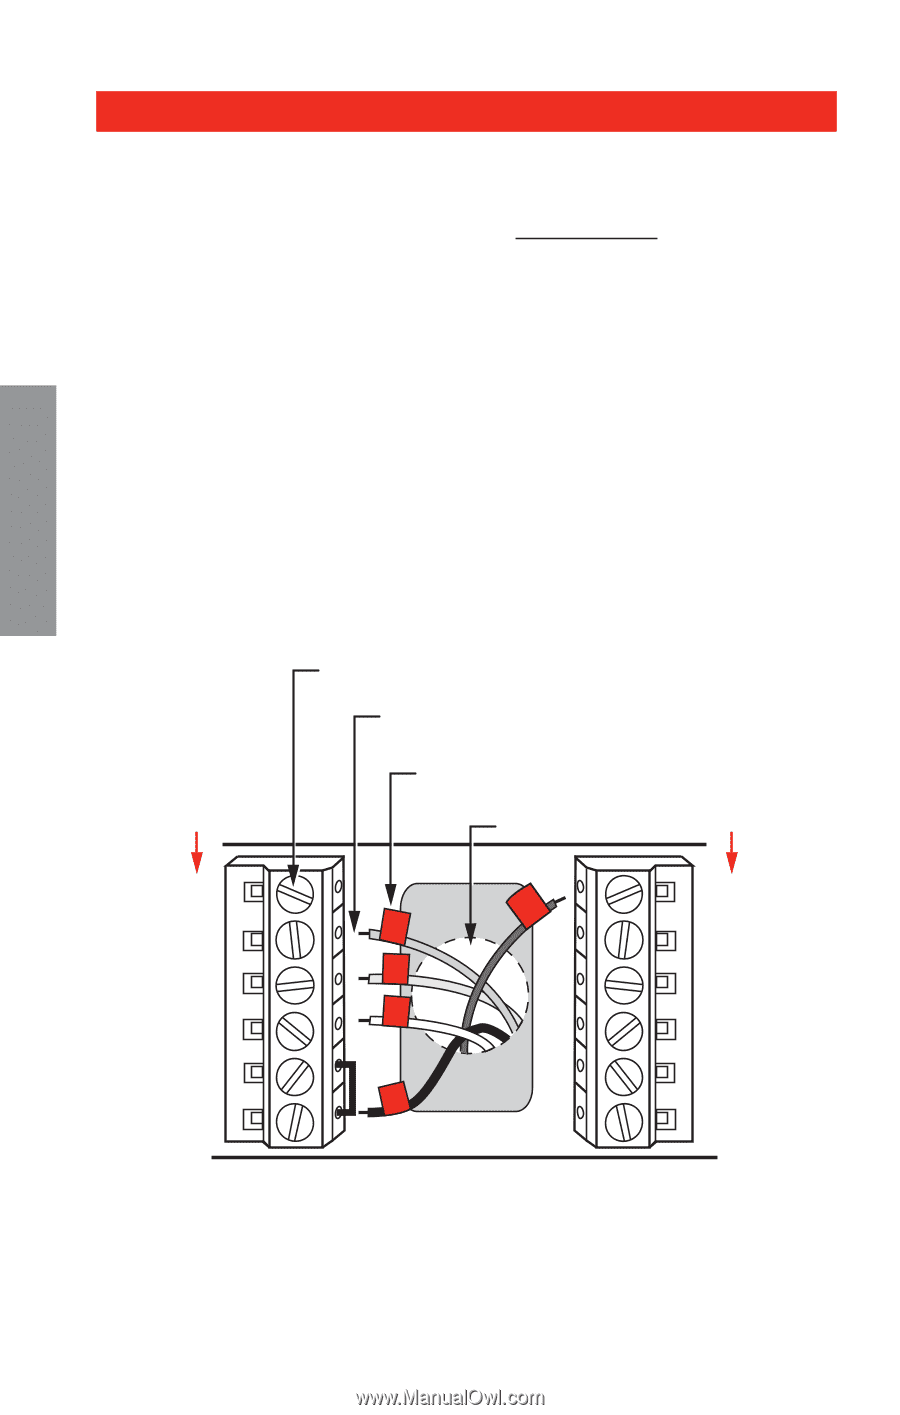
SETUP WIRING Advanced Installation Guide AWbiroiuntg-yohuerantepwumthpermostat Connect wires: Heat Pump 1. Match each labeled wire with same letter on new thermostat. 2. Use a screwdriver to loosen screws, insert wires into hole, then tighten screws. 3. If E and Aux do not each have a wire connected, use a small piece of wire to connect them to each other. 4. Push any excess wire back into the wall opening. Labels don't match? If labels do not match letters on thermostat, see page 23. SCREW INSERT WIRES THEN TIGHTEN SCREWS LABELED WIRES HEAT PUMP WIRE HOLE HEAT PUMP C Aux Aux OYG G E Y L O/B RC R R M28104 ASSISTANCE TROUBLESHOOTING 69-2206EF-01 22
-
 1
1 -
2
-
3
-
4
-
5
-
6
-
7
-
8
-
9
-
10
-
11
-
12
-
13
-
14
-
15
-
16
-
17
-
18
-
 19
19 -
 20
20 -
 21
21 -
 22
22 -
 23
23 -
 24
24 -
 25
25 -
 26
26 -
 27
27 -
 28
28 -
 29
29 -
30
-
31
-
32
-
33
-
34
-
35
-
36
-
37
-
38
-
39
-
40
-
41
-
42
-
43
-
44
-
45
-
46
-
47
-
48
-
49
-
50
-
51
-
52
-
53
-
54
-
55
-
56
-
57
-
58
-
59
-
60
 |
 |
Advanced Installation Guide
69-2206EF—01
22
About your new thermostat
SETUP
WIRING
ASSISTANCE
TROUBLESHOOTING
Connect wires: Heat Pump
1. Match each labeled wire with same letter on new
thermostat.
2. Use a screwdriver to loosen screws, insert wires into
hole, then tighten screws.
3. If
E
and
Aux
do not each have a wire connected,
use a small piece of wire to connect them to each
other.
4. Push any excess wire back into the wall opening.
Labels don’t match?
If labels do not match letters on thermostat, see page
23.
M28104
Aux
E
L
C
G
Y
O/B
RC
R
LABELED WIRES
SCREW
HEAT PUMP
INSERT WIRES
THEN TIGHTEN SCREWS
WIRE HOLE
Y
G
R
Aux
O
HEAT PUMP
Wiring—heat pump