Hoover CH82005 Manual - Page 3
Operating Tips, Storing the Air Mover, Troubleshooting
 |
View all Hoover CH82005 manuals
Add to My Manuals
Save this manual to your list of manuals |
Page 3 highlights
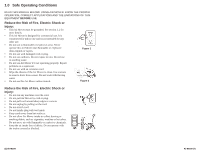
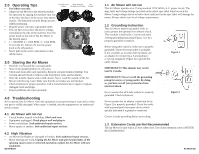
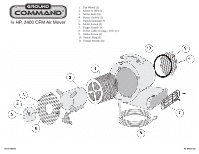
2.0 Operating Tips • For indoor use only. • Adjust the Air Mover to the desired position for operation by tipping the machine onto one of the three flat faces of the heavy duty plastic chassis. The balanced machine design assures stable positioning. • Plug the power cord into a grounded outlet. • This Air Mover has three (3) power settings controlled at the side of the machine. Turn the power knob on the side of the Air Mover to the desired speed. • 1 = 780 RPM. 2 = 1000 RPM. 3 = 1100 RPM. To turn the Air Mover off, turn the power knob to the off position. • Never pull on the cord to disconnect or turn off the motor. Dry Floors and Move Musty Air Carpets Dry Walls and Curtains Dry Ceilings 3.0 Storing the Air Mover • Wind the cord around the carrying handle. • Store in the upright position in a dry area. • Check and clean after each operation. Remove soil and chemical buildup. Use vacuum and soft brush to remove soils from motor vents and fan blades. • Wipe the outside chassis with a mild cleaner. Never wash the outside of the Air Mover with flowing water. Make sure that the air intakes are not blocked. • Check switches for proper operation. Call a trained electrician to repair or replace damaged cords and plugs. • Report problems and repair promptly. 4.0 Troubleshooting Never operate this Air Mover when the equipment is not performing as expected or when any part is visibly damaged. When repair is needed, take the equipment to an authorized service center. 4.1 Air Mover will not run • Circuit breaker tripped in building. Check and reset. • Equipment unplugged. Check plug at wall and plug in. • Power cord failure. Seek authorized repair services. • Motor sparks or smokes. Seek authorized repair services. 4.2 High Vibration • Air Mover fan blades are damaged or broken. Seek authorized repair services. • Motor bearings are worn. Unplug the Air Mover and spin the fan blades. If the spinning causes noise or restricted movement, replace the Air Mover with new equipment. (6) Air Mover 1.1 Air Mover will not run This Air Mover operates on a 15 amp nominal 115V, 60 Hz, A.C. power circuit. The, amp, hertz and voltage ratings are listed on the motor spec label found on each Air Mover. Using voltages above or below those indicated on the spec label will damage the motor. Always check your local voltage requirements. 1.2 Grounding Instruction This Air Mover must be grounded while in use to protect the operator from electric shock. This machine is built with a 3-wire cord and a 3-prong grounding-type plug (Figure 1) to fit a properly grounded receptacle. Before using this machine, make sure a properly grounded, 3-hole electrical outlet is available. If not available, as in some older facilities, use an adapter for connecting a 3-prong plug to a 2-prong receptacle (Figure 2) to ground the outlet chassis. IMPORTANT!! This adaptor may not be used in Canada. IMPORTANT!! Never cut off the grounding prong for use in a 2-prong outlet. By doing so, you have cut off your protection from electrical shock. Never assume that all 3-hole outlets are properly grounded. Check before use. Never assume that an adaptor connection (as in Figure 2) is properly grounded. Check the outlet with a ground fault interrupter device which quickly indicated if a ground is connected. Correct a faulty grounding before proceeding. Figure 1 Figure 2 1.3 Extension Cords are Not Recommended The Air Mover is built with a 25 foot safety cord. Use of any extension cords is NEVER RECOMMENDED. Air Mover (3)
-
 1
1 -
 2
2 -
 3
3 -
 4
4
 |
 |