Hoover FH50900 Product Manual - Page 14
Caution, Warning
 |
View all Hoover FH50900 manuals
Add to My Manuals
Save this manual to your list of manuals |
Page 14 highlights
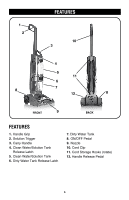
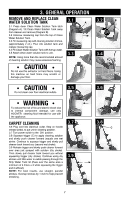
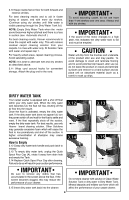
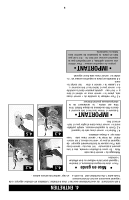
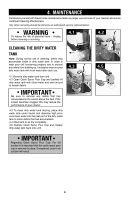
3. general operation remove and replace clean water solution tank 3.1 A 3.2 B 3.1 Press clean Clean Water Solution Tank latch (Diagram A). Tilt Clean Water Solution Tank away from cleaner and remove (Diagram B). 3.2 Unscrew measuring cap from the top of Clean Water Solution Tank. 3.3 Fill measuring cap with cleaning solution 2 times, (approximately 2 oz.). Pour into solution tank and replace measuring cap. 3.4 Fill Clean Water Solution Tank with hot tap water. 3.5 Attach clean water solution tank to unit. NOTE: Using more than the recommended amount of cleaning solution may cause excessive foaming. 3.3 3.4 CAUTION Do not use this extractor on hard floors. Using this machine on hard floors may scratch or damage your floor. CAUTION 3.5 3.6 Do not clean over floor electrical outlets. WARNING To reduce the risk of fire and electric shock due to internal component damage, use only HOOVER® cleaning fluid intended for use with the appliance. Carpet Cleaning 3.6 Plug cord into electrical outlet. Step on handle release pedal, to put unit in cleaning position. 3.7 Turn power switch to the "ON" position. 3.8 Squeeze trigger (C) to apply cleaning solution and slowly push cleaner forward (equals one wet stroke. Continue to squeeze trigger and slowly pull cleaner back toward you (second wet stroke). 3.9 Release trigger and slowly push cleaner forward over area just sprayed with solution (dry stroke). Then slowly pull cleaner back toward you without squeezing trigger (dry stroke). Continue using dry strokes until little water is visible passing through the Dirty Water Tank lid (Pass over the same area a minimum of 4 times = 2 while squeezing the trigger and 2 without). NOTE: For best results, use straight, parallel strokes. Overlap strokes by 1 inch to help prevent streaking. 3.7 3.9 3.8 C 7
-
 1
1 -
2
-
3
-
4
-
5
-
6
-
7
-
8
-
 9
9 -
 10
10 -
 11
11 -
 12
12 -
 13
13 -
 14
14 -
 15
15 -
 16
16 -
 17
17 -
 18
18 -
 19
19 -
20
-
21
-
22
-
23
-
24
-
25
-
26
 |
 |