Hoover ONEPWR Cordless High Performance Blower Product Manual - Page 6
Warning, Notice
 |
View all Hoover ONEPWR Cordless High Performance Blower manuals
Add to My Manuals
Save this manual to your list of manuals |
Page 6 highlights
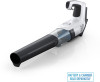
OPERATION WARNING! Do not allow familiarity with this product to make you careless. Remember that a careless fraction of a second is sufficient to inflict serious injury. WARNING! Always wear eye protection with side shields marked to comply with ANSI Z87.1. Failure to do so could result in objects being thrown into your eyes and other possible serious injuries. WARNING! Do not use any attachments or accessories not recommended by the manufacturer of this product. The use of attachments or accessories not recommended can result in serious personal injury. WARNING! Before each use, inspect the entire product for damaged, missing, or loose parts such as screws, nuts, bolts, caps, etc. Tighten securely all fasteners and caps and do not operate this product until all missing or damaged parts are replaced. Please contact customer service or a qualified service center for assistance. Applications You may use this product for the following purpose: • Clearing leaves and other debris from your lawn • Keeping decks and driveways free from grass clippings, leaves, pine needles and other debris To Install / Remove Battery Pack See Figure 3, page 8 NOTICE When placing battery pack in the blower, be sure raised rib on battery pack aligns with the bottom of the product and latches into place properly. Improper installation of the battery pack can cause damage to internal components. To install: • To install the battery, slide the pack into the body of the product. • Make sure the latches on each side of the battery pack snap in place and that the battery pack is secured in the blower before beginning operation. To remove: • Locate the latches on the side of the battery pack and depress both sides to release the battery pack from the blower. PG.5 WARNING! Battery products are always in operating condition. Therefore, switch should always be in the OFF position when not in use or carrying at your side. Charging Battery Pack See Figure 4, page 9 • Charge the battery fully before first use. This will take up to 3 hours. Due to federal regulations, the battery does not come fully charged. • Plug the charger into a power outlet. • Attach the battery pack to the charger by aligning the ribs on the battery pack to the grooves in the charger. Slide the battery pack into the charger. • When charging, the lights on the battery will illuminate to show the state of charge. The light on the charger will flash. • If the light on the charger flashes red, there is an error with the battery or the charger. Try again or call customer service for support. • When charge is complete the lights on the battery will turn off and the light on the charger will be solid. • To remove the battery pack from the charger, press the latches and pull up on the battery pack. Starting/Stopping the Blower See Figure 5, page 9 • To start the blower, depress the variable trigger. • To stop the blower, release the variable trigger. Operating the Blower See figure 6, page 9 • To keep from scattering debris, blow around the outer edges of a pile. Never blow directly into the center of a pile. • To reduce sound levels, limit the number of pieces of equipment used at any one time. • Use rakes and brooms to loosen debris before blowing. In dusty conditions, slightly dampen surfaces when water is available. • Conserve water by using power blowers instead of hoses for many lawn and garden applications, including areas such as gutters, screens patios, grills, porches and gardens. • Watch out for children, pets, open windows or freshly washed cars, and blow debris safely away. • After using blowers or other equipment, clean up. Dispose of debris properly
-
 1
1 -
 2
2 -
 3
3 -
 4
4 -
 5
5 -
 6
6 -
 7
7 -
 8
8 -
 9
9 -
 10
10 -
 11
11 -
 12
12 -
13
-
14
-
15
-
16
-
17
-
18
-
19
-
20
-
21
-
22
-
23
-
24
-
25
-
26
 |
 |
