Hoover Power Scrub Elite Product Manual English - Page 23
Cleaning Carpeted Stairs
 |
View all Hoover Power Scrub Elite manuals
Add to My Manuals
Save this manual to your list of manuals |
Page 23 highlights
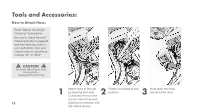
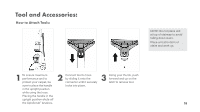
Tools and Accessories: Cleaning Carpeted Stairs: 1. Read "Before You Begin Cleaning" instructions on page 8. ! CAUTION ! Use extra care when cleaning on stairs. To avoid personal injury or damage, and to prevent the cleaner from falling, always place cleaner at bottom of stairs or on floor. Do not place cleaner on stairs or furniture, as it may result in injury or damage. 2. Attach hose and solution tube as instructed (page 15). 9-12. End with more dry strokes to aid in faster drying of carpet. 3. Place handle in upright position. SpinScrub® brushes will not rotate while handle is in upright position. 14. To avoid saturating carpet, do not use more than 4 wet strokes over any one area. Always end with dry strokes. 4. Fill Clean Water Tank according to instructions. 15. If additional cleaning is necessary, wait until the carpet is 5. Fill Solution Tank with HOOVER solution according to instructions. completely dry before using the tool again. 6. Attach tool to end of hose. 16. Empty Dirty Water Tank when the motor sound becomes higher 7. Dry hands and plug cleaner into a properly grounded outlet. pitched and there is a loss in suction. You will also see the float rise 8. Set Wash/Rinse Selection to WASH. Turn cleaner ON. and shut off suction at the same time. 9. Pre-spray the carpeted stair by holding the tool about one inch 17. When finished cleaning, follow "After Cleaning" and "After Using above the carpet and push it forward while pressing the trigger (Fig. Tool" instructions. C). 10. Position tool against the riser and slightly press it into carpet pile. Press the trigger and pull the tool slowly over the carpet. Release trigger at end of stroke. 11. Lift tool, and position it against riser. Pull tool slowly over carpet without pressing trigger (Fig. D). 12. Overlap strokes by 1/2 inch to help prevent streaking. 13. It is best to alternate wet and dry strokes as described in steps Fig. C Fig. D 20
-
 1
1 -
2
-
3
-
4
-
5
-
6
-
7
-
8
-
9
-
10
-
11
-
12
-
13
-
14
-
15
-
16
-
17
-
 18
18 -
 19
19 -
 20
20 -
 21
21 -
 22
22 -
 23
23 -
 24
24 -
 25
25 -
 26
26 -
 27
27 -
 28
28 -
29
-
30
-
31
-
32
-
33
-
34
-
35
-
36
-
37
-
38
-
39
-
40
-
41
-
42
-
43
-
44
-
45
-
46
-
47
-
48
-
49
-
50
-
51
-
52
-
53
-
54
-
55
-
56
-
57
-
58
-
59
-
60
-
61
-
62
-
63
-
64
-
65
-
66
-
67
-
68
 |
 |
