Hoover UH30310 Manual - Page 11
Warning, Caution - vacuum
 |
UPC - 073502032077
View all Hoover UH30310 manuals
Add to My Manuals
Save this manual to your list of manuals |
Page 11 highlights
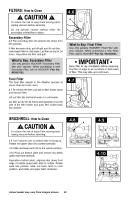
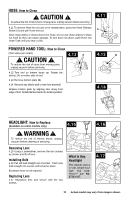
HOSE: How to Clean ! CAUTION ! To reduce the risk of injury from moving parts, unplug vacuum before servicing. 4.11 To remove Hose for tool use or for maintenance, press the Hose Release Button (A) and pull Hose end out. Clear away debris or obstructions from Hose. Do not use sharp objects to clean out hose as they can cause damage. To lock back into place, push Hose into Hose Tube until you hear a click. 4.11 A Powered Hand Tool: How to Clean (Tool varies per model) ! CAUTION ! 4.12 A To reduce the risk of injury from moving parts, unplug vacuum before servicing. 4.12 Turn tool so bottom faces up. Rotate the latches (A) on either side of tool. 4.13 Remove bottom plate (B). 4.14 Remove any debris and/ or hair from brushroll. Replace bottom plate by aligning tabs along front edge of tool. Rotate latches back into locked position. 4.13 B 4.14 Headlight: How to Replace (Available on select models only) 4.15 ! WARNING ! To reduce the risk of electric shock, unplug vacuum before cleaning or servicing. Removing Lens 4.15 Using a screwdriver, remove the two screws as shown and lift off lens. Installing Bulb 4.16 Pull old bulb straight out of socket. Push new bulb straight into socket until locked in place. Excessive force is not required. Replacing Lens 4.17 Reposition lens and secure with the two screws. What to Buy: Headlight This cleaner uses a 12 volt, wedge base type 912 bulb, Hoover® part No. 27313-107. 4.16 4.17 11 Actual model may vary from images shown.
-
 1
1 -
2
-
3
-
4
-
5
-
 6
6 -
 7
7 -
 8
8 -
 9
9 -
 10
10 -
 11
11 -
 12
12 -
 13
13 -
 14
14 -
 15
15 -
 16
16 -
17
-
18
-
19
-
20
-
21
-
22
-
23
-
24
-
25
-
26
-
27
-
28
-
29
-
30
-
31
-
32
-
33
-
34
-
35
-
36
-
37
-
38
-
39
-
40
-
41
-
42
-
43
-
44
-
45
 |
 |
