Hoover UH71300 Product Manual English - Page 2
Assembly, Operation, Maintenance, Maintenance Con't, Troubleshooting
 |
View all Hoover UH71300 manuals
Add to My Manuals
Save this manual to your list of manuals |
Page 2 highlights
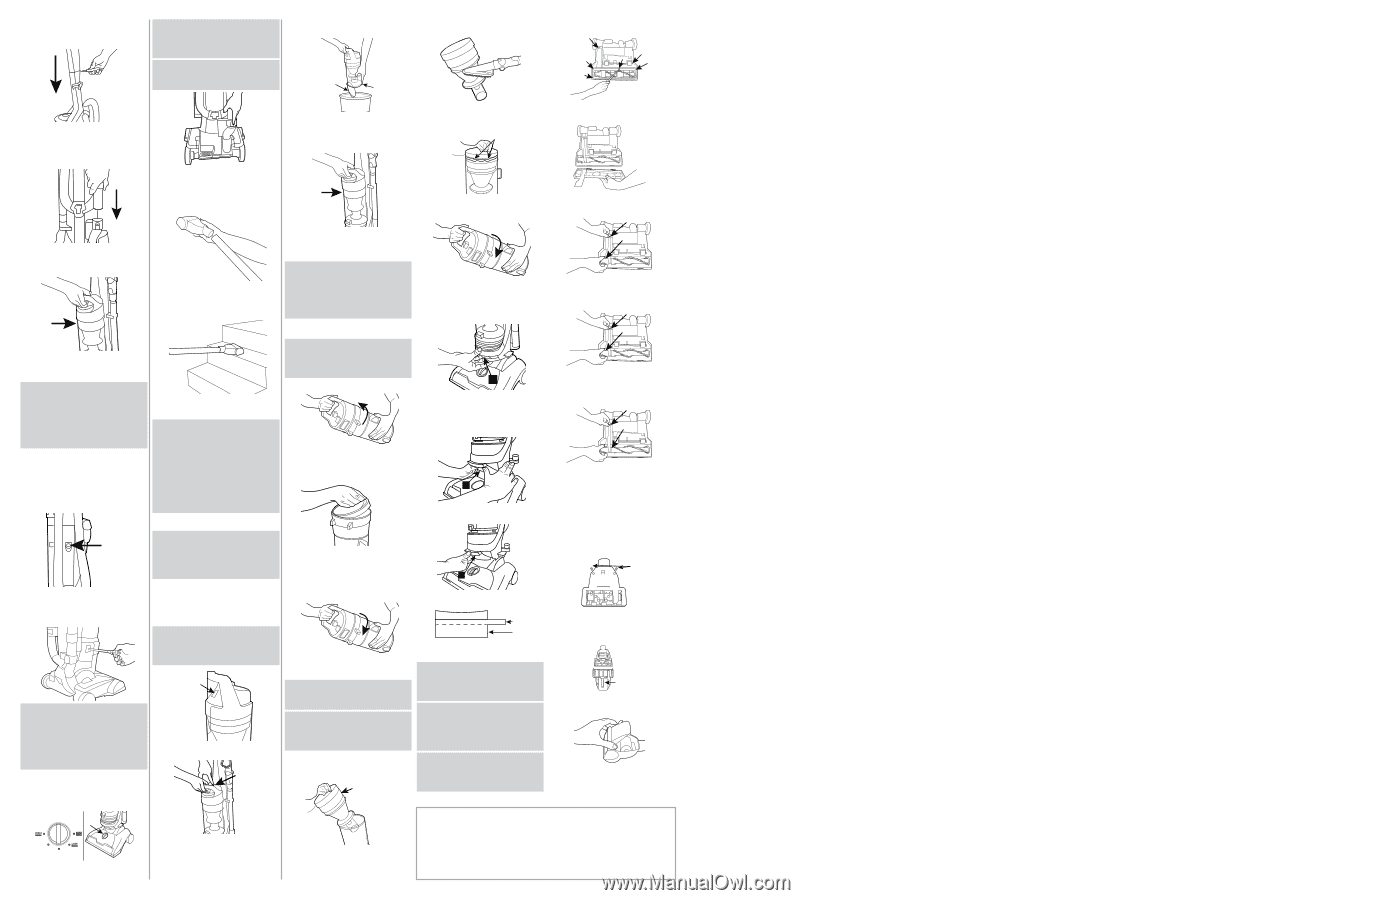
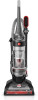
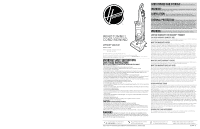
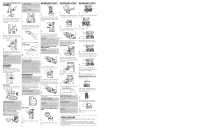
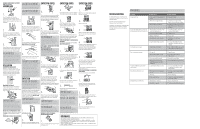
FULLY ASSEMBLE PRODUCT PRIOR TO USE ASSEMBLY CAUTION: To reduce the risk of injury from moving parts - Unplug before servicing. CAUTION: Not to be used for grooming pet. 1. Insert handle section into vacuum base. Push down firmly. Using a Phillips screwdriver, fasten included screw behind handle into vacuum base. 1. MAINTENANCE (CON'T) E D 3. Hold dirt cup over trash receptacle, push dirt cup door release lever (D) to open dirt cup door (E). Close dirt cup door (E). Press firmly to secure. MAINTENANCE (CON'T) 2. Dirt and debris can be cleaned from the filter assembly with the adjustable dusting brush. H MAINTENANCE (CON'T) 1. Remove the 6 screws as shown with a Phillips screwdriver. 2. Wrap hose around top of hose guide located on the handle. Insert the hose into hose tube until you hear a click. 3. Place bottom of dirt cup into vacuum body first. Pivot cup into vacuum. Dirt cup is secure when you hear a click. NOTE: Place the Crevice Tool into Wand and slide into tool storage area on left back side of vacuum and place Turbo Tool on right back side of vacuum as shown. Place adjustable dusting brush on top of wand. OPERATION ON/OFF SWITCH Plug cord into electrical outlet. To turn vacuum ON (I=0N), push ON/OFF switch (A) to ON position. To turn vacuum OFF (O=OFF), push switch to OFF position. A CORD RELEASE Prior to using, grasp the end of the plug and pull to release the cord from the cord reel until red tape is reached. IMPORTANT: When pulling on the cord, yellow tape will identify when the cord is almost fully extended. When red tape is visible on the cord, the cord has reached its full length. (Do not pull the cord past the red tape.) CARPET HEIGHT ADJUSTMENT To adjust height setting, PUSH DOWN and TURN knob (C) to desired height setting. USING HOSE AND ATTACHMENTS To remove hose for tool use, press the hose release button and pull hose end out. To lock back into place, push hose into hose tube until you hear a click.. 2. To attach tool or wand to hose, push firmly into place. TO CLEAN STAIRS: 3. Use the Hose and Turbo Tool (Tool varies per model) for stair cleaning. CAUTION: Use extra care when cleaning on stairs. To avoid personal injury or damage, and to prevent the cleaner from falling, always place cleaner at the bottom of the stairs or on the floor. Do not place cleaner on stairs or furniture, as it may result in injury or damage. When using tools, always ensure handle is in the upright position. MAINTENANCE WARNING: To reduce the risk of personal injury - Unplug before cleaning or servicing. Do not use vacuum without dirt cup or filters in place. This product contains no serviceable parts. If appliance is not working as it should, has been dropped, damaged, left outdoors, or dropped into water, call customer service at 1-800-944-9200 prior to continuing use. IMPORTANT: The System Check Indicator located at (A), alerts you to possible system performance issues. A 1. HOW TO EMPTY C 4. Place bottom of dirt cup into vacuum body first. Pivot dirt cup into vacuum body and press firmly until it locks into place. NOTE: To maintain optimal performance, empty the dirt cup before the dirt cup reaches the max line (B). Place the vacuum in the upright position before removing the dirt cup. RINSABLE FILTER: HOW TO CLEAN PART #304087001 NOTE: To maintain optimal performance, filters should be cleaned at least every two months under normal use. 1. To clean: Twist the dirt cup handle counterclockwise to open and remove lid. 2. Pull tab to remove rinsable filter. Rinse with water for two minutes or until water runs clear. Then squeeze out excess water. Allow 24 hours for filter to dry completely. Replace filter, tab side out. 3. Replace dirt cup lid and twist clockwise until locked in position. IMPORTANT: Allow filter to dry completely before replacing NOTE: To maintain optimal performance, filters should be cleaned at least every two months under normal use CYCLONIC FILTER ASSEMBLY: HOW TO CLEAN G 3. 2. Place the filter assembly on the dirt cup. Line Lift off bottom plate (A). up tabs (H) on lid with dirt cup body. D C 4. Replace dirt cup lid and twist clockwise until locked in position. Replace dirt cup. EXHAUST FILTER: HOW TO CLEAN (Exact filter may vary by model) PART #440005573 3. Remove used belt from brushroll (C) then from motor shaft (metal rod) (D) and discard. E G 1. A With fingers under filter door lip, pull filter frame (A) out and away from vacuum body. Hold filter over a trash receptacle and tap out dirt and debris. 4. With lettering on outside of belt, slide new belt over motor shaft (metal rod) (E). Then slip around area of brushroll without bristles (G). D G B 2. Bottom filter (B) must be pushed back into place first. 5. With belt in place, pull and slide brushroll into nozzle making sure that the brushroll end caps are in the correct orientation 6. Place the bottom plate aligning the screw holes and re-install the 6 screws POWERED HAND TOOL: HOW TO CLEAN (Tools vary per model) A 3. C 1. Then push the upper handle in (C) until it clicks. 4. C B Filter diagram: (B) bottom filter. (C) upper handle IMPORTANT: DO NOT RINSE OR WASH THE FILTER MADE WITH HEPA MEDIA. WARNING: To reduce the risk of personal injury - Unplug before cleaning or servicing. Do not use vacuum without dirt cup or filters in place. NOTE: Place handle in the low position and turn the cleaner over so the bottom side is up. Clean the Turbo Tool by removing the two screws (A), located on the bottom cover, with a Phillips head screwdriver. 2. B Remove the bottom cover (B). Clean out any debris or hair from the brushroll and turbine fan. 3. Replace the bottom cover, insert and tighten the (2) screws. C 2. 1. Press dirt cup release button (C) and pivot TROUBLESHOOTING AVAILABLE REPLACEMENT PARTS AND ACCESSORIES SUCH AS BRUSH ROLLS AND BELTS CAN BE FOUND ON HOOVER.COM. IF APPLIANCE IS NOT WORKING AS IT SHOULD, HAS BEEN DROPPED, DAMAGED, LEFT OUTDOORS, OR cup out. Pull filter assembly (G) out of dirt cup and DROPPED INTO WATER, CALL CUSTOMER SERVICE AT 1 (800) 944-9200 PRIOR TO CONTINUING USE. remove. ALWAYS IDENTIFY YOUR CLEANER BY THE COMPLETE MODEL NUMBER. (THE MODEL NUMBER APPEARS ON THE BACK OF THE CLEANER.)
-
 1
1 -
 2
2 -
 3
3 -
 4
4 -
 5
5 -
 6
6
 |
 |