Hotpoint HPS18BTHWW Use and Care Manual - Page 12
Cont., Reversing The Hardware
 |
View all Hotpoint HPS18BTHWW manuals
Add to My Manuals
Save this manual to your list of manuals |
Page 12 highlights
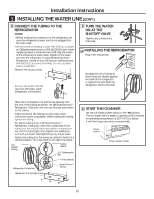
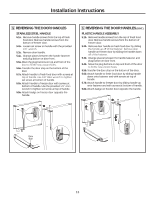
Installation Instructions 2 REVERSING THE DOOR SWING (CONT.) 3 REMOVE THE FRESH FOOD DOOR 3.1 Tape the door shut with masking tape. 4 REVERSING THE HARDWARE 4.1 Interchange the hinge and screws at top right with screws at top left of cabinet. Do not tighten screws on hinge side. NOTE: Some hinges have 4 holes. Which holes you use for installing depends on which side you install the hinge. The outer edge of the hinge should be parallel to the edge of the case for correct installation. 3.2 Unscrew the center hinge pin and remove it from its socket. Be careful not to lose the center hinge and washer. Center Hinge Pin Washer 4.2 Remove the three screws holding the center hinge to the cabinet. 4.3 Transfer the three screws from the opposite side of the cabinet to the screw holes vacated by the center hinge removal. 3.3 Remove the tape and tilt the door away from the cabinet. Lift the door from the pin in the bottom hinge. (If the plastic washer sticks to the door bottom, put it back on the hinge.) 4.4 Reattach the center hinge with all three screws on the left side of the cabinet. NOTE: The center hinge must be turned over as shown when mounted on the left side. 4.5 Remove the screws holding the bottom hinge to the cabinet. Move the bottom hinge from the right to left side of the cabinet. Switch the hinge pin to the opposite side of the hinge and reinsert the screws. 3.4 Set the door outside-up on a non-scratching surface. Switch the hinge pin to the opposite side of the bracket. Plastic Washer Hinge Pin Plastic Washer Hinge Pin Hinge Bracket 12 Hinge Bracket
-
 1
1 -
2
-
3
-
4
-
5
-
6
-
 7
7 -
 8
8 -
 9
9 -
 10
10 -
 11
11 -
 12
12 -
 13
13 -
 14
14 -
 15
15 -
 16
16 -
 17
17 -
18
-
19
-
20
-
21
-
22
-
23
-
24
-
25
-
26
-
27
-
28
-
29
-
30
-
31
-
32
-
33
-
34
-
35
-
36
-
37
-
38
-
39
-
40
-
41
-
42
-
43
-
44
-
45
-
46
-
47
-
48
-
49
-
50
-
51
-
52
-
53
-
54
-
55
-
56
 |
 |
