| Section |
Page |
| 6011575-Y220-U05 User Guide-(01,EN)20140326.pdf |
2 |
| 1 Read Before Proceeding |
13 |
| Safety Precautions |
13 |
| Personal Information and Data Security |
14 |
| 2 Legal Notice |
17 |
| Copyright © Huawei Technologies Co., Ltd. 2014. All rights reserved. |
17 |
| Trademarks and Permissions |
17 |
| Notice |
17 |
| Third-Party Software Statement |
18 |
| DISCLAIMER |
19 |
| Import and Export Regulations |
20 |
| Privacy Policy |
20 |
| 3 Getting Started |
21 |
| Key Functions at Your Fingertips |
21 |
| Important Information About the Battery |
22 |
| Power Saving Tips |
22 |
| Power On or Off Your Mobile Phone |
23 |
| Powering On Your Mobile Phone |
23 |
| Setting Up Your Mobile Phone |
24 |
| Powering Off Your Mobile Phone |
24 |
| 1 Press and hold Power key to open the Phone options menu. |
24 |
| 2 Touch Power off. |
24 |
| 3 Touch OK. |
24 |
| Turning On Quick Boot |
24 |
| 1 Touch > Settings > Accessibility. |
24 |
| 2 Select the Quick boot check box. |
24 |
| Using the Touchscreen |
24 |
| Touchscreen Actions |
24 |
| Rotating Your Mobile Phone Screen |
25 |
| Locking and Unlocking the Screen |
25 |
| Locking the Screen |
25 |
| Unlocking the Screen |
25 |
| 1 Press Power key to wake up the screen. |
25 |
| 2 Drag the lock icon from left to right to unlock the screen. |
26 |
| Home Screen |
27 |
| Notification and Status Icons |
27 |
| Notification Panel |
28 |
| Opening the Notification Panel |
29 |
| 1 When a new notification icon appears on the notification bar, place your finger on the notification bar and flick down to open the notification panel. |
29 |
| 2 On the panel, you can: |
29 |
| Closing the Notification Panel |
29 |
| Viewing Other Parts of the Home Screen |
30 |
| Customizing the Home Screen |
30 |
| Adding a New Home Screen Item |
30 |
| 1 Touch and hold a blank area on the home screen until the Add to home screen select action menu is displayed. |
30 |
| 2 Select an item to add it to the home screen. |
30 |
| Moving a Home Screen Item |
31 |
| 1 Touch and hold an item on the home screen until the item expands in size and the mobile phone vibrates. |
31 |
| 2 Without lifting your finger, drag the item to the desired position on the screen, and then release it. |
31 |
| Removing a Home Screen Item |
31 |
| 1 Touch and hold an item on the home screen until the item expands and the mobile phone vibrates. |
31 |
| 2 Without lifting your finger, drag the item to the trash can. When the item and the trash can turn red, the item is ready to be removed. |
31 |
| 3 Release the item to remove it from the home screen. |
31 |
| Service Shortcuts |
31 |
| 1 Open the notification bar. |
31 |
| 2 Touch at the top of the screen to switch data services on or off. |
31 |
| Setting a Home Screen Animation |
31 |
| 1 On the Home screen, touch > Home settings > Animation. |
31 |
| 2 Select an animation, and then touch Save. |
31 |
| Changing the Wallpaper |
32 |
| 1 On the home screen, touch > Wallpaper. |
32 |
| 2 Touch the following menu items to select a picture and set it as the wallpaper: |
32 |
| Changing the Theme |
32 |
| 1 On the home screen, touch > Home settings. |
32 |
| 2 Do any of the following: |
32 |
| 3 Touch Save. |
32 |
| Application Screen |
32 |
| Using a microSD Card |
33 |
| Using the microSD Card as a USB Mass Storage |
33 |
| 1 Connect your mobile phone to your PC with the USB cable provided. Your PC will detect the microSD card as a removable storage device. |
33 |
| 2 Open the notification bar, and then touch USB connected. |
33 |
| 3 Touch Turn on USB storage in the dialog box that opens to confirm that you want to transfer files. |
33 |
| Removing the microSD Card |
33 |
| 1 Power off the phone. |
33 |
| 2 Remove the battery cover, and remove the battery. |
33 |
| 3 Carefully remove the microSD card. |
33 |
| 4 Calling |
34 |
| Making a Call |
34 |
| Making a Call with the Dialer Application |
34 |
| 1 On the home screen, touch > Dialer to display the dialer. |
34 |
| 2 Touch the appropriate number keys to enter the phone number. |
35 |
| 3 Touch to initiate the call. |
35 |
| Making a Call from Contacts |
35 |
| 1 On the home screen, touch > Contacts to display the contact list. |
35 |
| 2 In the list, touch the contact you want to call. |
35 |
| 3 Touch to dial the phone number. |
35 |
| Making a Call from Call log |
35 |
| 1 On the home screen, touch > Call log to display the call log. |
35 |
| 2 Touch to the right of the log entry to dial. |
35 |
| Making an IP Call |
35 |
| 1 On the home screen, touch > Settings > Call settings > Voice Call > IP prefix number. |
35 |
| 2 Touch Enter prefix number, enter an IP call number, and touch OK. |
35 |
| 3 On the home screen, touch > Dialer to display the dialer. |
36 |
| 4 Dial the phone number that you wish to call. |
36 |
| 5 Touch > Touch , and the default IP call number will be added before the phone number to initiate an IP call. |
36 |
| Answering or Rejecting a Call |
36 |
| Answering an Incoming Call |
36 |
| Ending a Call |
37 |
| Rejecting an Incoming Call |
37 |
| Other Operations During a Call |
38 |
| Making a Conference Call |
38 |
| 1 To initiate a conference call, dial the number of the first participant. After you have connected to the first participant, keep the connection open, touch Add call. |
38 |
| 2 Enter the phone number of the next person you want to invite for the conversation and touch , or select someone from your Call log or Contacts. The first participant is automatically placed on hold while you do this. |
38 |
| 3 Once you have connected to the second person, touch Merge calls to begin the conference call. |
38 |
| 4 To end the conference call and disconnect from everyone, touch End conference. |
38 |
| Switching Between Calls |
38 |
| 1 While you are in the first call and the second call comes in, answer the incoming call, and then touch Swap. |
38 |
| 2 The current call is placed on hold and you are connected to the first call. |
39 |
| Using the Call log |
39 |
| Adding an Entry to Contacts |
39 |
| 1 If you are already working with Dialer or Contacts, touch the Call log tab. |
39 |
| 2 Touch and hold the entry you want to add to your Contacts. |
39 |
| 3 Touch Add to contacts in the options menu. |
39 |
| 4 Touch New or scroll through the contact list and touch an existing contact name. |
39 |
| Using Airplane Mode |
39 |
| 1 Press and hold Power key. |
39 |
| 2 Touch Airplane mode in the options menu. |
39 |
| 5 Contacts |
40 |
| Opening the Contacts Application |
40 |
| Importing Contacts from a SIM Card |
40 |
| 1 In the contact list, touch > More > Import/Export. |
40 |
| 2 Select SIM card name, and then touch Next. |
40 |
| 3 Select the location from which you want to export contacts, and then touch Next. |
40 |
| 4 Select the contacts you want to import or touch Select All to select all contacts. |
40 |
| 5 Touch Copy. |
40 |
| 6 After contacts are imported, touch OK. |
40 |
| Adding a Contact |
40 |
| 1 In the contact list, touch > New contact. |
40 |
| 2 If you have more than one account with contacts, touch the account to which you want to add the contact. |
41 |
| 3 Enter the contact's name, and then add detailed information such as phone number and address. |
41 |
| 4 When you are finished, touch Save to save the contact information. |
41 |
| Adding a Contact to Your Favorites |
41 |
| Searching for a Contact |
41 |
| 1 In the contact list, touch > Search. |
41 |
| 2 Enter the name of the contact you wish to search for. As you type, contacts with matching names appear below the search box. |
41 |
| Editing a Contact |
42 |
| 1 In the contacts list, touch and hold the contact whose details you want to edit, and then touch Edit contact in the options menu. |
42 |
| 2 Touch the category of contact information you wish to change: name, phone number, email address, or any other information you recorded earlier. |
42 |
| 3 Make the desired changes to the contact information, and then touch Save. To cancel all of your changes, touch Revert. |
42 |
| Communicating with Your Contacts |
42 |
| Using Quick Contact for Android |
42 |
| 1 Touch the contact's picture or picture frame (if you have not assigned a picture to the contact) to open Quick Contact for Android. |
42 |
| 2 Touch the icon for the way you want to communicate with the contact. |
42 |
| Communicating with a Contact |
43 |
| 1 In the contacts list, touch the contact that you want to communicate with. |
43 |
| 2 On the contact’s details screen, touch the icon to the right of the number to call or send messages. |
43 |
| Deleting a Contact |
43 |
| 1 In the contacts list, touch and hold the contact that you want to delete, and then touch Delete contact in the options menu. |
43 |
| 2 Touch OK to confirm that you want to delete the contact. |
43 |
| Backing Up and Synchronizing Contacts |
43 |
| Using a microSD Card to Back Up Contacts |
43 |
| Backing Up Contacts |
43 |
| 1 In the contact list, touch > More > Import/Export. |
43 |
| 2 Select Phone, and then touch Next. |
43 |
| 3 Select SD Card, and then touch Next. |
43 |
| 4 Select the contacts you want to import or touch Select All to select all contacts. |
44 |
| 5 Touch Copy to export your phone contact's information to the installed microSD card. |
44 |
| Restoring Contacts |
44 |
| 1 In the contact list, touch > More > Import/Export. |
44 |
| 2 Select SD Card, and then touch Next. |
44 |
| 3 Select Phone, and then touch Next. |
44 |
| 4 Select the .vcf files you want to import. |
44 |
| Using a Google Account to Synchronize Contacts |
44 |
| Managing Groups |
44 |
| Creating a Group |
44 |
| 1 On the home screen, touch > Contacts. Then touch > Groups. |
44 |
| 2 In the groups list, touch , and then touch Add group. |
44 |
| 3 Enter the name you want to assign to the group. |
45 |
| 4 Touch Add Members to add members to the group. |
45 |
| 5 Select the contacts to be added to the group and then touch Save. |
45 |
| 6 When you are finished, touch Save to save the group information. |
45 |
| Editing a Group |
45 |
| 1 In the groups list, touch and hold the group whose details you want to edit, and then touch Edit group in the options menu. |
45 |
| 2 Make the desired changes to the group information, and then touch Save. To cancel all changes you made to the group information, touch Revert. |
45 |
| Sending Contacts |
45 |
| 1 In the contacts list, touch > More. |
45 |
| 2 Touch Share visible contacts. |
45 |
| 3 Select the way you prefer to send the contacts you have selected, for example Bluetooth or Email. |
46 |
| 6 Using the Onscreen Keyboard |
47 |
| Displaying the Keyboard |
47 |
| Choosing an Input Method |
47 |
| 1 Touch a text field until the Edit text menu is displayed. |
47 |
| 2 Touch Input method. |
47 |
| 3 Select the input method. |
47 |
| Using the Android Keyboard |
48 |
| Using the Huawei Keyboard |
48 |
| Using the Landscape Keyboard |
49 |
| Customizing Keyboard Settings |
50 |
| 1 On the home screen, touch > Settings > Language & keyboard. |
50 |
| 2 In Keyboard settings, select an input method to customize the keyboard settings. |
50 |
| 7 Messaging |
51 |
| SMS and MMS |
51 |
| Opening Messaging |
51 |
| Creating and Sending a Text Message |
51 |
| 1 Touch > Messaging > Compose new message. |
51 |
| 2 Enter a phone number or a contact's name in the To field, or touch to select a contact from Contacts. |
51 |
| 3 Touch the composition text box to start entering your message. |
51 |
| 4 When you are ready to send the message, touch Send. |
51 |
| Creating and Sending a Multimedia Message |
52 |
| 1 Touch > Messaging > Compose new message. |
52 |
| 2 Enter a phone number in the To field, or touch to select a contact from Contacts. |
52 |
| 3 Touch the composition text box to start entering your message. |
52 |
| 4 Touch to display the options panel. |
52 |
| 5 When the message is ready to be sent, touch Send. |
52 |
| Adding a Slideshow |
53 |
| 1 On the message editing screen, touch to display the options panel. |
53 |
| 2 Touch Attach > Slideshow, and then select a slide to start editing it. |
53 |
| 3 Touch and then touch Add slide to add more slides. |
53 |
| 4 Touch to finish composing your message and return to the multimedia message screen. |
53 |
| 5 To alter your multimedia message, touch the slideshow on the multimedia message screen. When the message is ready to be sent, touch Send. |
53 |
| Opening and Viewing a Multimedia Message |
53 |
| 1 In the message list, touch the message thread you wish to view. |
53 |
| 2 Touch the multimedia message to view the message. |
53 |
| Replying to a Message |
53 |
| 1 In the message list, touch a text or multimedia message thread to open it. |
53 |
| 2 Touch the text box to compose your message. Once finished, touch Send. |
53 |
| Copying a Text Message |
54 |
| 1 In the message list, touch a text message thread to open it. |
54 |
| 2 Touch and hold one of the messages, and then touch Copy message text. |
54 |
| Customizing Message Settings |
54 |
| Email |
54 |
| Adding an Email Account |
54 |
| 1 On the home screen, touch > Email. |
54 |
| 2 In the email system list, touch Manual setup to select a system when you enter account number and password. |
54 |
| 3 To customize your email settings, follow the onscreen instructions, and then touch Next. |
54 |
| 4 Enter the account name and the name you want other people to see when they receive an email from you. |
55 |
| 5 Touch Done. |
55 |
| Adding Other Email Accounts |
55 |
| 1 After creating your initial email account, touch on the Inbox screen, and then touch Accounts to access the accounts screen. |
55 |
| 2 Touch on the accounts screen, and then touch Add account to create another email account. |
55 |
| Viewing an Email Message |
55 |
| 1 On the accounts screen, touch the email account you want to use. |
55 |
| 2 Access a folder, and then touch the message that you want to view. |
55 |
| Saving an Email Attachment |
55 |
| 1 On the accounts screen, touch the email account you want to use. |
55 |
| 2 Touch the email message you want to view. |
55 |
| 3 Touch Save next to the attachment in the email. |
55 |
| Creating and Sending an Email Message |
55 |
| 1 On the accounts screen, touch the email account you want to use. |
55 |
| 2 On the Inbox screen, touch , and then touch Compose in the options panel. |
56 |
| 3 In the To field, enter the recipients’ name or email address. |
56 |
| 4 Enter the subject of your message and compose the message. |
56 |
| 5 When you are finished, touch Send. |
56 |
| Replying to an Email Message |
56 |
| 1 On the accounts screen, touch the email account you want to use. |
56 |
| 2 Touch the email message to which you want to reply. |
56 |
| 3 Touch Reply or Reply all to reply to the email message. |
56 |
| Deleting an Email Account |
56 |
| 1 On the accounts screen, touch and hold the email account you want to delete. |
56 |
| 2 Touch Delete. |
56 |
| 3 Touch OK. |
56 |
| Changing Email Account Settings |
56 |
| 1 Touch > Email. |
57 |
| 2 On the accounts screen, touch and hold the email account you want to change. |
57 |
| 3 Touch Account settings. |
57 |
| 4 Change General settings, Notification settings, or Server settings. |
57 |
| 8 Getting Connected |
58 |
| Mobile Networks |
58 |
| Checking the Network Connection |
58 |
| 1 Touch > Settings. |
58 |
| 2 Touch Wireless & networks > Mobile networks. |
58 |
| 3 Touch Network operators or Access Point Names to check the network connection. |
58 |
| Turning on the Data Service |
58 |
| 1 Touch > Settings. |
58 |
| 2 Touch Wireless & networks > Mobile networks. |
58 |
| 3 Select the Data connection,then select operator’s check box to turn on the data connection. |
58 |
| Wi-Fi |
59 |
| Turning On Wi-Fi |
59 |
| 1 Touch > Settings. |
59 |
| 2 Touch Wireless & networks, and then select the Wi-Fi check box to turn on Wi-Fi. |
59 |
| Connecting to a Wireless Network |
59 |
| 1 After turning on Wi-Fi, touch > Settings. |
59 |
| 2 Touch Wireless & networks > Wi-Fi settings. You will see a list of detected Wi-Fi networks in the Wi-Fi networks section. |
59 |
| 3 Touch a Wi-Fi network to connect to it. |
59 |
| Sharing Your Phone’s Data Connection |
60 |
| Sharing Your Phone’s Data Connection via USB |
60 |
| 1 Touch > Settings. |
60 |
| 2 Touch Wireless & networks > Tethering & portable hotspot. |
60 |
| 3 Select the USB tethering check box to share your data connection. |
61 |
| Sharing Your Phone’s Data Connection as a Portable Wi-Fi Hotspot |
61 |
| 1 Touch > Settings. |
61 |
| 2 Touch Wireless & networks > Tethering & portable hotspot. |
61 |
| 3 Select the Portable Wi-Fi hotspot check box to share your data connection. |
61 |
| Browser |
61 |
| Opening the Browser |
61 |
| Opening a Webpage |
62 |
| 1 In a browser window, touch the URL field at the top of the screen. |
62 |
| 2 Use the keyboard to enter a webpage address. You can touch to enter the web page address by voice. |
62 |
| 3 As you enter the address, matching webpage addresses will appear on the screen. If you see the address you want, touch it and go directly to that webpage or complete entering your desired webpage. |
62 |
| Setting a Home Page |
62 |
| 1 In a browser window, touch . |
62 |
| 2 Touch More > Settings > Set home page. |
62 |
| 3 Enter the address of the desired home page, and then touch OK. |
63 |
| Managing Bookmarks |
63 |
| Adding a Bookmark |
63 |
| 1 In a browser window, go to the webpage you want to save as a bookmark. |
63 |
| 2 Touch , and then touch Bookmarks > Add bookmark. |
63 |
| 3 Edit the bookmark name and then touch OK. |
63 |
| Opening a Bookmark |
63 |
| 1 In a browser window, touch , and then touch Bookmarks. |
63 |
| 2 Touch the bookmark of the website you want to open. |
63 |
| Customizing Browser Settings |
63 |
| Bluetooth |
63 |
| Turning On Bluetooth |
64 |
| 1 Touch > Settings. |
64 |
| 2 Touch Wireless & networks, and then select the Bluetooth check box to turn on Bluetooth. When Bluetooth is turned on, the Bluetooth icon appears in the notification bar. |
64 |
| 3 Touch Bluetooth settings, and then select the Discoverable to make your mobile phone visible to other Bluetooth devices. |
64 |
| Pairing with and Connecting to a Bluetooth Device |
64 |
| 1 Ensure that the Bluetooth function on your mobile phone is enabled. |
65 |
| 2 On the home screen, touch > Settings > Wireless & networks > Bluetooth settings. Your mobile phone will then scan for Bluetooth devices in range. |
65 |
| 3 Touch the device you want to pair your mobile phone with. |
65 |
| 4 If required, enter the pairing password to complete the connection. |
65 |
| Sending Files via Bluetooth |
65 |
| 1 Touch and hold the file to be sent in your mobile phone or SD card. The active options menu is displayed. |
65 |
| 2 Touch Share, then Bluetooth to select a paired device. |
65 |
| Disconnecting from or Unpairing with a Bluetooth Device |
65 |
| 1 Touch > Settings > Wireless & networks > Bluetooth settings. |
65 |
| 2 Navigate to the Bluetooth devices section, and then touch and hold the device to which you are connected. |
66 |
| 3 Touch Unpair to disconnect from the device. |
66 |
| 9 Entertainment |
67 |
| Taking Photos and Recording Videos |
67 |
| Opening Your Camera |
67 |
| Capture Screen |
67 |
| Taking a Photo |
68 |
| 1 Open your camera application and switch it to camera mode. |
68 |
| 2 If necessary, change the camera settings. The preview changes as you change the settings. |
68 |
| 3 Frame your photo within the photo capture screen. |
68 |
| 4 Release to take your photo. |
68 |
| Viewing Your Photos |
68 |
| 1 After taking a photo, a thumbnail of the photo you have just taken is shown in the upper right corner of the capture screen. Touch the thumbnail to view it. |
68 |
| 2 Touch the onscreen button to do any of the following: |
68 |
| Recording a Video |
68 |
| 1 Open the camera application, and then switch it to camcorder mode. |
68 |
| 2 If necessary, change the camcorder settings. |
68 |
| 3 Frame the scene with which you want to start your video. |
68 |
| 4 Touch to start recording a video. |
69 |
| 5 Touch to stop recording. |
69 |
| Viewing Your Videos |
69 |
| 1 After recording a video, a thumbnail of the video you have just recorded is shown in the upper right corner of the capture screen. Touch the thumbnail to view it. |
69 |
| 2 Touch the onscreen buttons to do any of the following: |
69 |
| 3 If you want to view more videos, flick your finger left or right across the screen. |
69 |
| Using the Gallery |
69 |
| Opening the Gallery |
69 |
| Viewing a Picture |
70 |
| 1 In Gallery, touch the folder that contains the pictures you want to view. |
70 |
| 2 Touch the picture to view it in full-screen mode. |
70 |
| 3 Touch the screen. Then the zoom panel appears. You can zoom in or zoom out on the picture. |
70 |
| Rotating a Picture |
70 |
| 1 When viewing a picture, touch to display the operations panel. |
70 |
| 2 Touch More. |
70 |
| 3 Select either Rotate Left or Rotate Right. The picture is saved with the new orientation. |
70 |
| Cropping a Picture |
70 |
| 1 When viewing a picture, touch to display the operation panel, and then touch More > Crop. |
70 |
| 2 Use the cropping tool to select the portion of the picture to crop. |
70 |
| 3 Touch Save to save the cropped picture. Touch Discard to discard the changes. |
71 |
| Enjoying Music |
71 |
| Opening the Music Library |
71 |
| Playing Music |
71 |
| 1 From the music library, select a way to view your music. |
71 |
| 2 Touch the music file you want to play. |
71 |
| Creating a Playlist |
72 |
| 1 In the music library, select Songs. |
72 |
| 2 Touch and hold a music file, and then touch Add to playlist. |
72 |
| 3 Select New, and the enter the playlist name. |
72 |
| 4 Touch Save to create a new playlist. |
72 |
| Adding Music to a Playlist |
72 |
| 1 From the music library select a way to view your music. |
72 |
| 2 Touch and hold a music file, and then touch Add to playlist. |
73 |
| Playing Music in a Playlist |
73 |
| 1 In music library, touch Playlists. |
73 |
| 2 Touch and hold the playlist you want to play. |
73 |
| 3 Touch Play to play the playlist. |
73 |
| Listening to the FM Radio |
73 |
| Opening the FM Radio |
73 |
| 1 On the home screen, touch > FM Radio to open the application. |
73 |
| 2 The first time you open FM radio, touch > Search, which automatically scans for available FM channels, saves them as presets, and plays the first FM channel found. |
73 |
| Tuning the FM Radio |
73 |
| 10 Google Services |
75 |
| Creating a Google Account |
75 |
| 1 After reading the setup information, touch Next. |
75 |
| 2 Touch Create. |
75 |
| 3 Enter the first name, last name, and user name for your Google account, and then touch Next. The mobile phone will connect to a Google server to check whether the username is available. If the username you entered is already in use, you will be prom... |
75 |
| 4 Enter and confirm your Google account password. |
76 |
| 5 Select a security question from the drop-down menu, and then enter the answer. |
76 |
| 6 Touch Create. |
76 |
| 7 Enter the characters that appear on the screen, and then touch Next. |
76 |
| Gmail |
76 |
| Opening Gmail |
76 |
| Switching Between Accounts |
76 |
| 1 In the mail list, touch , and then touch Accounts. |
76 |
| 2 Touch the account that contains the email you want to read. |
76 |
| Creating and Sending an Email |
77 |
| 1 In the mail list, touch , and then touch Compose. |
77 |
| 2 Enter the message recipient’s email address in the To field. If you are sending the email to several recipients, separate the email addresses with commas. You can add as many message recipients as you want. |
77 |
| 3 Enter the email subject and write your email. |
77 |
| 4 After writing your email, touch . |
77 |
| Replying to or Forwarding an Email |
77 |
| 1 In the mail list, touch the email that you want to reply to or forward. |
77 |
| 2 Touch to reply. You can also touch , and then touch Reply, Reply all, or Forward. |
77 |
| 3 Do one of the following: |
77 |
| 4 Touch to send, or touch to save as a draft. |
78 |
| Searching for an Email |
78 |
| 1 In the mail list, touch , and then touch Search. |
78 |
| 2 Enter the search keywords in the box, and then touch . |
78 |
| Customizing Your Gmail Settings |
78 |
| Talk |
78 |
| Opening Talk |
78 |
| Adding a Friend |
78 |
| 1 In the friends list, touch , and then touch Add friend. |
78 |
| 2 Enter the Talk instant messaging ID or Gmail address of the friend you want to add. |
78 |
| 3 Touch Send. |
78 |
| Accepting an Invitation |
79 |
| 1 If you have invited anyone to chat or if someone else has invited you to chat, this information will appear in the friends list. |
79 |
| 2 Touch a pending invitation, and then touch Accept. |
79 |
| Starting a Chat |
79 |
| 1 In the friends list, touch a friend's name in the friends list. |
79 |
| 2 Use the onscreen keyboard to enter text and chat with your friend. |
79 |
| 3 After entering your message, touch Send. |
79 |
| Setting Notifications for New Instant Messages |
79 |
| Signing out of Talk |
80 |
| Maps |
80 |
| Enabling the Location Service |
80 |
| 1 On the home screen, touch > Settings. |
80 |
| 2 Touch Location. |
80 |
| 3 In the Location section, select the Use wireless networks check box. |
80 |
| Opening Maps |
80 |
| Searching for Places of Interest |
80 |
| 1 On the map, touch , and then touch Search. |
80 |
| 2 Enter the place you want to search for in the search box, and then touch the Search icon. |
80 |
| 3 Your search results will then be displayed. Touch a place you are interested in and the application will show where it is on the map. |
80 |
| Getting Directions |
81 |
| 1 While viewing a map, touch , and then touch Directions. |
81 |
| 2 Enter the starting point in the first text box, and then enter your destination in the second text box. |
81 |
| 3 Touch the icon for car, public transit, or walking directions. |
81 |
| 4 Touch Get directions. Your directions will appear in a list. |
81 |
| 5 Touch a direction item on the list to show it on the map. |
81 |
| 6 When you finish viewing or following the directions, touch , and then touch Clear Map to reset the map. |
81 |
| YouTube |
81 |
| Opening YouTube |
81 |
| Searching for a Video |
81 |
| 1 On the YouTube screen, and touch . |
81 |
| 2 Enter a search keyword, and then touch the Search icon. |
81 |
| 3 You will see a number of search results displayed below the notification bar. Scroll through the results and touch a video to watch it. |
81 |
| Sharing a Video |
82 |
| Play Store |
82 |
| Opening Play Store |
82 |
| 1 On the home screen, touch > Play Store |
82 |
| 2 When you open Play Store for the first time, the Android Market Terms of Service window will appear. Touch Accept to continue. |
82 |
| Searching for Applications |
82 |
| Installing an Application |
82 |
| 1 In the Play Store, select a category, and then touch the application you want to download. On the application details screen, you can view more information about this application, such as its cost, overall rating, user comments, and similar applicat... |
82 |
| 2 To install the application, touch Install (if it is free) or touch the button with a price (if it is not free), and confirm your download or purchase. |
83 |
| 3 To check the progress of a download, open the notification panel. Most applications are installed within seconds. To stop an application from downloading, touch the cross (×). |
83 |
| Uninstalling an Application |
83 |
| 1 On the Play Store screen, touch > My Apps. |
83 |
| 2 Touch the application you want to uninstall, and then touch Uninstall. |
83 |
| 3 When prompted, touch OK to remove the application from your mobile phone. |
83 |
| 11 Synchronizing Information |
84 |
| Managing Your Accounts |
84 |
| Adding an Account |
84 |
| 1 On the home screen, touch > Settings > Accounts & sync. The screen displays your current synchronization settings and a list of your current accounts. |
85 |
| 2 Touch Add account. |
85 |
| 3 Touch the kind of account to add. |
85 |
| 4 Follow the onscreen steps to enter the required and optional information about the account. Most accounts require a username and password, but the details depend on the kind of account and the configuration of the service to which you are connecting. |
85 |
| 5 Configure the account. Depending on the kind of account, you may be asked to configure what kind of data you want to synchronize to the mobile phone, to name the account, and for other details. When you are finished, the account is added to the list... |
85 |
| Adding an Exchange Account |
85 |
| 1 On the home screen, touch > Settings > Accounts & sync. |
85 |
| 2 Touch Corporate. |
85 |
| 3 Follow the instructions and enter the required information about the exchange account you want to add. For details, contact the server administrator. |
86 |
| 4 Touch Next to display the Account options screen. Configure the synchronization settings for this account. |
86 |
| 5 Touch Next to finish configuring the account settings. If emails are not synchronized properly, contact the server administrator. |
86 |
| Removing an Account |
86 |
| Prerequisite |
86 |
| 1 On the Accounts & sync settings screen, touch the account to be deleted. |
86 |
| 2 Touch ,and then touch Remove account . |
86 |
| 3 Confirm that you want to remove the account. |
86 |
| Customizing Your Account Synchronization |
87 |
| Configuring General Synchronization Settings |
87 |
| Changing an Account’s Synchronization Settings |
88 |
| 1 On the Accounts & sync settings screen, select Background data and Auto-sync. |
88 |
| 2 Touch the account for which you want to change the synchronization settings. The data and synchronization screen opens, displaying a list of the kinds of information the account can synchronize. |
88 |
| 3 Select the items you want to synchronize from the list. Your phone will automatically synchronize the selected items. |
88 |
| 12 Using Other Applications |
89 |
| All Backup |
89 |
| Backing Up data by using Backup to SD |
89 |
| 1 On the home screen, touch > All Backup. |
89 |
| 2 Touch Backup to SD. |
89 |
| 3 Enter a file name in the Filename: field. |
89 |
| 4 In the Backup contents: field, select the contents you want to back up. |
89 |
| 5 Touch Backup to back up the selected data. |
89 |
| Calendar |
89 |
| Opening Calendar |
89 |
| Creating an Event |
90 |
| 1 In any calendar view, touch > More, and then touch New event to open the Event details screen. |
90 |
| 2 Enter the event name. |
90 |
| 3 Enter the location of the event and a description. |
90 |
| 4 Specify in Repetition whether the event recurs and, if it does, how frequently, and then set the time for your event reminder in Reminders. |
90 |
| 5 Touch Done. |
91 |
| Setting an Event Reminder |
91 |
| 1 In any calendar view, touch an event to view its details. |
91 |
| 2 Touch “+” to add a reminder, or touch the reminder’s “-” button to delete an existing reminder. |
91 |
| 3 Touch the reminder time, and then, from the list displayed, touch the length of time before the event when you want to be reminded. When the time comes, you will receive a notification about the event. |
91 |
| Setting Synchronization and Display |
91 |
| 1 In any calendar view, touch . Then touch More > Calendars. |
91 |
| 2 Touch the icon next to a calendar to change whether it is synchronized and whether it is displayed. |
91 |
| 3 Touch OK. |
92 |
| Customizing Calendar Settings |
92 |
| ES File Explorer |
92 |
| Opening ES File Explorer |
92 |
| Creating a Folder |
93 |
| 1 On the ES File Explorer screen, access the directory in which you want to create a new folder. |
93 |
| 2 Touch > New to open the options panel, and then touch Folder. |
93 |
| 3 Enter the name of the new folder in the text box. |
93 |
| 4 Touch Ok. |
93 |
| Moving or Copying a File |
93 |
| 1 On the ES File Explorer screen, Touch Select, and then you can make multiple selections. |
93 |
| 2 Touch the file or folder you want to move or copy. When a file or a folder is selected, a check mark will appear. |
93 |
| To select or unselect all files, Touch and hold Select until the Choose menu is displayed. |
93 |
| 3 Touch Cut or Copy. |
93 |
| 4 Select the path where you want the file to be copied or moved. Touch Paste to move or copy the file to the selected path. |
93 |
| Searching for a File |
93 |
| 1 On the ES File Explorer screen, touch a folder to access the directory where the file you want is located. |
93 |
| 2 Touch Search. |
93 |
| 3 Write a key word of the name of your file in the search box. |
93 |
| 4 Touch OK. Your mobile phone will start the search. |
93 |
| 5 A list of search results will be displayed. Touch a file in the list to open it. |
94 |
| 6 Touch the back key to return to the file manager screen. |
94 |
| Extracting a File |
94 |
| 1 Touch and hold a compressed file. |
94 |
| 2 Touch > Extract to. |
94 |
| 3 Edit the save path for the extracted files. |
94 |
| 4 Touch OK to start extracting. |
94 |
| Clock |
94 |
| Opening the Clock |
94 |
| Opening the Alarms |
94 |
| Adding an Alarm |
94 |
| 1 On the alarm list screen, touch Add alarm. |
94 |
| 2 Set the alarm, and then touch Done. |
95 |
| Setting an Alarm |
95 |
| 1 On the alarm list screen, touch one of the alarms on the screen. |
95 |
| 2 Touch Time to set the time of the alarm. |
95 |
| 3 Touch Repeat to set the days when you want the alarm to sound. |
95 |
| 4 Touch Ringtone to select a ringtone for the alarm. |
95 |
| 5 Select the Vibrate check box to enable the phone to vibrate, in addition to playing the ringtone. |
95 |
| 6 Touch Label to enter a name for the alarm. |
95 |
| 7 Touch Done. |
95 |
| Customizing Alarm Settings |
95 |
| Calculator |
95 |
| Opening Calculator |
95 |
| Switching Between Basic and Advanced panel |
95 |
| ToDo |
96 |
| 1 On the home screen, touch > ToDo to open the application. |
96 |
| 2 Touch to create a note. |
96 |
| 3 Touch No expire date to open the time setting box, you can set the year and month, then touch set. |
96 |
| 4 Touch or Done to save the note. |
96 |
| Weather Clock |
96 |
| Setting the Default City |
96 |
| 1 On the home screen, touch > Weather Clock. |
96 |
| 2 On the weather clock screen, touch > Add city. |
96 |
| 3 Select the city you want to add. |
96 |
| 4 On the weather information screen, touch the city name, and confirm that you want to set the city as the default city. |
97 |
| Updating Weather |
97 |
| 1 On the weather clock screen, touch > More > Settings. |
97 |
| 2 Select Auto update. |
97 |
| 3 Touch Update interval to set the interval between automatic weather updates. |
97 |
| Changing a City |
97 |
| 1 On the weather clock screen, touch > Change city. |
97 |
| 2 Select a city from the Popular cities list, or search for another city by entering its name in the search field. |
97 |
| Sharing Weather Information |
97 |
| 1 On the weather clock screen, touch > Share weather. |
97 |
| 2 Enter a phone number or a contact's name in the To field, or touch to select a contact. |
97 |
| 3 Touch Send to send weather information to the recipient. |
98 |
| 13 Managing Your Mobile Phone |
99 |
| Setting the Date and Time |
99 |
| 1 On the Settings screen, touch Date & time. |
99 |
| 2 Clear the Automatic with network check box. |
99 |
| 3 Touch Set date. On the set date screen, flick up and down to adjust the month, date, and year, and then touch Set when the configuration is complete. |
99 |
| 4 Touch Select time zone, and then select the desired time zone from the list. Scroll the list to view more time zones. |
99 |
| 5 Touch Set time. On the set time screen, flick up and down to adjust the hour and minute. Touch Set when the configuration is complete. |
99 |
| 6 Select or clear the Use 24-hour format check box to switch between 24-hour and 12-hour formats. |
99 |
| 7 Touch Select date format to select how you want the date to display on your mobile phone. |
99 |
| Setting the Display |
100 |
| Adjusting the Screen Brightness |
100 |
| 1 On the Settings screen, touch Display > Brightness. |
100 |
| 2 Drag the slider left to make the screen darker, or right to make it brighter. |
100 |
| 3 Touch OK to save the adjustment. |
100 |
| Adjusting the Time Before the Screen Turns Off |
100 |
| 1 On the Settings screen, touch Display > Screen timeout. |
100 |
| 2 Select the duration you want the screen to be illuminated. |
100 |
| Setting Ringers |
100 |
| Turning On Silent Mode |
100 |
| 1 On the Settings screen, touch Audio profiles. |
100 |
| 2 Select the Silent check box to silence all sounds except alarms, and music and video media. |
100 |
| Adjusting the Volume |
100 |
| 1 On the Settings screen, touch Audio profiles > General > Volume. |
101 |
| 2 Drag the slider left to make the volume lower, or right to make it higher. |
101 |
| 3 Touch OK to save the adjustment. |
101 |
| Changing the Phone Ringtone |
101 |
| 1 On the Settings screen, touch Audio profiles > General> Phone ringtone. |
101 |
| 2 In the displayed list, select an option: |
101 |
| 3 Touch OK. |
101 |
| Changing the Message Ringtone |
101 |
| 1 On the home screen, touch > Messaging. |
101 |
| 2 In the message list, touch > Settings > Select ringtone. |
101 |
| 3 In the displayed list, select an option: |
101 |
| 4 Touch OK. |
102 |
| Setting Phone Services |
102 |
| Customizing Call Settings |
102 |
| Turning on Data Roaming |
102 |
| 1 On the Settings screen, touch Wireless & networks > Mobile networks. |
102 |
| 2 Select Data roming check box . |
102 |
| Switching off the Data Service |
102 |
| 1 On the Settings screen, touch Wireless & networks > Mobile networks. |
102 |
| 2 Select Data enabled check box. |
102 |
| Configuring Text-to-Speech |
102 |
| Installing Voice Data |
103 |
| 1 On the Settings screen, touch Voice input & output > Text-to-speech settings > Install voice data. |
103 |
| 2 If your mobile phone does not have speech synthesizer data installed, connect to Android Market and let it guide you through the process of downloading and installing the data. |
103 |
| 3 Follow the instructions to install the voice data. |
103 |
| Adjusting the Speech Rate |
103 |
| 1 On the Settings screen, touch Voice input & output > Text-to-speech settings > Speech rate. |
103 |
| 2 Select a speed at which the text is to be spoken. |
103 |
| Protecting Your Mobile Phone |
103 |
| Turning on Your SIM Card PIN |
103 |
| 1 On the Settings screen, touch Security > Set up SIM card lock. |
103 |
| 2 Select the Lock SIM card check box. |
103 |
| 3 Use the keyboard to enter the PIN, and then touch OK. |
103 |
| 4 To change the PIN at any time, touch Change SIM PIN. |
103 |
| Protecting Your Mobile Phone with a Screen Lock |
104 |
| 1 On the Settings screen, touch Security > Set up screen lock > Pattern. |
104 |
| 2 Flick your finger vertically, horizontally or diagonally, connect at least four dots in any order you choose. Lift your finger from the screen when you are finished. |
104 |
| 3 Your mobile phone will record the pattern. Touch Continue. |
104 |
| 4 When prompted, draw the screen unlock pattern again, and then touch Confirm. |
104 |
| Protecting Your Mobile Phone with a Numeric PIN |
104 |
| 1 On the Settings screen, touch Security > Set up screen lock > PIN. |
104 |
| 2 Enter at least four characters. |
104 |
| 3 Touch Continue. |
104 |
| 4 Enter the same characters again and touch OK. |
104 |
| Managing Applications |
105 |
| Viewing an Installed Application |
105 |
| 1 On the Settings screen, touch Applications > Manage applications. |
105 |
| 2 In the applications list, do either of the following: |
105 |
| Uninstalling an Application |
105 |
| 1 On the Settings screen, touch Applications > Manage applications. |
105 |
| 2 Touch an application, and then touch Uninstall. |
105 |
| Moving an Application to the microSD Card |
105 |
| 1 On the Settings screen, touch Applications > Manage applications. |
105 |
| 2 Touch an application in the list. Then touch Move to SD card to move the bulk of the application from the phone’s internal storage. |
106 |
| Ways to Free Up Your Mobile Phone Memory |
106 |
| Resetting Your Mobile Phone |
106 |
| Restoring Factory Data |
106 |
| 1 On the Settings screen, touch Privacy > Factory data reset. |
107 |
| 2 When prompted, touch Reset phone, and then touch Erase everything. The mobile phone resets the settings to the original factory settings, and then restarts. |
107 |
| System Updates |
107 |
| 1 Back up your data before upgrading, because after the upgrade there is the risk of losing data. |
107 |
| 2 Make sure that your microSD card has sufficient space to store the new software version. |
107 |
| 3 Perform the online update following the onscreen instructions. |
107 |
| 14 Appendix |
108 |
| FAQs |
108 |
| How Can I Use a microSD Card to Import Contacts to My Phone from a Different Mobile Phone? |
108 |
| 1) Save the contacts you want to import to your mobile phone to a microSD card as a .vcf file. |
108 |
| 2) Insert the microSD card into your mobile phone and find the .vcf file using ES File Explorer. |
108 |
| 3) Touch the .vcf file. The phone displays a message asking whether you want to import the contacts. |
108 |
| 4) Touch Yes to import the contacts. |
108 |
| How Do I Set a Song As a Phone Ringtone? |
108 |
| How Do I Prevent Automatic Change of Screen Orientation When Rotating My Phone? |
109 |
| How Do I Set an Unlock Pattern? |
109 |
| How Can I Change the Input Method? |
109 |
| How Do I Stop the Song Playing in the Background? |
109 |
| How Do I Return to the Call Screen? |
109 |
| How Do I Create an Application Shortcut on the Home Screen? |
109 |
| How Do I Hide the Keyboard? |
109 |
 1
1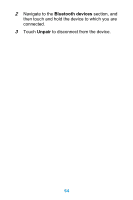 66
66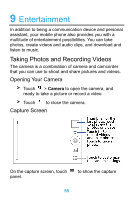 67
67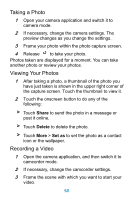 68
68 69
69 70
70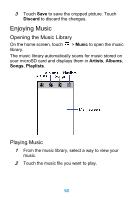 71
71 72
72 73
73 74
74 75
75 76
76

