Huawei MediaPad T1 10 MediaPad User Guide
Huawei MediaPad T1 10 Manual
 |
View all Huawei MediaPad T1 10 manuals
Add to My Manuals
Save this manual to your list of manuals |
Huawei MediaPad T1 10 manual content summary:
- Huawei MediaPad T1 10 | MediaPad User Guide - Page 1
User Guide EMUI 3.0 - Huawei MediaPad T1 10 | MediaPad User Guide - Page 2
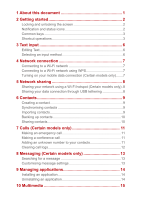
using a Wi-Fi hotspot (Certain models only) .8 Sharing your data connection through USB tethering 8 6 Contacts 9 Creating a contact 9 Synchronising contacts 9 Importing contacts 9 Backing up contacts 10 Sharing contacts 10 7 Calls (Certain models only 11 Making an emergency call 11 Making - Huawei MediaPad T1 10 | MediaPad User Guide - Page 3
23 Enabling power saving mode 23 Checking the memory status 23 Setting the date and time 24 Formatting a microSD card 24 Restoring factory settings 24 Updating your HUAWEI MediaPad 24 14 Personal Information and Data Security 25 15 Legal Notice 26 - Huawei MediaPad T1 10 | MediaPad User Guide - Page 4
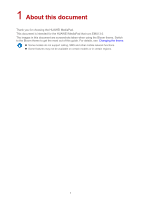
document is intended for the HUAWEI MediaPad that runs EMUI 3.0. The images in this document are screenshots taken when using the Bloom theme. Switch to the Bloom theme to get the most out of this guide. For details, see Changing the theme. Some models do not support calling, SMS and other mobile - Huawei MediaPad T1 10 | MediaPad User Guide - Page 5
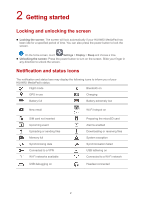
you of your HUAWEI MediaPad's status. Flight mode Bluetooth on GPS in use Charging Battery full Battery extremely low New email / Wi-Fi hotspot on SIM card not inserted Upcoming event Uploading or sending files Memory full Synchronising data Connected - Huawei MediaPad T1 10 | MediaPad User Guide - Page 6
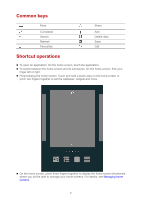
Common keys More Completed Search Refresh Favourites Share Add Delete data Save Call Shortcut operations To open an application: On the home screen, touch the application. To switch between the home screen and its extensions: On the home screen, flick your finger left or right. - Huawei MediaPad T1 10 | MediaPad User Guide - Page 7
Opening the notification and shortcut panels: Slide down from the status bar to open the notification panel. Swipe left or right to switch between the notifications and shortcuts tabs. 4 - Huawei MediaPad T1 10 | MediaPad User Guide - Page 8
Touch a notification to view its details and swipe left or right across a notification to dismiss it. Touch to delete all notifications. Touch to display all of the shortcut switches. You can then touch to customise the list. Drag the slider to adjust the screen brightness. You can also enable - Huawei MediaPad T1 10 | MediaPad User Guide - Page 9
insert the text (to move the insertion point, drag ) and touch Paste to paste the text you copied or cut. Selecting an input method The HUAWEI MediaPad provides multiple methods to input text. You can select your desired input method. 1. On the text editing screen, touch a text field to bring up - Huawei MediaPad T1 10 | MediaPad User Guide - Page 10
onscreen instructions to enter the required information and connect to the network. Your HUAWEI MediaPad consumes more power when Wi-Fi is turned on. To save battery power, turn off Wi-Fi when it is not in use. Connecting to a Wi-Fi network using WPS If the wireless router being used supports Wi - Huawei MediaPad T1 10 | MediaPad User Guide - Page 11
hotspot and follow the onscreen instructions to set the required information, such as your Wi-Fi network name and password. Once the Wi-Fi hotspot settings are complete, other Wi-Fi enabled devices can search for and connect to the Wi-Fi hotspot provided by your HUAWEI MediaPad. Sharing your data - Huawei MediaPad T1 10 | MediaPad User Guide - Page 12
box. If the account you want to synchronise has not been added to your HUAWEI MediaPad, touch Add account and follow the onscreen instructions to add the account. When it is added, your HUAWEI MediaPad automatically synchronises with it. Importing contacts You can import contacts from a micro-SIM - Huawei MediaPad T1 10 | MediaPad User Guide - Page 13
case your contacts are accidentally deleted or lost. 1. On the home screen, touch Contacts to display your contacts list. 2. Touch > Import/Export. 3. Touch Export to storage. Sharing contacts You can share contacts in your HUAWEI MediaPad follow the onscreen instructions to share the contacts - Huawei MediaPad T1 10 | MediaPad User Guide - Page 14
and colleagues is easy with your HUAWEI MediaPad. Before you make a conference call, make sure you have subscribed to the conference call service. For details, contact your service provider. 1. Call the first participant. 2. When the call is connected, touch > with the first participant is - Huawei MediaPad T1 10 | MediaPad User Guide - Page 15
Clearing call logs To delete a single call log entry: On the Dialler screen, touch and hold the call log entry. On the displayed option menu, touch Delete entry. To delete all or multiple call log entries: On the Dialler screen, touch log. > Delete call Select the check box and touch to - Huawei MediaPad T1 10 | MediaPad User Guide - Page 16
8 Messaging (Certain models only) Searching for a message Lots of messages and looking for one in particular? This handy function makes it easy to find that elusive message. 1. On the home screen, touch Messaging. 2. Touch > Search. 3. Enter a keyword in the search box. 4. In the results - Huawei MediaPad T1 10 | MediaPad User Guide - Page 17
Connect your HUAWEI MediaPad to a computer. Use HiSuite or third-party software to download the application. After you have downloaded the application, follow the onscreen instructions to install it. Use Bluetooth or Wi-Fi Direct to send an application on another device, such as a phone or tablet - Huawei MediaPad T1 10 | MediaPad User Guide - Page 18
only a USB OTG cable. To purchase a USB OTG cable, please contact an authorised Huawei supplier or your device retailer. Use a USB OTG cable to connect a camera and your HUAWEI MediaPad. 1. On your HUAWEI MediaPad's home screen, touch Files > Local > USB. 2. Touch or , select the photos or - Huawei MediaPad T1 10 | MediaPad User Guide - Page 19
You can share photos and videos via Bluetooth or email. Take your HUAWEI MediaPad and start sharing! 1. On the home screen, touch Gallery to open for example, using Bluetooth or Wi-Fi Direct. Then follow the onscreen instructions. For details, see File sharing. Scanning a QR code using the - Huawei MediaPad T1 10 | MediaPad User Guide - Page 20
11 Customised settings Changing the theme Your HUAWEI MediaPad comes with multiple themes, allowing you to change the look of your device as often as you want. 1. On the home screen, touch Themes. 2. Select - Huawei MediaPad T1 10 | MediaPad User Guide - Page 21
touch Settings > Sound. 2. Select the desired ringtone type. 3. Follow the onscreen instructions to set your favourite music as the ringtone. Setting the font size 1. On models only) Drag the slider left or right to manually adjust the screen brightness. You can also open the notification - Huawei MediaPad T1 10 | MediaPad User Guide - Page 22
3. Select a password format. 4. Follow the onscreen instructions and enter your owner password and guest password. 5. Under Set private data, set your private contacts, albums and applications. To disable privacy protection, unlock your HUAWEI MediaPad using the owner password. Enter the Privacy - Huawei MediaPad T1 10 | MediaPad User Guide - Page 23
or games on your HUAWEI MediaPad to a large screen, such as a TV, to view them more conveniently. If your screen supports HDMI and a resolution of 720p or above, you can use it with a HUAWEI MediaQ for multi-screen display. 1. Use an HDMI cable to connect the HUAWEI MediaQ to the TV. 2. Turn on the - Huawei MediaPad T1 10 | MediaPad User Guide - Page 24
corner of the TV. Connect your HUAWEI MediaPad and HUAWEI MediaQ to your home Wi-Fi network. 21 - Huawei MediaPad T1 10 | MediaPad User Guide - Page 25
select the receiving For more details, refer to the HUAWEI MediaQ User Guide. Copying files from a computer Use a USB cable to connect your HUAWEI MediaPad to a computer. Follow your HUAWEI MediaPad's onscreen instructions to select a connection method. You can then transfer files between your - Huawei MediaPad T1 10 | MediaPad User Guide - Page 26
a screen lock 1. On the home screen, touch Settings > Security > Screen lock. 2. Select a locking method and follow the onscreen instructions. With a screen lock set, if your HUAWEI MediaPad is idle for the specified period of time, it automatically locks its screen. You can also touch the power - Huawei MediaPad T1 10 | MediaPad User Guide - Page 27
Follow the onscreen instructions to set the date and time. If your HUAWEI MediaPad is set to automatically update the date and time, it obtains information about the date and time from the network and updates them according to your time zone. In this case, you cannot manually change the time zone - Huawei MediaPad T1 10 | MediaPad User Guide - Page 28
avoid theft of your personal information. If you use services such as Wi-Fi or Bluetooth, set passwords for these services to prevent unauthorised access. When these services are not in use, turn them off. Install or upgrade device security software and regularly scan for viruses. Be sure to - Huawei MediaPad T1 10 | MediaPad User Guide - Page 29
of Huawei Android™ is a trademark of Google Inc. LTE is Huawei provide support to customers who use third-party software and applications, nor be responsible or liable for the functions or performance of third-party software and applications. Third-party software and applications services - Huawei MediaPad T1 10 | MediaPad User Guide - Page 30
to the platform. Therefore, this product may not support all the functions that are supported by the standard Android platform or may be incompatible with third-party software. Huawei does not provide any warranty or representation in connect with any such compatibility and expressly excludes all
-
 1
1 -
 2
2 -
 3
3 -
 4
4 -
 5
5 -
 6
6 -
 7
7 -
8
-
9
-
10
-
11
-
12
-
13
-
14
-
15
-
16
-
17
-
18
-
19
-
20
-
21
-
22
-
23
-
24
-
25
-
26
-
27
-
28
-
29
-
30
 |
 |

User Guide
EMUI 3.0