Hunter 23562 Owner's Manual - Page 8
If necessary, lift the side of the gasket to insert the screws into
 |
View all Hunter 23562 manuals
Add to My Manuals
Save this manual to your list of manuals |
Page 8 highlights
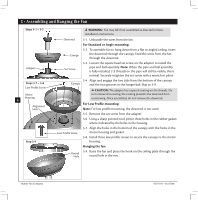
5 • Installing the Canopy Steps 5-1- 5-3 Canopy 5-1. Holding the canopy, raise the fan off the hook. 5-2. Align the holes in the canopy with the mounting holes on the ceiling plate. 5-3. Insert and tighten the mounting screws securely. Note: If necessary, lift the side of the gasket to insert the screws into the mounting holes on the ceiling plate. Mounting Screw 8 Hunter Fan Company 42701-01 • 01/25/06
-
 1
1 -
2
-
 3
3 -
 4
4 -
 5
5 -
 6
6 -
 7
7 -
 8
8 -
 9
9 -
 10
10 -
 11
11
 |
 |

8
Hunter Fan Company
42701-01 • 01/25/06
5 • Installing the Canopy
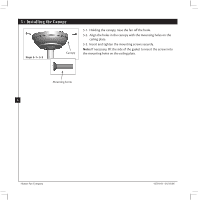
5-1. Holding the canopy, raise the fan off the hook.
5-2. Align the holes in the canopy with the mounting holes on the
ceiling plate.
5-3. Insert and tighten the mounting screws securely.
Note:
If necessary, lift the side of the gasket to insert the screws into
the mounting holes on the ceiling plate.
Steps 5-1– 5-3
Mounting Screw
Canopy