Hunter 81021 Owner's Manual - Page 5
Choose Installation Option
 |
View all Hunter 81021 manuals
Add to My Manuals
Save this manual to your list of manuals |
Page 5 highlights
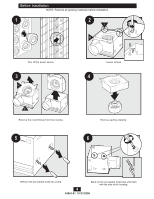
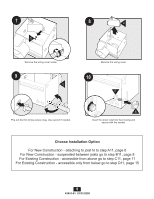
7 G 8 F Remove the wiring cover screw. 9 E Remove the wiring cover. 10 C Pop out the first wiring access slug. Use second if needed. B Insert the strain relief into the housing and secure with the washer. Choose Installation Option For New Construction - attaching to joist fo to step A11, page 6 For New Construction - suspended between joists go to step B11, page 8 For Existing Construction - accessible from above go to step C11, page 11 For Existing Construction - accessible only from below go to step D11, page 15 5 43041-01 01/31/2008
-
 1
1 -
 2
2 -
 3
3 -
 4
4 -
 5
5 -
 6
6 -
 7
7 -
 8
8 -
 9
9 -
 10
10 -
 11
11 -
12
-
13
-
14
-
15
-
16
-
17
-
18
-
19
-
20
-
21
-
22
-
23
-
24
-
25
-
26
-
27
-
28
-
29
-
30
-
31
-
32
-
33
-
34
-
35
-
36
-
37
-
38
-
39
-
40
-
41
-
42
-
43
-
44
-
45
-
46
-
47
-
48
-
49
-
50
-
51
-
52
-
53
-
54
-
55
-
56
-
57
-
58
-
59
-
60
-
61
-
62
-
63
-
64
-
65
 |
 |

43041-01
01/31/2008
5
7
G
Pop out the first wiring access slug. Use second if needed.
Insert the strain relief into the housing and
secure with the washer.
Remove the wiring cover screw.
Remove the wiring cover.
Choose Installation Option
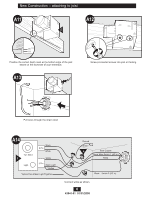
For New Construction - attaching to joist fo to step A11, page 6
For New Construction - suspended between joists go to step B11, page 8
For Existing Construction - accessible from above go to step C11, page 11
For Existing Construction - accessible only from below go to step D11, page 15
8
F
9
E
10
B
C