Hunter 82040 Owner's Manual - Page 10
Pop out a wiring access slug.
 |
View all Hunter 82040 manuals
Add to My Manuals
Save this manual to your list of manuals |
Page 10 highlights
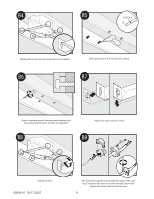
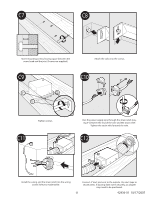
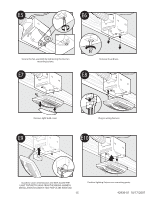
C3 OR Pop out a wiring access slug. C3 C4 Slide the mounting rails into brackets. C5 5/8 5/8 1/2 1/2 Using the depth markings on the housing, position the bottom edge of the housing so that it will be flush with the sheetrock. C6 1/16" bit Mark position of screws by using holes as a template. Drill a pilot hole at the TOP of each outline, AS SHOWN. 42936-01 10/17/2007 10
-
 1
1 -
2
-
3
-
4
-
 5
5 -
 6
6 -
 7
7 -
 8
8 -
 9
9 -
 10
10 -
 11
11 -
 12
12 -
 13
13 -
 14
14 -
 15
15 -
16
-
17
-
18
-
19
-
20
-
21
-
22
-
23
-
24
-
25
-
26
-
27
-
28
-
29
-
30
-
31
-
32
-
33
-
34
-
35
-
36
 |
 |

42936-01
10/17/2007
10
Slide the mounting rails into brackets.
C3
5/8
1/2
5/8
1/2
C4
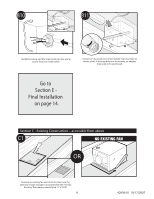
Using the depth markings on the housing, position the
bottom edge of the housing so that it will be flush with
the sheetrock.
Pop out a wiring access slug.
1/16” bit
C6
C5
Mark position of screws by using holes as a template.
Drill a pilot hole at the TOP of each outline, AS SHOWN.
C3
OR