Husqvarna 450 Operation Manual - Page 27
Muffler, Starter - piston replacement
 |
View all Husqvarna 450 manuals
Add to My Manuals
Save this manual to your list of manuals |
Page 27 highlights
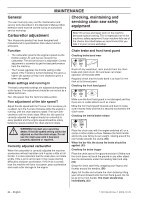
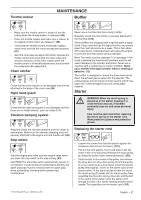
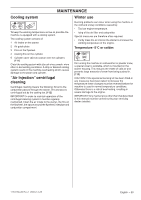
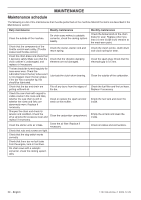
Throttle lockout MAINTENANCE Muffler • Make sure the throttle control is locked at the idle setting when the throttle lockout is released. (95) • Press the throttle lockout and make sure it returns to its original position when you release it. (96) • Check that the throttle control and throttle lockout move freely and that the return springs work properly. (97) • Start the chain saw and apply full throttle. Release the throttle control and check that the chain stops and remains stationary. If the chain rotates when the throttle control is in the idle position you should check the carburettor idle adjustment. Chain catcher Check that the chain catcher is not damaged and is firmly attached to the body of the chain saw. (98) Right hand guard Check that the right hand guard is not damaged and that there are no visible defects, such as cracks. (11) Vibration damping system Never use a machine that has a faulty muffler. Regularly check that the muffler is securely attached to the machine. (100) Some mufflers are equipped with a special spark arrestor mesh. If your machine has this type of muffler, you should clean the mesh at least once a week. This is best done with a wire brush. A blocked mesh will cause the engine to overheat and may lead to serious damage. Note! The mesh must be replaced if it is damaged. If the mesh is blocked the machine will overheat and this will cause damage to the cylinder and piston. Never use a machine with a muffler that is in poor condition. Never use a muffler if the spark arrestor mesh is missing or defective. (13) The muffler is designed to reduce the noise level and to direct the exhaust gases away from the operator. The exhaust gases are hot and can contain sparks, which may cause fire if directed against dry and combustible material. Starter WARNING! When the recoil spring is ! wound up in the starter housing it is under tension and can, if handled carelessly, pop out and cause personal injury. Care must be exercised when replacing the return spring or the starter cord. Wear protective glasses and protective gloves. Regularly check the vibration damping units for cracks or deformation. Make sure the vibration damping units are securely attached to the engine unit and handle unit. (99) Stop switch Start the engine and make sure the engine stops when you move the stop switch to the stop setting. (53) CAUTION! The start/stop switch automatically returns to run position. In order to prevent unintentional starting, the spark plug cap must be removed from the spark plug when assembling, checking and/or performing maintenance. Replacing the starter cord • Loosen the screws that hold the starter against the crankcase and remove the starter. (101) • Pull out the cord approx. 30 cm and hook it into the notch in the rim of the pulley. Release the recoil spring by letting the pulley rotate slowly backwards. (102) • Undo the bolt in the centre of the pulley and remove the drive disc (A), drive disc spring (B) and the pulley (C). Insert and secure a new starter cord in the starter pulley. Wind approx. 3 turns of the starter cord on the starter pulley. Fit the starter pulley so that the end of the recoil spring (D) hooks into the starter pulley. Now assemble the drive disc spring, drive disc and the bolt in the centre of the pulley. Carry the starter cord through the hole in the starter housing and the starter handle. Tie a good knot on the starter cord. (103) 1153136-26 Rev.1 2009-12-29 English - 27
-
 1
1 -
2
-
3
-
4
-
5
-
6
-
7
-
8
-
9
-
10
-
11
-
12
-
13
-
14
-
15
-
16
-
17
-
18
-
19
-
20
-
21
-
 22
22 -
 23
23 -
 24
24 -
 25
25 -
 26
26 -
 27
27 -
 28
28 -
 29
29 -
 30
30 -
 31
31 -
 32
32 -
33
-
34
-
35
-
36
 |
 |
