Husqvarna AUTOMOWER 520 Owner Manual - Page 54
the other end of this new wire at the middle of
 |
View all Husqvarna AUTOMOWER 520 manuals
Add to My Manuals
Save this manual to your list of manuals |
Page 54 highlights
Continue until only a very short section of the wire remains which is the difference between a solid green light and a flashing blue light. Then follow instruction in step 5 below. 4. If indicator lamp still flashes blue in step 3 above: Put AL and G1 back in their original positions. Then switch AR and G1. If indicator lamp now is lit with a solid green light then disconnect AL and connect a new boundary wire to AL. Connect the other end of this new wire at the middle of the suspected wire section. Follow the same approach as in 3a) and 3b) above. 5. When the break is found, the damaged section must be replaced with a new wire. Always use original couplers. 54 - Troubleshooting 362 - 002 - 06.02.2018
-
 1
1 -
2
-
3
-
4
-
5
-
6
-
7
-
8
-
9
-
10
-
11
-
12
-
13
-
14
-
15
-
16
-
17
-
18
-
19
-
20
-
21
-
22
-
23
-
24
-
25
-
26
-
27
-
28
-
29
-
30
-
31
-
32
-
33
-
34
-
35
-
36
-
37
-
38
-
39
-
40
-
41
-
42
-
43
-
44
-
45
-
46
-
47
-
48
-
 49
49 -
 50
50 -
 51
51 -
 52
52 -
 53
53 -
 54
54 -
 55
55 -
 56
56 -
 57
57 -
 58
58 -
 59
59 -
60
-
61
-
62
-
63
-
64
 |
 |

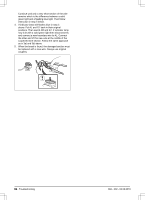
Continue until only a very short section of the wire
remains which is the difference between a solid
green light and a flashing blue light. Then follow
instruction in step 5 below.
4.
If indicator lamp still flashes blue in step 3
above: Put AL and G1 back in their original
positions. Then switch AR and G1. If indicator lamp
now is lit with a solid green light then disconnect AL
and connect a new boundary wire to AL. Connect
the other end of this new wire at the middle of the
suspected wire section. Follow the same approach
as in 3a) and 3b) above.
5.
When the break is found, the damaged section must
be replaced with a new wire. Always use original
couplers.
54
- Troubleshooting
362 - 002 - 06.02.2018